Brother International PE-DESIGN Ver.5 Users Manual - English - Page 118
To Handle, Stage, Cancel, Design Property
 |
View all Brother International PE-DESIGN Ver.5 manuals
Add to My Manuals
Save this manual to your list of manuals |
Page 118 highlights
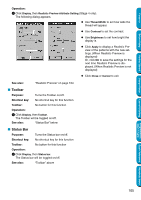
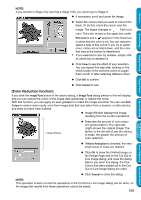
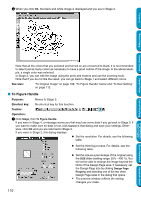
2 When you click OK, the black and white image is displayed and you are in Stage 2. Contents Before Using Getting Started Design Center Layout & Editing Programmable Stitch Creator Note that all the colors that you selected and turned on are converted to black. It is recommended to select just as many colors as necessary to have a good outline of the image. In the above example, a single color was selected. In Stage 2, you can edit the image using the pens and erasers and use the zooming tools. Note that if you do not like the result, you can go back to Stage 1 and select different colors. See also: "To Original Image" on page 108, "To Figure Handle" below and "To Sew Setting" on page 112 I To Figure Handle Purpose: Moves to Stage 3. Shortcut key: No shortcut key for this function Toolbar: Operation: 1 Click Stage, then To Figure Handle. If you were in Stage 4, a message warns you that may lose some data if you go back to Stage 3. If you want to make sure no data is lost, click Cancel in that dialog and save your settings. Otherwise, click OK and you are returned to Stage 3. If you were in Stage 2, this dialog displays. N Set the resolution. For details, see the following table. N Set the thinning process. For details, see the following table. N Set the size as a percentage of the original using the SIZE slider (setting range: 25% - 400 %). You will not be able to enlarge the image beyond the limits of the Design Page area. If necessary, set the Design Page size by clicking Design Page Property and selecting one of the two other Design Page sizes in the dialog that opens. • The preview window reflects the setting changes you make. 110 Quick Reference Alphabetic Index
-
 1
1 -
2
-
3
-
4
-
5
-
6
-
7
-
8
-
9
-
10
-
11
-
12
-
13
-
14
-
15
-
16
-
17
-
18
-
19
-
20
-
21
-
22
-
23
-
24
-
25
-
26
-
27
-
28
-
29
-
30
-
31
-
32
-
33
-
34
-
35
-
36
-
37
-
38
-
39
-
40
-
41
-
42
-
43
-
44
-
45
-
46
-
47
-
48
-
49
-
50
-
51
-
52
-
53
-
54
-
55
-
56
-
57
-
58
-
59
-
60
-
61
-
62
-
63
-
64
-
65
-
66
-
67
-
68
-
69
-
70
-
71
-
72
-
73
-
74
-
75
-
76
-
77
-
78
-
79
-
80
-
81
-
82
-
83
-
84
-
85
-
86
-
87
-
88
-
89
-
90
-
91
-
92
-
93
-
94
-
95
-
96
-
97
-
98
-
99
-
100
-
101
-
102
-
103
-
104
-
105
-
106
-
107
-
108
-
109
-
110
-
111
-
112
-
 113
113 -
 114
114 -
 115
115 -
 116
116 -
 117
117 -
 118
118 -
 119
119 -
 120
120 -
 121
121 -
 122
122 -
 123
123 -
124
-
125
-
126
-
127
-
128
-
129
-
130
-
131
-
132
-
133
-
134
-
135
-
136
-
137
-
138
-
139
-
140
-
141
-
142
-
143
-
144
-
145
-
146
-
147
-
148
-
149
-
150
-
151
-
152
-
153
-
154
-
155
-
156
-
157
-
158
-
159
-
160
-
161
-
162
-
163
-
164
-
165
-
166
-
167
-
168
-
169
-
170
-
171
-
172
-
173
-
174
-
175
-
176
-
177
-
178
-
179
-
180
-
181
-
182
-
183
-
184
-
185
-
186
-
187
-
188
-
189
-
190
-
191
-
192
-
193
-
194
-
195
-
196
-
197
-
198
-
199
-
200
-
201
-
202
-
203
-
204
-
205
-
206
-
207
-
208
-
209
-
210
-
211
-
212
-
213
-
214
-
215
-
216
-
217
-
218
-
219
-
220
-
221
-
222
-
223
-
224
-
225
-
226
-
227
-
228
-
229
-
230
-
231
-
232
-
233
-
234
-
235
-
236
-
237
-
238
-
239
-
240
-
241
-
242
-
243
-
244
-
245
-
246
-
247
-
248
-
249
-
250
-
251
-
252
-
253
-
254
-
255
-
256
-
257
-
258
-
259
-
260
-
261
-
262
-
263
-
264
-
265
-
266
-
267
-
268
-
269
-
270
-
271
-
272
-
273
-
274
 |
 |
