Brother International PE-DESIGN Ver.5 Users Manual - English - Page 38
Step 1 Starting Layout & Editing, Option - Design Property, Design Property
 |
View all Brother International PE-DESIGN Ver.5 manuals
Add to My Manuals
Save this manual to your list of manuals |
Page 38 highlights
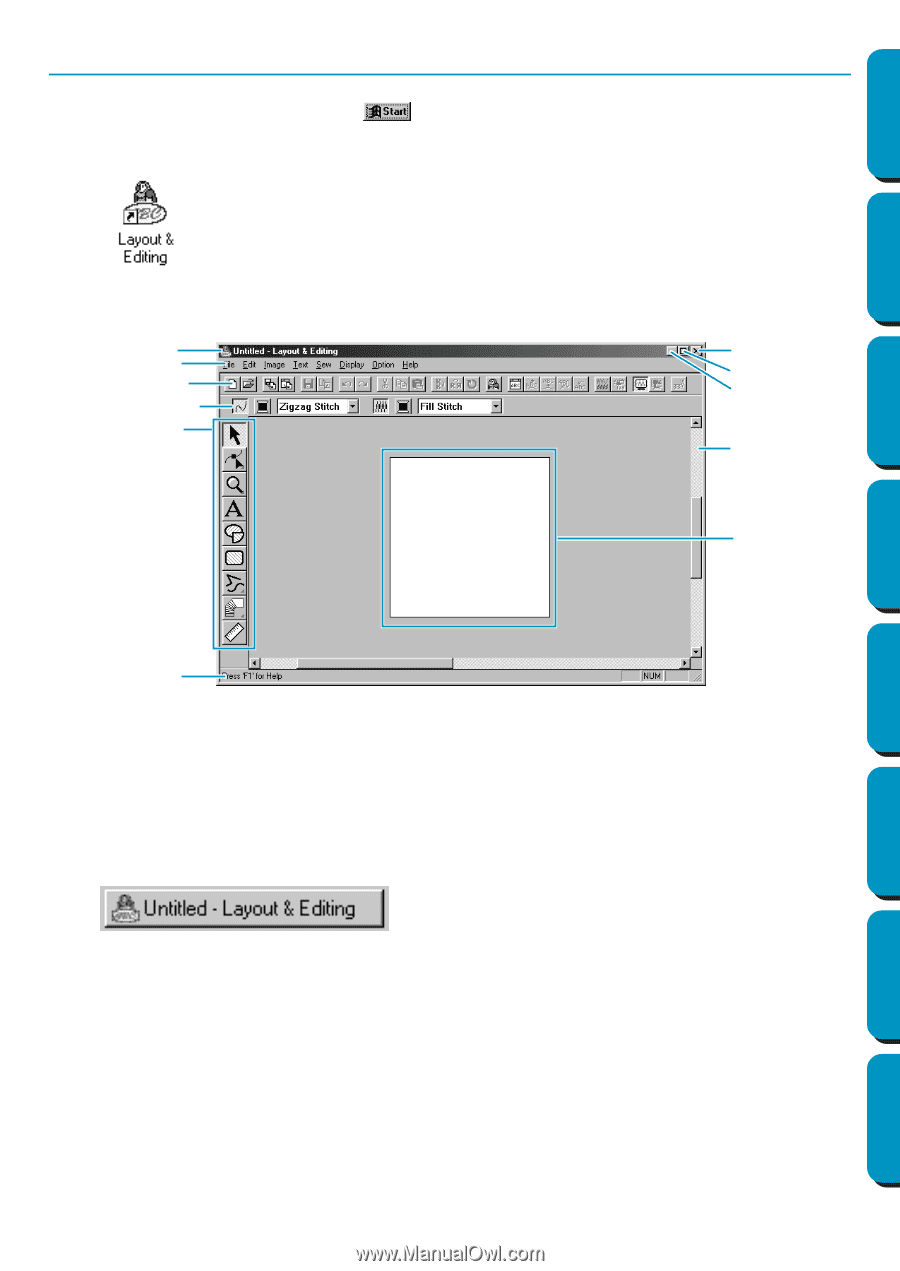
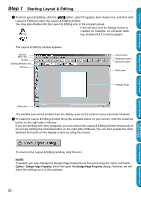
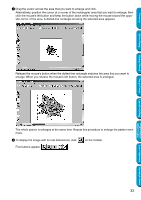
Contents Before Using Step 1 Starting Layout & Editing 1 To start Layout & Editing, click the button, select Programs, then Version 5.0, and then click Layout & Editing to open the Layout & Editing window. You may also double-click the Layout & Editing icon in the program group. If the shortcut icon for Design Center is created, for example, on computer desk- top, double-click it to start program. The Layout & Editing window appears. Title bar Menu bar Toolbar Sewing attributes bar Tool box Close button Maximize button Minimize button Work area Design Page Getting Started Design Center Layout & Editing Programmable Stitch Creator Quick Reference Alphabetic Index Status bar The window size will be smaller than the display area on the screen of your personal computer. 2 To make the Layout & Editing window fill up the available space on your screen, click the maximize button on the right side of title bar. If you are working with other programs, you can reduce the Layout & Editing window temporarily to an icon by clicking the minimize button on the right side of title bar. You can then access the other windows and icons on the display screen by using the mouse. To return to the Layout & Editing window, click the icon. NOTE: If needed, you may change the Design Page properties at this point using the menu command Option - Design Page Property, which will open the Design Page Property dialog. However, we will leave the settings as is in this example. 30
-
 1
1 -
2
-
3
-
4
-
5
-
6
-
7
-
8
-
9
-
10
-
11
-
12
-
13
-
14
-
15
-
16
-
17
-
18
-
19
-
20
-
21
-
22
-
23
-
24
-
25
-
26
-
27
-
28
-
29
-
30
-
31
-
32
-
 33
33 -
 34
34 -
 35
35 -
 36
36 -
 37
37 -
 38
38 -
 39
39 -
 40
40 -
 41
41 -
 42
42 -
 43
43 -
44
-
45
-
46
-
47
-
48
-
49
-
50
-
51
-
52
-
53
-
54
-
55
-
56
-
57
-
58
-
59
-
60
-
61
-
62
-
63
-
64
-
65
-
66
-
67
-
68
-
69
-
70
-
71
-
72
-
73
-
74
-
75
-
76
-
77
-
78
-
79
-
80
-
81
-
82
-
83
-
84
-
85
-
86
-
87
-
88
-
89
-
90
-
91
-
92
-
93
-
94
-
95
-
96
-
97
-
98
-
99
-
100
-
101
-
102
-
103
-
104
-
105
-
106
-
107
-
108
-
109
-
110
-
111
-
112
-
113
-
114
-
115
-
116
-
117
-
118
-
119
-
120
-
121
-
122
-
123
-
124
-
125
-
126
-
127
-
128
-
129
-
130
-
131
-
132
-
133
-
134
-
135
-
136
-
137
-
138
-
139
-
140
-
141
-
142
-
143
-
144
-
145
-
146
-
147
-
148
-
149
-
150
-
151
-
152
-
153
-
154
-
155
-
156
-
157
-
158
-
159
-
160
-
161
-
162
-
163
-
164
-
165
-
166
-
167
-
168
-
169
-
170
-
171
-
172
-
173
-
174
-
175
-
176
-
177
-
178
-
179
-
180
-
181
-
182
-
183
-
184
-
185
-
186
-
187
-
188
-
189
-
190
-
191
-
192
-
193
-
194
-
195
-
196
-
197
-
198
-
199
-
200
-
201
-
202
-
203
-
204
-
205
-
206
-
207
-
208
-
209
-
210
-
211
-
212
-
213
-
214
-
215
-
216
-
217
-
218
-
219
-
220
-
221
-
222
-
223
-
224
-
225
-
226
-
227
-
228
-
229
-
230
-
231
-
232
-
233
-
234
-
235
-
236
-
237
-
238
-
239
-
240
-
241
-
242
-
243
-
244
-
245
-
246
-
247
-
248
-
249
-
250
-
251
-
252
-
253
-
254
-
255
-
256
-
257
-
258
-
259
-
260
-
261
-
262
-
263
-
264
-
265
-
266
-
267
-
268
-
269
-
270
-
271
-
272
-
273
-
274
 |
 |