Brother International PE-DESIGN Ver.5 Users Manual - English - Page 18
Design Center, Programmable Stitch Creator, Stage 1, Original Image, Line Image, Handle
 |
View all Brother International PE-DESIGN Ver.5 manuals
Add to My Manuals
Save this manual to your list of manuals |
Page 18 highlights
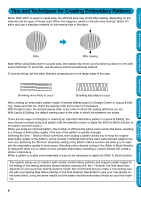
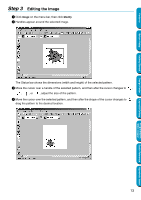
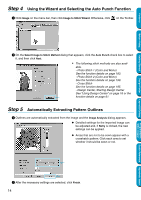
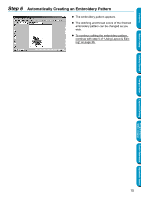
Contents Before Using Getting Started Design Center Layout & Editing N Embroidery patterns created with Design Center N Embroidery patterns on Embroidery cards purchased from your dealer (Note that some patterns cannot be read.) N Embroidery patterns in the Tajima, Melco, Pfaff and Husqvarna formats N Patterns created within Layout & Editing itself (These patterns include text, circles and related shapes, rounded boxes, polygonal lines, curves and manual punching patterns.) After gathering the different components of your embroidery picture, you can use the layout functions to modify their relative position, orientation and scale. When an embroidery image is complete, you can save it (the file name extension will be pes) and write it to an Original card. The Original card can then be inserted into your sewing machine and the embroidery process continued. I Design Center Design Center is used to manually create embroidery patterns from images. The images may come from scanning a printed image or can be created with an application like Paint. The extension of the image files must be bmp, tif, jpg, j2k, pcx, wmf, png, eps, pcd, or fpx. Design Center automatically detects outlines in the image and replaces them with broken lines that can be edited and assigned sewing attributes. The procedure is divided in four stages: N Stage 1 - Original Image: You open the image file and select one or more colors that the application will use to retrace the outlines. N Stage 2 - Line Image: The original color image is replaced with a black and white image (the colors selected in Stage 1 become black, and all the other colors become white). You can edit this image using pens and erasers of different thicknesses. (You can also start at this step and draw a complete black and white image by hand.) When the image is ready, you set and start the automatic retracing process. N Stage 3 - Figure Handle: The black and white image is replaced with a set of outlines made of editable broken lines. You can edit the broken lines by moving, inserting or deleting points. N Stage 4 - Sew Setting: In this final step, you apply sewing attributes (thread color and stitch type) to the outlines and regions inside. At any stage, you can save your work to retrieve it later. Up to stage 2, the file will be saved with the extension pel. In stages 3 and 4, the file will be saved with the extension pem. Saving your work as you move through the stages will be helpful if you make changes, then later decide to use the original pattern. When your image has reached stage 4, you can import it in Layout & Editing. The image will be considered a single object by Layout & Editing, which means that you will be able to move and scale it, but you will not be able to edit the outline. You can however change the pattern and some of the sewing attributes after applying the Stitch to Block function. I Programmable Stitch Creator Programmable Stitch Creator allows you to create, edit and save fill stitch patterns, which you can apply to the enclosed regions of patterns, both in Design Center and Layout & Editing. The fill stitch pattern files are saved as pas files. The application comes with a number of pas files, which you can use as such or edit to enhance your embroidery patterns. 10 Programmable Stitch Creator Quick Reference Alphabetic Index
-
 1
1 -
2
-
3
-
4
-
5
-
6
-
7
-
8
-
9
-
10
-
11
-
12
-
 13
13 -
 14
14 -
 15
15 -
 16
16 -
 17
17 -
 18
18 -
 19
19 -
 20
20 -
 21
21 -
 22
22 -
 23
23 -
24
-
25
-
26
-
27
-
28
-
29
-
30
-
31
-
32
-
33
-
34
-
35
-
36
-
37
-
38
-
39
-
40
-
41
-
42
-
43
-
44
-
45
-
46
-
47
-
48
-
49
-
50
-
51
-
52
-
53
-
54
-
55
-
56
-
57
-
58
-
59
-
60
-
61
-
62
-
63
-
64
-
65
-
66
-
67
-
68
-
69
-
70
-
71
-
72
-
73
-
74
-
75
-
76
-
77
-
78
-
79
-
80
-
81
-
82
-
83
-
84
-
85
-
86
-
87
-
88
-
89
-
90
-
91
-
92
-
93
-
94
-
95
-
96
-
97
-
98
-
99
-
100
-
101
-
102
-
103
-
104
-
105
-
106
-
107
-
108
-
109
-
110
-
111
-
112
-
113
-
114
-
115
-
116
-
117
-
118
-
119
-
120
-
121
-
122
-
123
-
124
-
125
-
126
-
127
-
128
-
129
-
130
-
131
-
132
-
133
-
134
-
135
-
136
-
137
-
138
-
139
-
140
-
141
-
142
-
143
-
144
-
145
-
146
-
147
-
148
-
149
-
150
-
151
-
152
-
153
-
154
-
155
-
156
-
157
-
158
-
159
-
160
-
161
-
162
-
163
-
164
-
165
-
166
-
167
-
168
-
169
-
170
-
171
-
172
-
173
-
174
-
175
-
176
-
177
-
178
-
179
-
180
-
181
-
182
-
183
-
184
-
185
-
186
-
187
-
188
-
189
-
190
-
191
-
192
-
193
-
194
-
195
-
196
-
197
-
198
-
199
-
200
-
201
-
202
-
203
-
204
-
205
-
206
-
207
-
208
-
209
-
210
-
211
-
212
-
213
-
214
-
215
-
216
-
217
-
218
-
219
-
220
-
221
-
222
-
223
-
224
-
225
-
226
-
227
-
228
-
229
-
230
-
231
-
232
-
233
-
234
-
235
-
236
-
237
-
238
-
239
-
240
-
241
-
242
-
243
-
244
-
245
-
246
-
247
-
248
-
249
-
250
-
251
-
252
-
253
-
254
-
255
-
256
-
257
-
258
-
259
-
260
-
261
-
262
-
263
-
264
-
265
-
266
-
267
-
268
-
269
-
270
-
271
-
272
-
273
-
274
 |
 |