Brother International PE-DESIGN Ver.5 Users Manual - English - Page 155
Sewing attribute Set, Prog., ll Stitch, Motif Stitch, Sewing, Attribute Setting
 |
View all Brother International PE-DESIGN Ver.5 manuals
Add to My Manuals
Save this manual to your list of manuals |
Page 155 highlights
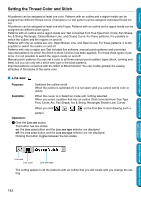
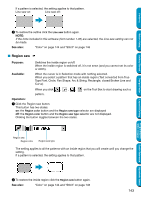
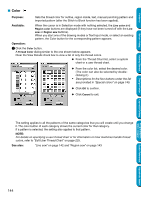
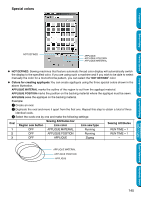
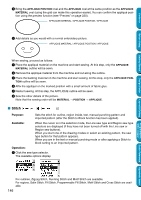
Contents 2 Click the desired stitch. The setting applies to all the patterns of the same categories that you will create until you change it. If a pattern is selected, the setting also applies to that pattern. NOTE: You can set the stitch attributes for the selected line and region stitches in the Sewing attribute Setting dialog. When you select Prog. fill Stitch or Motif Stitch, you also need to select a pattern in the Sewing Attribute Setting dialog, as there is no default programmable stitch setting. See also: "Line sew" on page 142, "Region sew" on page 143 and "Sewing Attribute Setting" on page 204 Before Using Getting Started Design Center Layout & Editing Programmable Stitch Creator Quick Reference Alphabetic Index 147
-
 1
1 -
2
-
3
-
4
-
5
-
6
-
7
-
8
-
9
-
10
-
11
-
12
-
13
-
14
-
15
-
16
-
17
-
18
-
19
-
20
-
21
-
22
-
23
-
24
-
25
-
26
-
27
-
28
-
29
-
30
-
31
-
32
-
33
-
34
-
35
-
36
-
37
-
38
-
39
-
40
-
41
-
42
-
43
-
44
-
45
-
46
-
47
-
48
-
49
-
50
-
51
-
52
-
53
-
54
-
55
-
56
-
57
-
58
-
59
-
60
-
61
-
62
-
63
-
64
-
65
-
66
-
67
-
68
-
69
-
70
-
71
-
72
-
73
-
74
-
75
-
76
-
77
-
78
-
79
-
80
-
81
-
82
-
83
-
84
-
85
-
86
-
87
-
88
-
89
-
90
-
91
-
92
-
93
-
94
-
95
-
96
-
97
-
98
-
99
-
100
-
101
-
102
-
103
-
104
-
105
-
106
-
107
-
108
-
109
-
110
-
111
-
112
-
113
-
114
-
115
-
116
-
117
-
118
-
119
-
120
-
121
-
122
-
123
-
124
-
125
-
126
-
127
-
128
-
129
-
130
-
131
-
132
-
133
-
134
-
135
-
136
-
137
-
138
-
139
-
140
-
141
-
142
-
143
-
144
-
145
-
146
-
147
-
148
-
149
-
 150
150 -
 151
151 -
 152
152 -
 153
153 -
 154
154 -
 155
155 -
 156
156 -
 157
157 -
 158
158 -
 159
159 -
 160
160 -
161
-
162
-
163
-
164
-
165
-
166
-
167
-
168
-
169
-
170
-
171
-
172
-
173
-
174
-
175
-
176
-
177
-
178
-
179
-
180
-
181
-
182
-
183
-
184
-
185
-
186
-
187
-
188
-
189
-
190
-
191
-
192
-
193
-
194
-
195
-
196
-
197
-
198
-
199
-
200
-
201
-
202
-
203
-
204
-
205
-
206
-
207
-
208
-
209
-
210
-
211
-
212
-
213
-
214
-
215
-
216
-
217
-
218
-
219
-
220
-
221
-
222
-
223
-
224
-
225
-
226
-
227
-
228
-
229
-
230
-
231
-
232
-
233
-
234
-
235
-
236
-
237
-
238
-
239
-
240
-
241
-
242
-
243
-
244
-
245
-
246
-
247
-
248
-
249
-
250
-
251
-
252
-
253
-
254
-
255
-
256
-
257
-
258
-
259
-
260
-
261
-
262
-
263
-
264
-
265
-
266
-
267
-
268
-
269
-
270
-
271
-
272
-
273
-
274
 |
 |
147
Contents
Before Using
Getting Started
Design Center
Layout & Editing
Programmable
Stitch Creator
Quick Reference
Alphabetic Index
2
Click the desired stitch.
The setting applies to all the patterns of the same categories that you will create until you change it.
If a pattern is selected, the setting also applies to that pattern.
NOTE:
You can set the stitch attributes for the selected line and region stitches in the
Sewing attribute Set-
ting
dialog.
When you select
Prog.
fi
ll Stitch
or
Motif Stitch
, you also need to select a pattern in the
Sewing
Attribute Setting
dialog, as there is no default programmable stitch setting.
See also:
“
Line sew
”
on page 142,
“
Region sew
”
on page 143 and
“
Sewing Attribute Setting
”
on page 204