Brother International PE-DESIGN Ver.5 Users Manual - English - Page 146
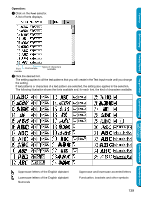
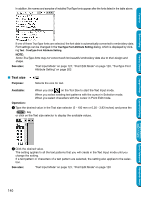
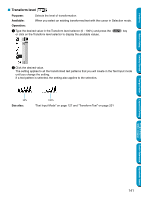
Path shape, Setting Text Attributes, Font
 |
View all Brother International PE-DESIGN Ver.5 manuals
Add to My Manuals
Save this manual to your list of manuals |
Page 146 highlights
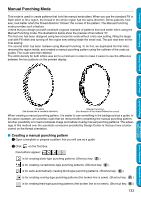
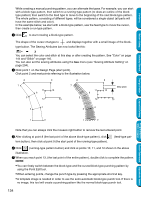
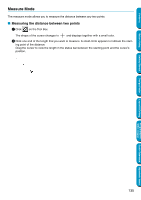
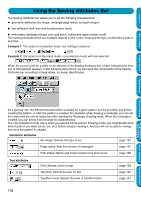
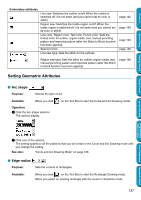
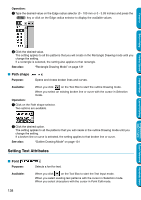
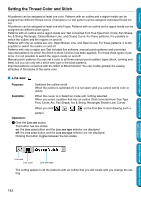
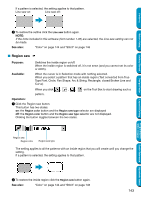
Contents Operation: 1 Type the desired value on the Edge radius selector (0 - 100 mm or 0 - 3.93 inches) and press the Enter key or click on the Edge radius selector to display the available values. Before Using Getting Started Design Center Layout & Editing 2 Click the desired value. The setting applies to all the patterns that you will create in the Rectangle Drawing mode until you change the setting. If a rectangle is selected, the setting also applies to that rectangle. See also: "Rectangle Drawing Mode" on page 131 I Path shape Purpose: Opens and closes broken lines and curves. Available: When you click on the Tool Box to start the outline Drawing mode. When you select an existing broken line or curve with the cursor in Selection mode. Operation: 1 Click on the Path shape selector. Two options are available. 2 Click the desired option. The setting applies to all the patterns that you will create in the outline Drawing mode until you change the setting. If a broken line or curve is selected, the setting applies to that broken line or curve. See also: "Outline Drawing Mode" on page 131 Setting Text Attributes I Font Purpose: Available: 138 Selects a font for text. When you click on the Tool Box to start the Text Input mode. When you select existing text patterns with the cursor in Selection mode. When you select characters with the cursor in Point Edit mode. Programmable Stitch Creator Quick Reference Alphabetic Index
-
 1
1 -
2
-
3
-
4
-
5
-
6
-
7
-
8
-
9
-
10
-
11
-
12
-
13
-
14
-
15
-
16
-
17
-
18
-
19
-
20
-
21
-
22
-
23
-
24
-
25
-
26
-
27
-
28
-
29
-
30
-
31
-
32
-
33
-
34
-
35
-
36
-
37
-
38
-
39
-
40
-
41
-
42
-
43
-
44
-
45
-
46
-
47
-
48
-
49
-
50
-
51
-
52
-
53
-
54
-
55
-
56
-
57
-
58
-
59
-
60
-
61
-
62
-
63
-
64
-
65
-
66
-
67
-
68
-
69
-
70
-
71
-
72
-
73
-
74
-
75
-
76
-
77
-
78
-
79
-
80
-
81
-
82
-
83
-
84
-
85
-
86
-
87
-
88
-
89
-
90
-
91
-
92
-
93
-
94
-
95
-
96
-
97
-
98
-
99
-
100
-
101
-
102
-
103
-
104
-
105
-
106
-
107
-
108
-
109
-
110
-
111
-
112
-
113
-
114
-
115
-
116
-
117
-
118
-
119
-
120
-
121
-
122
-
123
-
124
-
125
-
126
-
127
-
128
-
129
-
130
-
131
-
132
-
133
-
134
-
135
-
136
-
137
-
138
-
139
-
140
-
 141
141 -
 142
142 -
 143
143 -
 144
144 -
 145
145 -
 146
146 -
 147
147 -
 148
148 -
 149
149 -
 150
150 -
 151
151 -
152
-
153
-
154
-
155
-
156
-
157
-
158
-
159
-
160
-
161
-
162
-
163
-
164
-
165
-
166
-
167
-
168
-
169
-
170
-
171
-
172
-
173
-
174
-
175
-
176
-
177
-
178
-
179
-
180
-
181
-
182
-
183
-
184
-
185
-
186
-
187
-
188
-
189
-
190
-
191
-
192
-
193
-
194
-
195
-
196
-
197
-
198
-
199
-
200
-
201
-
202
-
203
-
204
-
205
-
206
-
207
-
208
-
209
-
210
-
211
-
212
-
213
-
214
-
215
-
216
-
217
-
218
-
219
-
220
-
221
-
222
-
223
-
224
-
225
-
226
-
227
-
228
-
229
-
230
-
231
-
232
-
233
-
234
-
235
-
236
-
237
-
238
-
239
-
240
-
241
-
242
-
243
-
244
-
245
-
246
-
247
-
248
-
249
-
250
-
251
-
252
-
253
-
254
-
255
-
256
-
257
-
258
-
259
-
260
-
261
-
262
-
263
-
264
-
265
-
266
-
267
-
268
-
269
-
270
-
271
-
272
-
273
-
274
 |
 |
