Brother International PE-DESIGN Ver.5 Users Manual - English - Page 63
Creating data for the multi-position frame, Select the Design size
 |
View all Brother International PE-DESIGN Ver.5 manuals
Add to My Manuals
Save this manual to your list of manuals |
Page 63 highlights
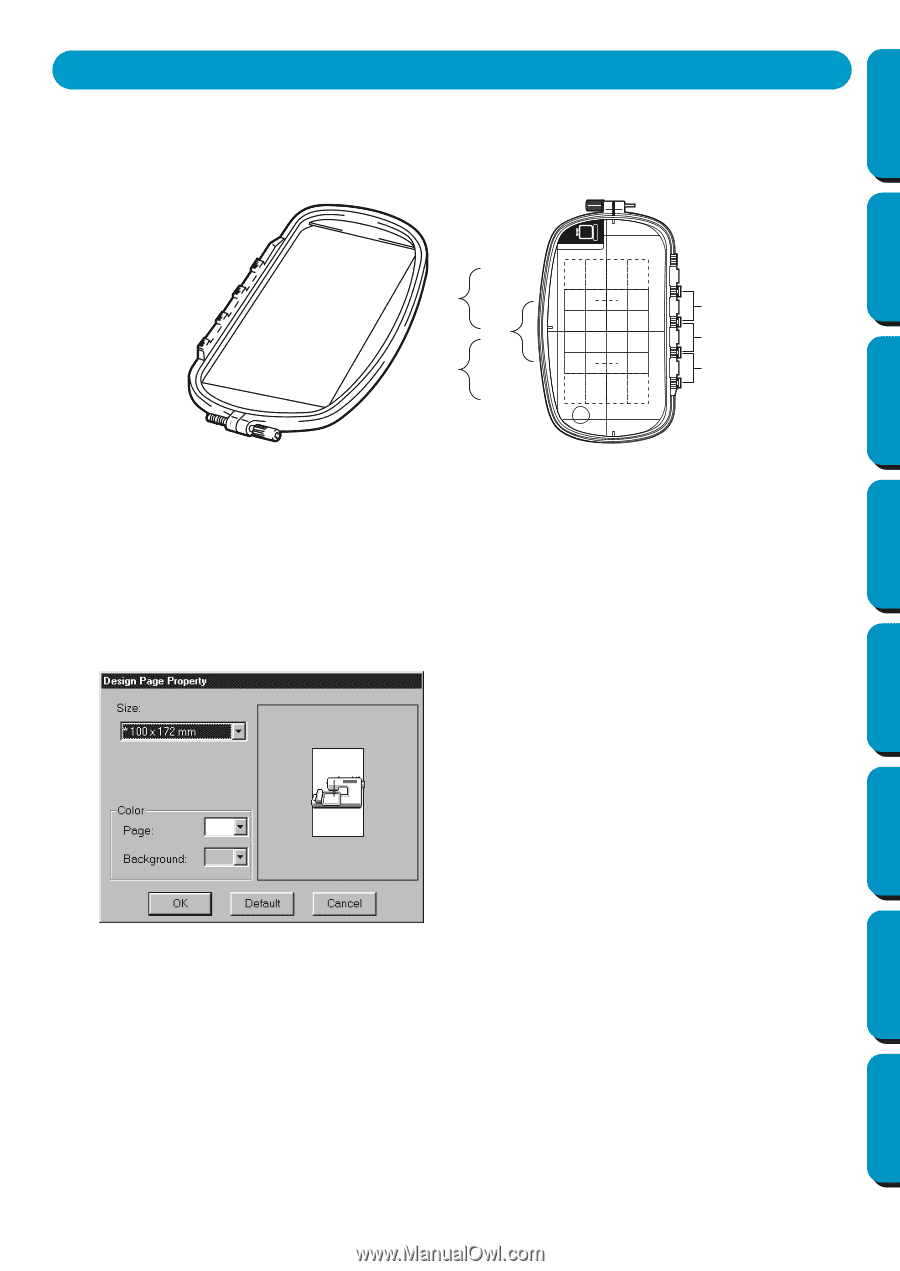
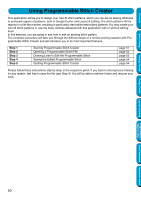
Contents Before Using Getting Started Design Center Creating data for the multi-position frame By attaching the enclosed (or optional) multi-position frame (130 × 300 mm or 100 × 172 mm) at each of its three installation positions, multi-position designs can be embroidered. With this program you will be able to create designs that you can stitch in any multi-position hoop. (Jumbo Hoop and Extra Large Hoop) ABC a a b b c c Example of Multi-Position Frame: 100 × 172 mm embroidery frame Although the size of the pattern that can be embroidered using an multi-position frame is 130 × 180 mm (or 100 × 100 mm, depending on the sewing area of the embroidery machine), first determine which of the three installation positions (indicated as a, b, and c in the illustration above) the multi-position frame will be installed at and determine the orientation of the data. When creating the pattern, each design section can only be as large as the sewing field of the machine. I Select the Design Page size 1 In Layout & Editing, click Option, then Design Page Property. N From the Size selector, choose a Design Page size of 130 × 300 mm, 300 × 130 mm, 100 × 172 mm, or 172 × 100 mm. (Settings for multi-position frames are indicated by "*".) • Choose the appropriate setting after checking the size of the embroidery frame available for your machine. NOTE: The Design Page size in dialog shown above is not available in Design Center since the maximum sizes for a single pattern are 260 × 160 mm, 130 × 180 mm, and 100 × 100 mm. Remember that 260 × 160 mm size cannot be used for a multi-position frame. Layout & Editing Programmable Stitch Creator Quick Reference Alphabetic Index 55
-
 1
1 -
2
-
3
-
4
-
5
-
6
-
7
-
8
-
9
-
10
-
11
-
12
-
13
-
14
-
15
-
16
-
17
-
18
-
19
-
20
-
21
-
22
-
23
-
24
-
25
-
26
-
27
-
28
-
29
-
30
-
31
-
32
-
33
-
34
-
35
-
36
-
37
-
38
-
39
-
40
-
41
-
42
-
43
-
44
-
45
-
46
-
47
-
48
-
49
-
50
-
51
-
52
-
53
-
54
-
55
-
56
-
57
-
 58
58 -
 59
59 -
 60
60 -
 61
61 -
 62
62 -
 63
63 -
 64
64 -
 65
65 -
 66
66 -
 67
67 -
 68
68 -
69
-
70
-
71
-
72
-
73
-
74
-
75
-
76
-
77
-
78
-
79
-
80
-
81
-
82
-
83
-
84
-
85
-
86
-
87
-
88
-
89
-
90
-
91
-
92
-
93
-
94
-
95
-
96
-
97
-
98
-
99
-
100
-
101
-
102
-
103
-
104
-
105
-
106
-
107
-
108
-
109
-
110
-
111
-
112
-
113
-
114
-
115
-
116
-
117
-
118
-
119
-
120
-
121
-
122
-
123
-
124
-
125
-
126
-
127
-
128
-
129
-
130
-
131
-
132
-
133
-
134
-
135
-
136
-
137
-
138
-
139
-
140
-
141
-
142
-
143
-
144
-
145
-
146
-
147
-
148
-
149
-
150
-
151
-
152
-
153
-
154
-
155
-
156
-
157
-
158
-
159
-
160
-
161
-
162
-
163
-
164
-
165
-
166
-
167
-
168
-
169
-
170
-
171
-
172
-
173
-
174
-
175
-
176
-
177
-
178
-
179
-
180
-
181
-
182
-
183
-
184
-
185
-
186
-
187
-
188
-
189
-
190
-
191
-
192
-
193
-
194
-
195
-
196
-
197
-
198
-
199
-
200
-
201
-
202
-
203
-
204
-
205
-
206
-
207
-
208
-
209
-
210
-
211
-
212
-
213
-
214
-
215
-
216
-
217
-
218
-
219
-
220
-
221
-
222
-
223
-
224
-
225
-
226
-
227
-
228
-
229
-
230
-
231
-
232
-
233
-
234
-
235
-
236
-
237
-
238
-
239
-
240
-
241
-
242
-
243
-
244
-
245
-
246
-
247
-
248
-
249
-
250
-
251
-
252
-
253
-
254
-
255
-
256
-
257
-
258
-
259
-
260
-
261
-
262
-
263
-
264
-
265
-
266
-
267
-
268
-
269
-
270
-
271
-
272
-
273
-
274
 |
 |