Brother International PE-DESIGN Ver.5 Users Manual - English - Page 57
Step 17 Transferring the Data to a Card, Step 18 Saving the File, Saving the File
 |
View all Brother International PE-DESIGN Ver.5 manuals
Add to My Manuals
Save this manual to your list of manuals |
Page 57 highlights
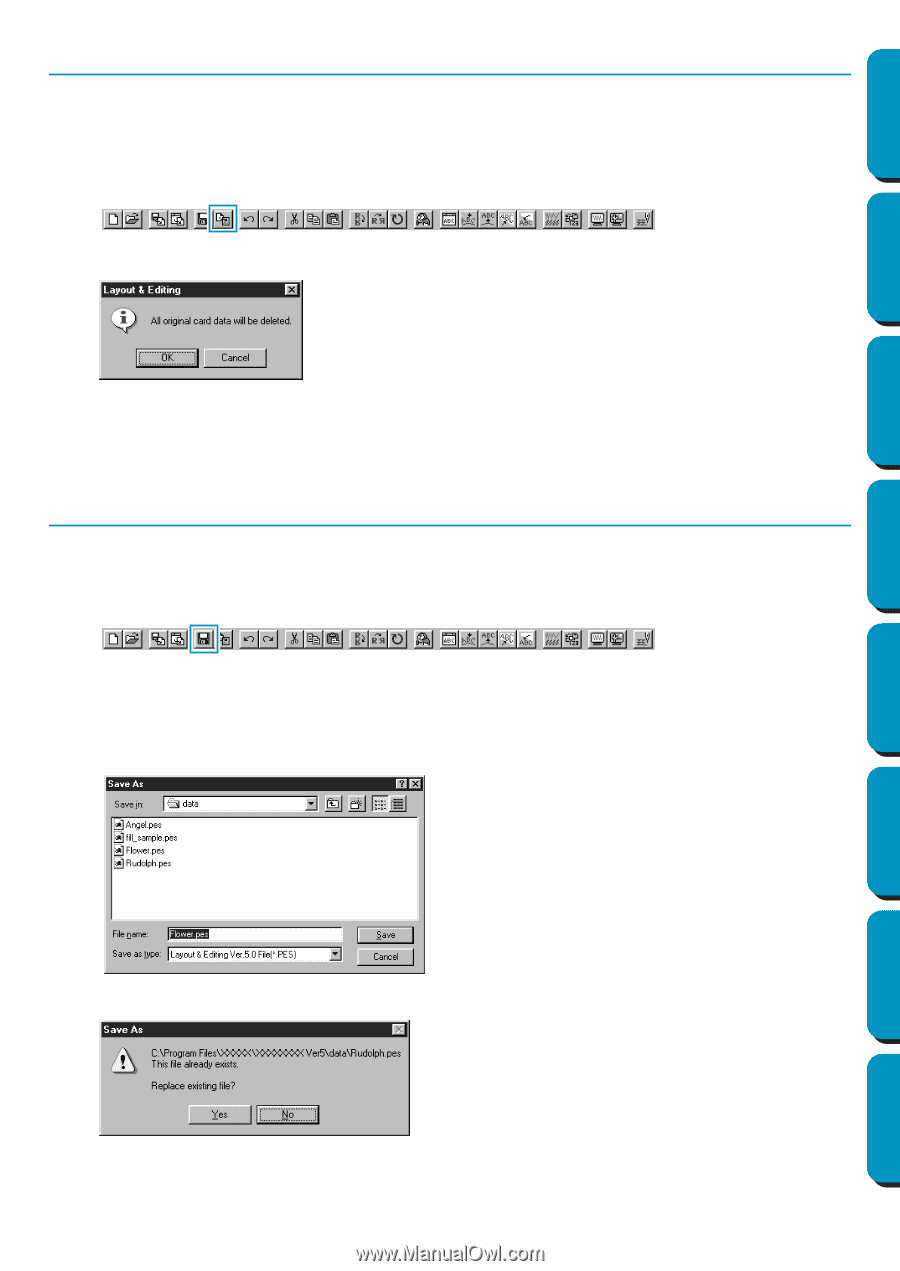
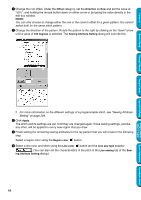
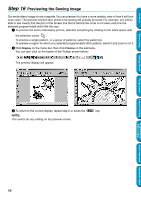
Contents Before Using Getting Started Step 17 Transferring the Data to a Card Before you can actually sew your embroidery pattern, you must transfer it to an Original card. 1 Insert an Original card in the module. 2 Click File on the menu bar, then click Write to Card on the submenu. You can also click on the button of the Toolbar shown below: This dialog will display. N If the card is not brand new, make sure that you want to erase the data that is already stored on the card and click OK. N Click Cancel to exit. If the card module is not correctly connected or powered, if the card is not inserted or is defective, you will see an error message. Refer to "Write to Card - Current Design" on page 157 for more details. Step 18 Saving the File Before quitting the application, you should save your file on disk to be able to retrieve it later. 1 Click File on the menu bar, then click Save on the submenu. You can also click on the button of the Toolbar shown below: If the file already exists on the disk (the file has been saved at least once), the file is saved immediately. 2 If the file name is still Untitled or if, for any other reason, the file cannot be found on the disk, the application will ask you to enter a file name and select a target folder. N Select the drive, the folder and type the file name. N Click Save to save. N Click Cancel to exit. Design Center Layout & Editing Programmable Stitch Creator Quick Reference Alphabetic Index If the new file name already exists, this dialog will appear: N Click Yes to overwrite. N Click No if you do not want to overwrite the existing file. You can then enter another file name. The new file name displays in the title bar of the Layout & Editing window. 49
-
 1
1 -
2
-
3
-
4
-
5
-
6
-
7
-
8
-
9
-
10
-
11
-
12
-
13
-
14
-
15
-
16
-
17
-
18
-
19
-
20
-
21
-
22
-
23
-
24
-
25
-
26
-
27
-
28
-
29
-
30
-
31
-
32
-
33
-
34
-
35
-
36
-
37
-
38
-
39
-
40
-
41
-
42
-
43
-
44
-
45
-
46
-
47
-
48
-
49
-
50
-
51
-
 52
52 -
 53
53 -
 54
54 -
 55
55 -
 56
56 -
 57
57 -
 58
58 -
 59
59 -
 60
60 -
 61
61 -
 62
62 -
63
-
64
-
65
-
66
-
67
-
68
-
69
-
70
-
71
-
72
-
73
-
74
-
75
-
76
-
77
-
78
-
79
-
80
-
81
-
82
-
83
-
84
-
85
-
86
-
87
-
88
-
89
-
90
-
91
-
92
-
93
-
94
-
95
-
96
-
97
-
98
-
99
-
100
-
101
-
102
-
103
-
104
-
105
-
106
-
107
-
108
-
109
-
110
-
111
-
112
-
113
-
114
-
115
-
116
-
117
-
118
-
119
-
120
-
121
-
122
-
123
-
124
-
125
-
126
-
127
-
128
-
129
-
130
-
131
-
132
-
133
-
134
-
135
-
136
-
137
-
138
-
139
-
140
-
141
-
142
-
143
-
144
-
145
-
146
-
147
-
148
-
149
-
150
-
151
-
152
-
153
-
154
-
155
-
156
-
157
-
158
-
159
-
160
-
161
-
162
-
163
-
164
-
165
-
166
-
167
-
168
-
169
-
170
-
171
-
172
-
173
-
174
-
175
-
176
-
177
-
178
-
179
-
180
-
181
-
182
-
183
-
184
-
185
-
186
-
187
-
188
-
189
-
190
-
191
-
192
-
193
-
194
-
195
-
196
-
197
-
198
-
199
-
200
-
201
-
202
-
203
-
204
-
205
-
206
-
207
-
208
-
209
-
210
-
211
-
212
-
213
-
214
-
215
-
216
-
217
-
218
-
219
-
220
-
221
-
222
-
223
-
224
-
225
-
226
-
227
-
228
-
229
-
230
-
231
-
232
-
233
-
234
-
235
-
236
-
237
-
238
-
239
-
240
-
241
-
242
-
243
-
244
-
245
-
246
-
247
-
248
-
249
-
250
-
251
-
252
-
253
-
254
-
255
-
256
-
257
-
258
-
259
-
260
-
261
-
262
-
263
-
264
-
265
-
266
-
267
-
268
-
269
-
270
-
271
-
272
-
273
-
274
 |
 |