Brother International PE-DESIGN Ver.5 Users Manual - English - Page 44
Step 5 Adding an Oval, Select the shape, Disable the outline, Disable the region inside, Draw the oval
 |
View all Brother International PE-DESIGN Ver.5 manuals
Add to My Manuals
Save this manual to your list of manuals |
Page 44 highlights
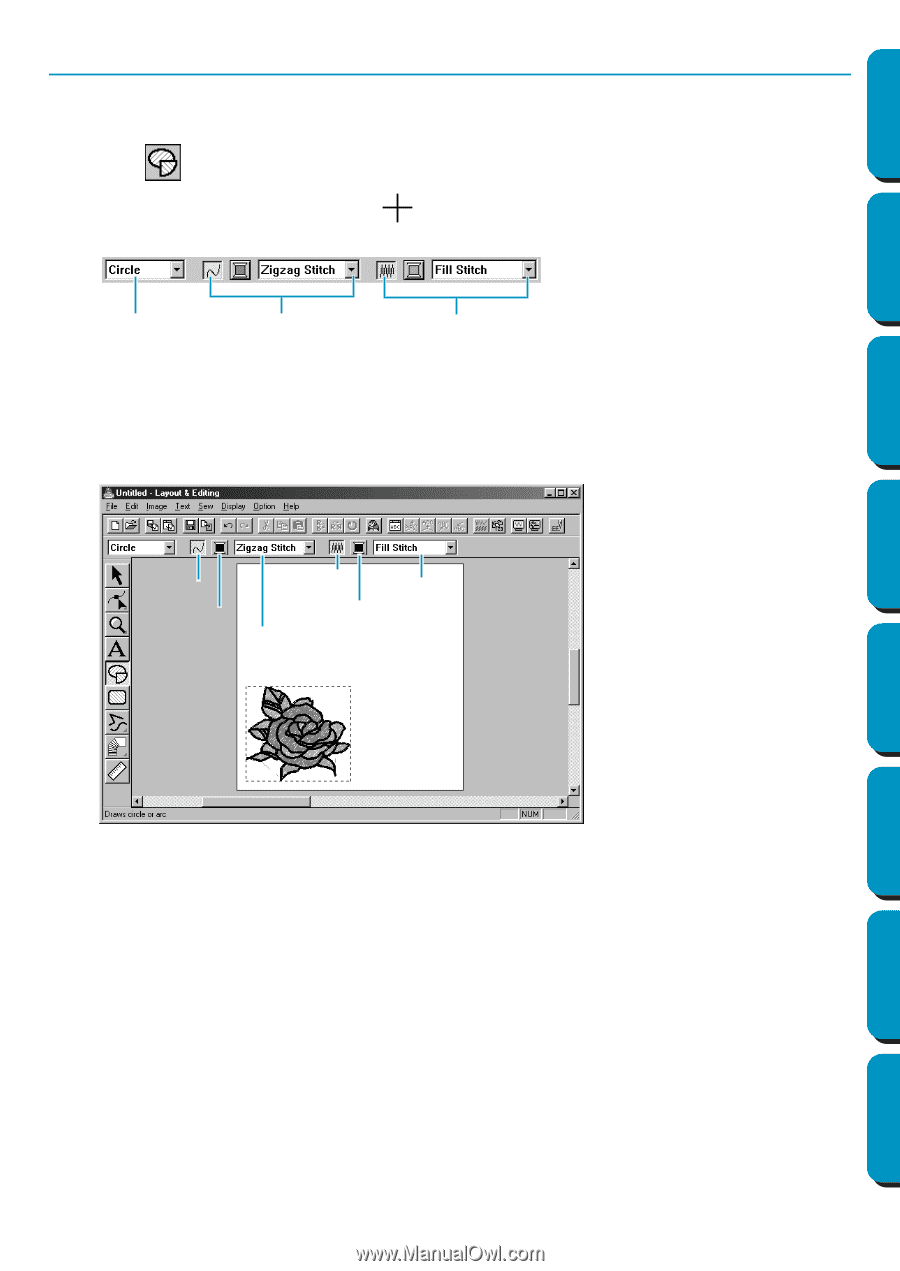
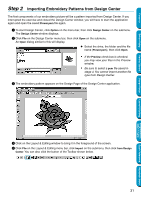
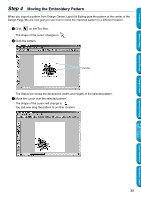
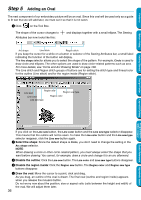
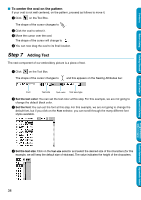
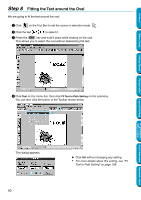
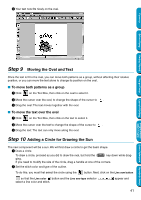
Contents Before Using Step 5 Adding an Oval The next component of our embroidery picture will be an oval. Since this oval will be used only as a guide to fit text that we will add later, we must set it so that it is not sewn. 1 Click on the Tool Box. The shape of the cursor changes to Attributes bar now looks like this: and displays together with a small ellipse. The Sewing Arc shape Line stitch Region stitch If you keep the cursor for a while on a button or selector of the Sewing Attributes bar, a small label indicating the function of the button will display. The Arc shape selector allows you to select the shape of the pattern. For example, Circle is used to draw circle and ellipses. The other options are used to draw circle-related patterns such as arcs. For more details, see "Circle and Arc Drawing Mode" on page 128. The Line stitch and Region stitch groups of buttons are for setting the stitch type and thread color for the outline (Line stitch) and for the region inside (Region stitch). Line sew Region sew Region sew type Line color Region color Line sew type Getting Started Design Center Layout & Editing Programmable Stitch Creator Quick Reference Alphabetic Index If you click on the Line sew button, the Line color button and the Line sew type selector disappear. This means that the outline will not be sewn. To make the Line color button and the Line sew type selector reappear, click the Line sew button again. 2 Select the shape: Since the default shape is Circle, you don't need to change the setting in the Arc shape selector. NOTE: When drawing a circle or other circle-related pattern, you must always select the shape that you want before drawing. You cannot, for example, draw a circle and change it to an arc afterward. 3 Disable the outline: Click the Line sew button. The Line color and Line sew type buttons disappear. 4 Disable the region inside: Click the Region sew button. The Region color and Region sew type buttons disappear. 5 Draw the oval: Move the cursor to a point, click and drag. As you drag, an outline of the oval is drawn. The final oval (outline and region inside) appears when you release the mouse's button. Do not worry now about the position, size or aspect ratio (ratio between the height and width) of the oval. We will adjust them later. 36
-
 1
1 -
2
-
3
-
4
-
5
-
6
-
7
-
8
-
9
-
10
-
11
-
12
-
13
-
14
-
15
-
16
-
17
-
18
-
19
-
20
-
21
-
22
-
23
-
24
-
25
-
26
-
27
-
28
-
29
-
30
-
31
-
32
-
33
-
34
-
35
-
36
-
37
-
38
-
 39
39 -
 40
40 -
 41
41 -
 42
42 -
 43
43 -
 44
44 -
 45
45 -
 46
46 -
 47
47 -
 48
48 -
 49
49 -
50
-
51
-
52
-
53
-
54
-
55
-
56
-
57
-
58
-
59
-
60
-
61
-
62
-
63
-
64
-
65
-
66
-
67
-
68
-
69
-
70
-
71
-
72
-
73
-
74
-
75
-
76
-
77
-
78
-
79
-
80
-
81
-
82
-
83
-
84
-
85
-
86
-
87
-
88
-
89
-
90
-
91
-
92
-
93
-
94
-
95
-
96
-
97
-
98
-
99
-
100
-
101
-
102
-
103
-
104
-
105
-
106
-
107
-
108
-
109
-
110
-
111
-
112
-
113
-
114
-
115
-
116
-
117
-
118
-
119
-
120
-
121
-
122
-
123
-
124
-
125
-
126
-
127
-
128
-
129
-
130
-
131
-
132
-
133
-
134
-
135
-
136
-
137
-
138
-
139
-
140
-
141
-
142
-
143
-
144
-
145
-
146
-
147
-
148
-
149
-
150
-
151
-
152
-
153
-
154
-
155
-
156
-
157
-
158
-
159
-
160
-
161
-
162
-
163
-
164
-
165
-
166
-
167
-
168
-
169
-
170
-
171
-
172
-
173
-
174
-
175
-
176
-
177
-
178
-
179
-
180
-
181
-
182
-
183
-
184
-
185
-
186
-
187
-
188
-
189
-
190
-
191
-
192
-
193
-
194
-
195
-
196
-
197
-
198
-
199
-
200
-
201
-
202
-
203
-
204
-
205
-
206
-
207
-
208
-
209
-
210
-
211
-
212
-
213
-
214
-
215
-
216
-
217
-
218
-
219
-
220
-
221
-
222
-
223
-
224
-
225
-
226
-
227
-
228
-
229
-
230
-
231
-
232
-
233
-
234
-
235
-
236
-
237
-
238
-
239
-
240
-
241
-
242
-
243
-
244
-
245
-
246
-
247
-
248
-
249
-
250
-
251
-
252
-
253
-
254
-
255
-
256
-
257
-
258
-
259
-
260
-
261
-
262
-
263
-
264
-
265
-
266
-
267
-
268
-
269
-
270
-
271
-
272
-
273
-
274
 |
 |