Brother International PE-DESIGN Ver.5 Users Manual - English - Page 140
Drawing a line
 |
View all Brother International PE-DESIGN Ver.5 manuals
Add to My Manuals
Save this manual to your list of manuals |
Page 140 highlights
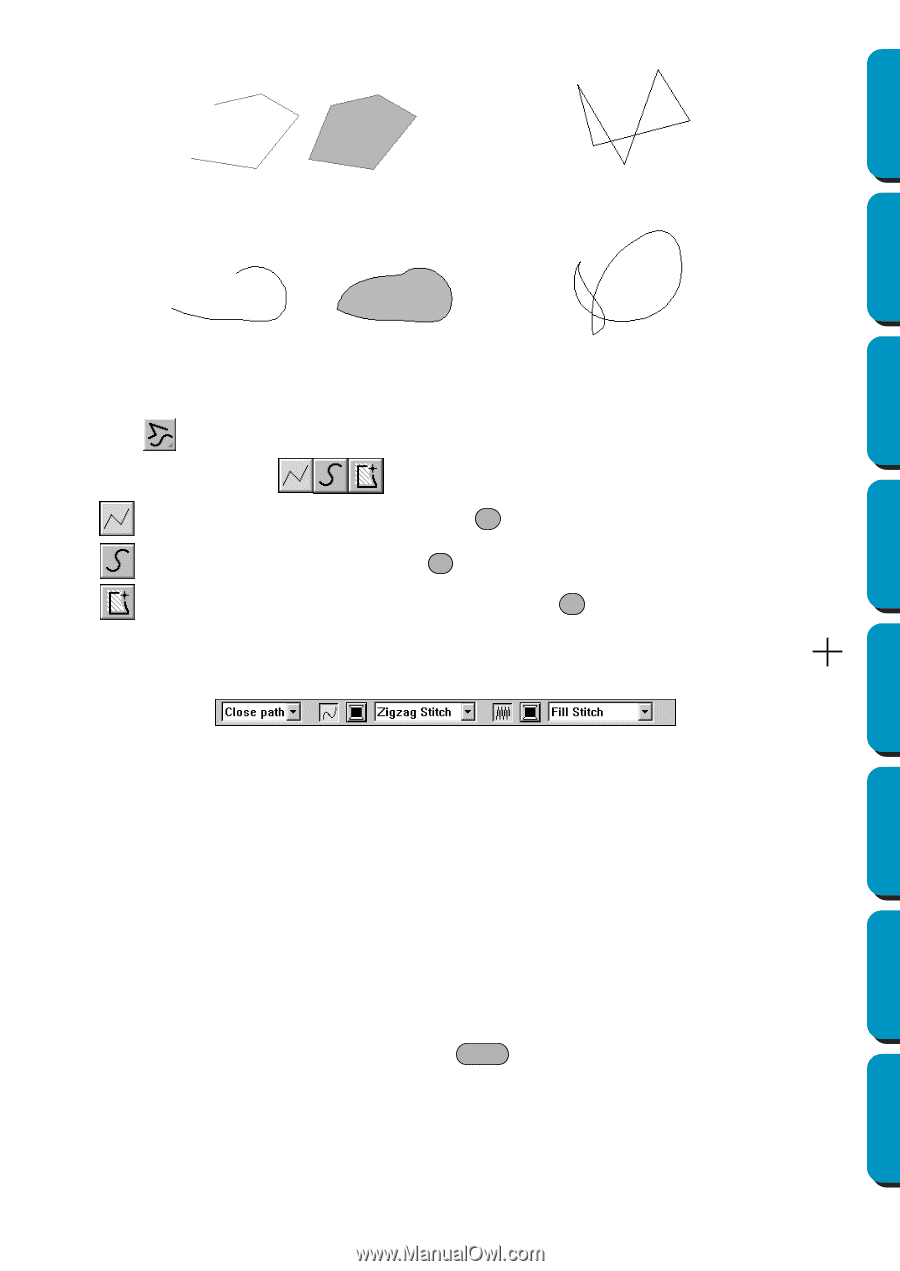
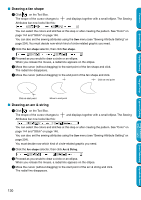
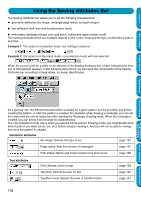
Contents End point Start point Open line Closed line This closed broken line has no region inside. Before Using Getting Started Design Center Layout & Editing End point Start point Open curve Closed curve This closed curve has no region inside. I Drawing a line 1 Click on the Tool Box. Three buttons appear: is for drawing straight lines. (Shortcut key: Z ) is for drawing curves. (Shortcut key: X ) is for semi-automatically drawing lines. (Shortcut key: C ) 2 Click the button for the type of line that you want to draw. The shape of the cursor changes to and displays together with the symbol for the selected line type. The Sewing Attributes bar now looks like this: You can select the path shape, colors and stitches at this step or after creating the pattern. See "Path shape" on page 138, "Color" on page 144 and "Stitch" on page 146. You can also set the sewing attributes using the Sew menu (see "Sewing Attribute Setting" on page 204). 3 Draw the outline. Move the mouse to the start point and click. Move the mouse to the end point of the first line and click again. NOTE: You can always remove the last-entered point by clicking the right mouse button. 4 Repeat until you arrive at the last end point. At that point double-click. NOTE: • While drawing the pattern, you can freely switch between the different line types either by clicking a different button or by pressing the shortcut key. • When drawing a straight line, hold down the Shift key while moving the mouse to draw verti- cally or horizontally. • A template image is needed in order to draw using the semi-automatic line drawing tool. If there is no image, this tool will draw like the normal straight line drawing tool. Programmable Stitch Creator Quick Reference Alphabetic Index 132
-
 1
1 -
2
-
3
-
4
-
5
-
6
-
7
-
8
-
9
-
10
-
11
-
12
-
13
-
14
-
15
-
16
-
17
-
18
-
19
-
20
-
21
-
22
-
23
-
24
-
25
-
26
-
27
-
28
-
29
-
30
-
31
-
32
-
33
-
34
-
35
-
36
-
37
-
38
-
39
-
40
-
41
-
42
-
43
-
44
-
45
-
46
-
47
-
48
-
49
-
50
-
51
-
52
-
53
-
54
-
55
-
56
-
57
-
58
-
59
-
60
-
61
-
62
-
63
-
64
-
65
-
66
-
67
-
68
-
69
-
70
-
71
-
72
-
73
-
74
-
75
-
76
-
77
-
78
-
79
-
80
-
81
-
82
-
83
-
84
-
85
-
86
-
87
-
88
-
89
-
90
-
91
-
92
-
93
-
94
-
95
-
96
-
97
-
98
-
99
-
100
-
101
-
102
-
103
-
104
-
105
-
106
-
107
-
108
-
109
-
110
-
111
-
112
-
113
-
114
-
115
-
116
-
117
-
118
-
119
-
120
-
121
-
122
-
123
-
124
-
125
-
126
-
127
-
128
-
129
-
130
-
131
-
132
-
133
-
134
-
 135
135 -
 136
136 -
 137
137 -
 138
138 -
 139
139 -
 140
140 -
 141
141 -
 142
142 -
 143
143 -
 144
144 -
 145
145 -
146
-
147
-
148
-
149
-
150
-
151
-
152
-
153
-
154
-
155
-
156
-
157
-
158
-
159
-
160
-
161
-
162
-
163
-
164
-
165
-
166
-
167
-
168
-
169
-
170
-
171
-
172
-
173
-
174
-
175
-
176
-
177
-
178
-
179
-
180
-
181
-
182
-
183
-
184
-
185
-
186
-
187
-
188
-
189
-
190
-
191
-
192
-
193
-
194
-
195
-
196
-
197
-
198
-
199
-
200
-
201
-
202
-
203
-
204
-
205
-
206
-
207
-
208
-
209
-
210
-
211
-
212
-
213
-
214
-
215
-
216
-
217
-
218
-
219
-
220
-
221
-
222
-
223
-
224
-
225
-
226
-
227
-
228
-
229
-
230
-
231
-
232
-
233
-
234
-
235
-
236
-
237
-
238
-
239
-
240
-
241
-
242
-
243
-
244
-
245
-
246
-
247
-
248
-
249
-
250
-
251
-
252
-
253
-
254
-
255
-
256
-
257
-
258
-
259
-
260
-
261
-
262
-
263
-
264
-
265
-
266
-
267
-
268
-
269
-
270
-
271
-
272
-
273
-
274
 |
 |