Brother International PE-DESIGN Ver.5 Users Manual - English - Page 192
Emphasizing the Outline], If you select the Arbitrary Shape Mask
 |
View all Brother International PE-DESIGN Ver.5 manuals
Add to My Manuals
Save this manual to your list of manuals |
Page 192 highlights
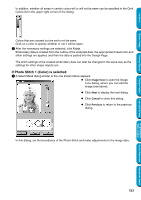
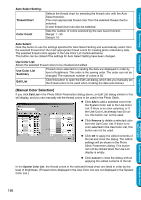
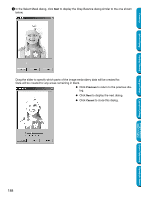
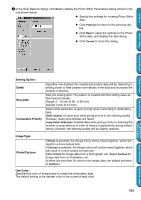
Contents Before Using Getting Started Design Center Layout & Editing N Use the ZOOM slider to zoom in and out on the image, as necessary. N In the Mask Type section in the bottom of the dialog, select the trimming shape you want to use for the mask, and edit the mask in the shape you want to use. When the dialog opens, the square mask is selected. Change the size of the mask by dragging the handles on the outside of the mask. If you select the Arbitrary Shape Mask , the first display shows white square handles in the four corners of the square mask. You can move points, enter points, delete points, or edit this square mask however you like in the Point Edit mode. (Pattern edited with the round mask) (Pattern edited with the arbitrary shape mask) NOTE: The mask size can be set in the range from 64 × 64 dots to the size of the image data. [Emphasizing the Outline] In the Select Mask dialog above, click Image Tune. An Image Tune dialog similar to the one shown below appears. You can make the image brighter or darker (clearer or less sharp). N The image window displays the image resulting from the current operations. N Use Original - Sharp to adjust the sharpness of the image's outlines. A setting more towards Sharp makes a more noticeable boundary between bright and dark areas. N Use Dark - Bright to adjust the brightness of the image. N Use Contrast Low - High to adjust the contrast of the image. N Click OK to show the finished image on the Design Page and on the Select Mask dialog, and close this dialog. N Click Cancel to close this dialog. 184 Programmable Stitch Creator Quick Reference Alphabetic Index
-
 1
1 -
2
-
3
-
4
-
5
-
6
-
7
-
8
-
9
-
10
-
11
-
12
-
13
-
14
-
15
-
16
-
17
-
18
-
19
-
20
-
21
-
22
-
23
-
24
-
25
-
26
-
27
-
28
-
29
-
30
-
31
-
32
-
33
-
34
-
35
-
36
-
37
-
38
-
39
-
40
-
41
-
42
-
43
-
44
-
45
-
46
-
47
-
48
-
49
-
50
-
51
-
52
-
53
-
54
-
55
-
56
-
57
-
58
-
59
-
60
-
61
-
62
-
63
-
64
-
65
-
66
-
67
-
68
-
69
-
70
-
71
-
72
-
73
-
74
-
75
-
76
-
77
-
78
-
79
-
80
-
81
-
82
-
83
-
84
-
85
-
86
-
87
-
88
-
89
-
90
-
91
-
92
-
93
-
94
-
95
-
96
-
97
-
98
-
99
-
100
-
101
-
102
-
103
-
104
-
105
-
106
-
107
-
108
-
109
-
110
-
111
-
112
-
113
-
114
-
115
-
116
-
117
-
118
-
119
-
120
-
121
-
122
-
123
-
124
-
125
-
126
-
127
-
128
-
129
-
130
-
131
-
132
-
133
-
134
-
135
-
136
-
137
-
138
-
139
-
140
-
141
-
142
-
143
-
144
-
145
-
146
-
147
-
148
-
149
-
150
-
151
-
152
-
153
-
154
-
155
-
156
-
157
-
158
-
159
-
160
-
161
-
162
-
163
-
164
-
165
-
166
-
167
-
168
-
169
-
170
-
171
-
172
-
173
-
174
-
175
-
176
-
177
-
178
-
179
-
180
-
181
-
182
-
183
-
184
-
185
-
186
-
 187
187 -
 188
188 -
 189
189 -
 190
190 -
 191
191 -
 192
192 -
 193
193 -
 194
194 -
 195
195 -
 196
196 -
 197
197 -
198
-
199
-
200
-
201
-
202
-
203
-
204
-
205
-
206
-
207
-
208
-
209
-
210
-
211
-
212
-
213
-
214
-
215
-
216
-
217
-
218
-
219
-
220
-
221
-
222
-
223
-
224
-
225
-
226
-
227
-
228
-
229
-
230
-
231
-
232
-
233
-
234
-
235
-
236
-
237
-
238
-
239
-
240
-
241
-
242
-
243
-
244
-
245
-
246
-
247
-
248
-
249
-
250
-
251
-
252
-
253
-
254
-
255
-
256
-
257
-
258
-
259
-
260
-
261
-
262
-
263
-
264
-
265
-
266
-
267
-
268
-
269
-
270
-
271
-
272
-
273
-
274
 |
 |