Brother International PE-DESIGN Ver.5 Users Manual - English - Page 142
Sewing Attribute Setting, While creating a manual punching pattern
 |
View all Brother International PE-DESIGN Ver.5 manuals
Add to My Manuals
Save this manual to your list of manuals |
Page 142 highlights
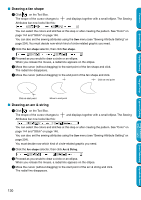
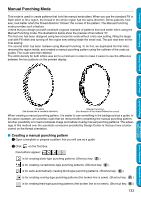
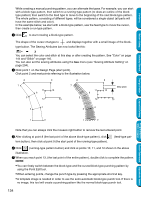
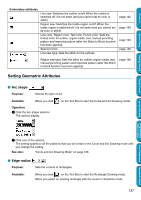
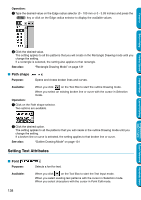
Contents Before Using Getting Started While creating a manual punching pattern, you can alternate the types. For example, you can start with a block-type pattern, then switch to a running-type pattern (to draw an outline of the blocktype pattern) then switch to the feed type to move to the beginning of the next block-type pattern. The whole pattern, consisting of different types, will be considered a single object (all parts will have the same stitch and color). In the example below, we start with a block-type pattern, use the feed type to move the cursor, then create a run-type pattern. 3 Click to start creating a block-type pattern. The shape of the cursor changes to and displays together with a small image of the block- type button. The Sewing Attributes bar now looks like this: You can select the color and stitch at this step or after creating the pattern. See "Color" on page 144 and "Stitch" on page 146. You can also set the sewing attributes using the Sew menu (see "Sewing Attribute Setting" on page 204). 4 Click point 1 on the Design Page (start point). Click point 2 and next points referring to the illustration below. 8 7 5 9 11 6 12 10 13 8 7 5 11 6 12 9 Step pitch 10 13 4 3 4 3 Design Center Layout & Editing Programmable Stitch Creator Quick Reference Alphabetic Index 1 2 1 2 Note that you can always click the mouse's right button to remove the last entered point. 5 After clicking at point 8 (the last point of the above block-type pattern), click tern button), then click at point 9 (the start point of the running-type pattern). (feed-type pat- 6 Click (running-type pattern button) and click at points 10, 11, and 12 shown in the above illustration. 7 When you reach point 13, (the last point of the entire pattern), double click to complete the pattern. NOTE: • You can freely switch between the block-type and the curved block-type punching pattern by using the Point Edit tool. • When entering points, change the punch type by pressing the appropriate shortcut key. • A template image is needed in order to use the semi-automatic block-type punch tool. If there is no image, this tool will create a punching pattern like the normal block-type punch tool. 134
-
 1
1 -
2
-
3
-
4
-
5
-
6
-
7
-
8
-
9
-
10
-
11
-
12
-
13
-
14
-
15
-
16
-
17
-
18
-
19
-
20
-
21
-
22
-
23
-
24
-
25
-
26
-
27
-
28
-
29
-
30
-
31
-
32
-
33
-
34
-
35
-
36
-
37
-
38
-
39
-
40
-
41
-
42
-
43
-
44
-
45
-
46
-
47
-
48
-
49
-
50
-
51
-
52
-
53
-
54
-
55
-
56
-
57
-
58
-
59
-
60
-
61
-
62
-
63
-
64
-
65
-
66
-
67
-
68
-
69
-
70
-
71
-
72
-
73
-
74
-
75
-
76
-
77
-
78
-
79
-
80
-
81
-
82
-
83
-
84
-
85
-
86
-
87
-
88
-
89
-
90
-
91
-
92
-
93
-
94
-
95
-
96
-
97
-
98
-
99
-
100
-
101
-
102
-
103
-
104
-
105
-
106
-
107
-
108
-
109
-
110
-
111
-
112
-
113
-
114
-
115
-
116
-
117
-
118
-
119
-
120
-
121
-
122
-
123
-
124
-
125
-
126
-
127
-
128
-
129
-
130
-
131
-
132
-
133
-
134
-
135
-
136
-
 137
137 -
 138
138 -
 139
139 -
 140
140 -
 141
141 -
 142
142 -
 143
143 -
 144
144 -
 145
145 -
 146
146 -
 147
147 -
148
-
149
-
150
-
151
-
152
-
153
-
154
-
155
-
156
-
157
-
158
-
159
-
160
-
161
-
162
-
163
-
164
-
165
-
166
-
167
-
168
-
169
-
170
-
171
-
172
-
173
-
174
-
175
-
176
-
177
-
178
-
179
-
180
-
181
-
182
-
183
-
184
-
185
-
186
-
187
-
188
-
189
-
190
-
191
-
192
-
193
-
194
-
195
-
196
-
197
-
198
-
199
-
200
-
201
-
202
-
203
-
204
-
205
-
206
-
207
-
208
-
209
-
210
-
211
-
212
-
213
-
214
-
215
-
216
-
217
-
218
-
219
-
220
-
221
-
222
-
223
-
224
-
225
-
226
-
227
-
228
-
229
-
230
-
231
-
232
-
233
-
234
-
235
-
236
-
237
-
238
-
239
-
240
-
241
-
242
-
243
-
244
-
245
-
246
-
247
-
248
-
249
-
250
-
251
-
252
-
253
-
254
-
255
-
256
-
257
-
258
-
259
-
260
-
261
-
262
-
263
-
264
-
265
-
266
-
267
-
268
-
269
-
270
-
271
-
272
-
273
-
274
 |
 |