Brother International PE-DESIGN Ver.5 Users Manual - English - Page 256
Display Menu, Grid, Medium, Narrow
 |
View all Brother International PE-DESIGN Ver.5 manuals
Add to My Manuals
Save this manual to your list of manuals |
Page 256 highlights
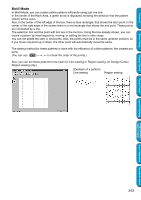
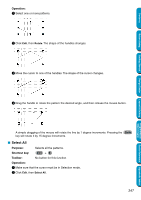
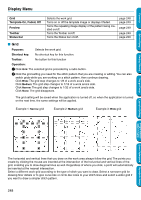
Contents Before Using Getting Started Display Menu Grid Template-On, Faded, Off Preview Toolbar Status bar Selects the work grid. Turns on or off the template image or displays it faded. Turns the repeating image display of the pattern being created on/off. Turns the Toolbar on/off. Turns the Status bar on/off. page 248 page 249 page 249 page 249 page 250 I Grid Purpose: Selects the work grid. Shortcut key: No shortcut key for this function. Toolbar: No button for this function Operation: 1 Click Grid. The selected grid is preceded by a radio button. 2 Click the grid setting you need for the stitch pattern that you are creating or editing. You can also switch grids while you are working on a stitch pattern, then continue drawing. Click Wide: The grid step changes to 1/8 of a work area's side. Click Medium: The grid step changes to 1/16 of a work area's side. Click Narrow: The grid step changes to 1/32 of a work area's side. Click None: The grid disappears. The grid setting will be saved when the application is turned off, so when the application is turned on the next time, the same settings will be applied. Example 1: Narrow grid Example 2: Medium grid Example 3: Wide grid Design Center Layout & Editing Programmable Stitch Creator Quick Reference Alphabetic Index The horizontal and vertical lines that you draw on the work area always follow the grid. The points you create by clicking the mouse are inserted at the intersection of the horizontal and vertical lines of the grid, enabling you to draw diagonal lines as well. Regardless of where you click, a point will automatically be inserted at the nearest intersection. Select a different work grid according to the type of stitch you want to draw. Select a narrower grid for drawing finer details or to give curve-like or circle-like looks to your stitch lines and select a wider grid if you want to draw a simpler stitch pattern. 248
-
 1
1 -
2
-
3
-
4
-
5
-
6
-
7
-
8
-
9
-
10
-
11
-
12
-
13
-
14
-
15
-
16
-
17
-
18
-
19
-
20
-
21
-
22
-
23
-
24
-
25
-
26
-
27
-
28
-
29
-
30
-
31
-
32
-
33
-
34
-
35
-
36
-
37
-
38
-
39
-
40
-
41
-
42
-
43
-
44
-
45
-
46
-
47
-
48
-
49
-
50
-
51
-
52
-
53
-
54
-
55
-
56
-
57
-
58
-
59
-
60
-
61
-
62
-
63
-
64
-
65
-
66
-
67
-
68
-
69
-
70
-
71
-
72
-
73
-
74
-
75
-
76
-
77
-
78
-
79
-
80
-
81
-
82
-
83
-
84
-
85
-
86
-
87
-
88
-
89
-
90
-
91
-
92
-
93
-
94
-
95
-
96
-
97
-
98
-
99
-
100
-
101
-
102
-
103
-
104
-
105
-
106
-
107
-
108
-
109
-
110
-
111
-
112
-
113
-
114
-
115
-
116
-
117
-
118
-
119
-
120
-
121
-
122
-
123
-
124
-
125
-
126
-
127
-
128
-
129
-
130
-
131
-
132
-
133
-
134
-
135
-
136
-
137
-
138
-
139
-
140
-
141
-
142
-
143
-
144
-
145
-
146
-
147
-
148
-
149
-
150
-
151
-
152
-
153
-
154
-
155
-
156
-
157
-
158
-
159
-
160
-
161
-
162
-
163
-
164
-
165
-
166
-
167
-
168
-
169
-
170
-
171
-
172
-
173
-
174
-
175
-
176
-
177
-
178
-
179
-
180
-
181
-
182
-
183
-
184
-
185
-
186
-
187
-
188
-
189
-
190
-
191
-
192
-
193
-
194
-
195
-
196
-
197
-
198
-
199
-
200
-
201
-
202
-
203
-
204
-
205
-
206
-
207
-
208
-
209
-
210
-
211
-
212
-
213
-
214
-
215
-
216
-
217
-
218
-
219
-
220
-
221
-
222
-
223
-
224
-
225
-
226
-
227
-
228
-
229
-
230
-
231
-
232
-
233
-
234
-
235
-
236
-
237
-
238
-
239
-
240
-
241
-
242
-
243
-
244
-
245
-
246
-
247
-
248
-
249
-
250
-
 251
251 -
 252
252 -
 253
253 -
 254
254 -
 255
255 -
 256
256 -
 257
257 -
 258
258 -
 259
259 -
 260
260 -
 261
261 -
262
-
263
-
264
-
265
-
266
-
267
-
268
-
269
-
270
-
271
-
272
-
273
-
274
 |
 |
