Brother International PE-DESIGN Ver.5 Users Manual - English - Page 26
Step 2 Opening an Image, Cancel, Flower.bmp, Preview
 |
View all Brother International PE-DESIGN Ver.5 manuals
Add to My Manuals
Save this manual to your list of manuals |
Page 26 highlights
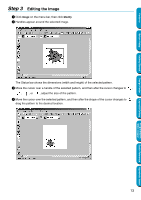
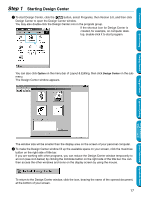
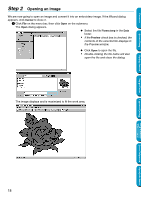
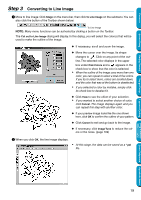
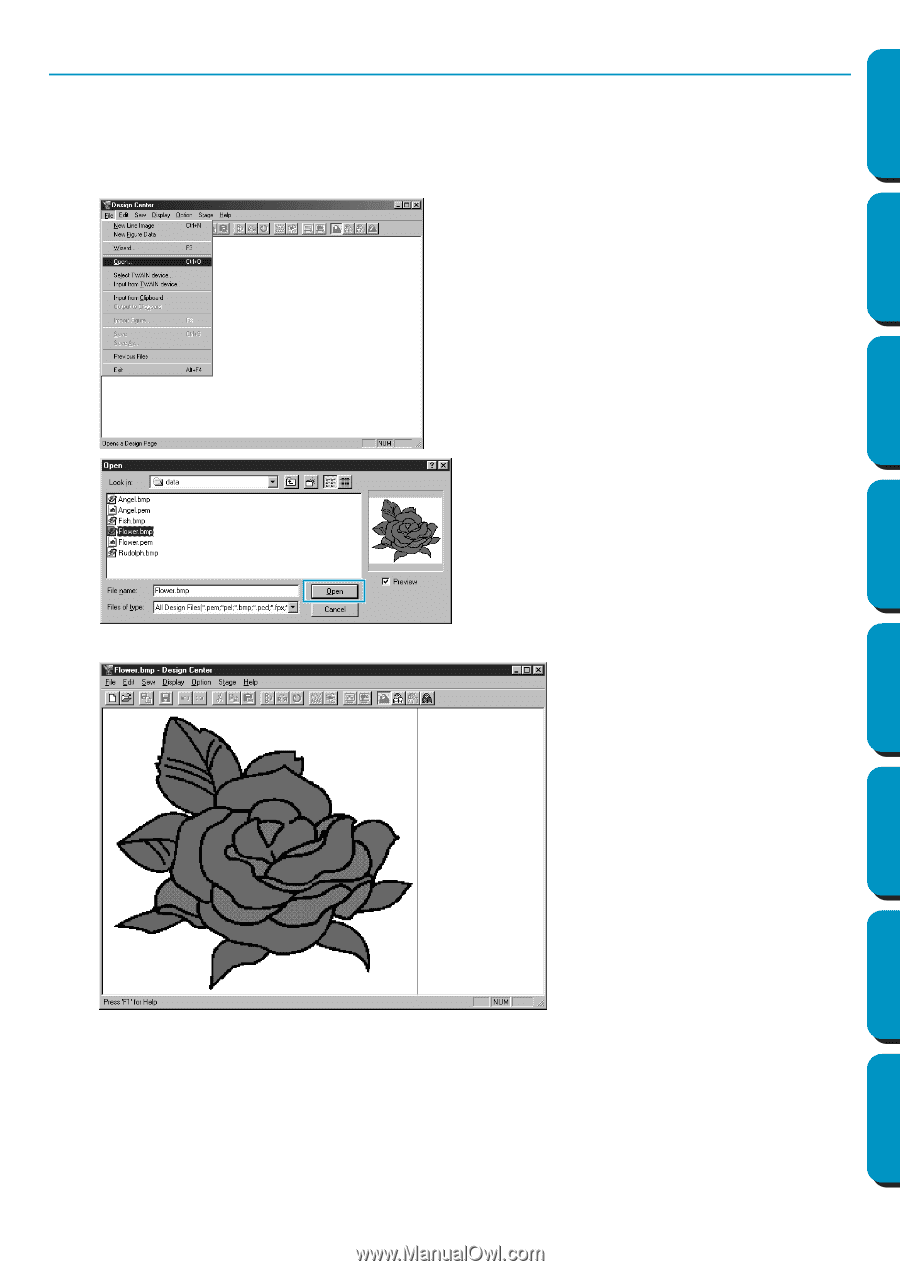
Contents Before Using Getting Started Design Center Layout & Editing Step 2 Opening an Image We are now going to open an image and convert it into an embroidery image. If the Wizard dialog appears, click Cancel to close it. 1 Click File on the menu bar, then click Open on the submenu. The Open dialog appears. N Select the file Flower.bmp in the Data folder. • If the Preview check box is checked, the contents of the selected file displays in the Preview window. N Click Open to open the file. • Double-clicking the file name will also open the file and close the dialog. The image displays and is maximized to fit the work area. 18 Programmable Stitch Creator Quick Reference Alphabetic Index
-
 1
1 -
2
-
3
-
4
-
5
-
6
-
7
-
8
-
9
-
10
-
11
-
12
-
13
-
14
-
15
-
16
-
17
-
18
-
19
-
20
-
 21
21 -
 22
22 -
 23
23 -
 24
24 -
 25
25 -
 26
26 -
 27
27 -
 28
28 -
 29
29 -
 30
30 -
 31
31 -
32
-
33
-
34
-
35
-
36
-
37
-
38
-
39
-
40
-
41
-
42
-
43
-
44
-
45
-
46
-
47
-
48
-
49
-
50
-
51
-
52
-
53
-
54
-
55
-
56
-
57
-
58
-
59
-
60
-
61
-
62
-
63
-
64
-
65
-
66
-
67
-
68
-
69
-
70
-
71
-
72
-
73
-
74
-
75
-
76
-
77
-
78
-
79
-
80
-
81
-
82
-
83
-
84
-
85
-
86
-
87
-
88
-
89
-
90
-
91
-
92
-
93
-
94
-
95
-
96
-
97
-
98
-
99
-
100
-
101
-
102
-
103
-
104
-
105
-
106
-
107
-
108
-
109
-
110
-
111
-
112
-
113
-
114
-
115
-
116
-
117
-
118
-
119
-
120
-
121
-
122
-
123
-
124
-
125
-
126
-
127
-
128
-
129
-
130
-
131
-
132
-
133
-
134
-
135
-
136
-
137
-
138
-
139
-
140
-
141
-
142
-
143
-
144
-
145
-
146
-
147
-
148
-
149
-
150
-
151
-
152
-
153
-
154
-
155
-
156
-
157
-
158
-
159
-
160
-
161
-
162
-
163
-
164
-
165
-
166
-
167
-
168
-
169
-
170
-
171
-
172
-
173
-
174
-
175
-
176
-
177
-
178
-
179
-
180
-
181
-
182
-
183
-
184
-
185
-
186
-
187
-
188
-
189
-
190
-
191
-
192
-
193
-
194
-
195
-
196
-
197
-
198
-
199
-
200
-
201
-
202
-
203
-
204
-
205
-
206
-
207
-
208
-
209
-
210
-
211
-
212
-
213
-
214
-
215
-
216
-
217
-
218
-
219
-
220
-
221
-
222
-
223
-
224
-
225
-
226
-
227
-
228
-
229
-
230
-
231
-
232
-
233
-
234
-
235
-
236
-
237
-
238
-
239
-
240
-
241
-
242
-
243
-
244
-
245
-
246
-
247
-
248
-
249
-
250
-
251
-
252
-
253
-
254
-
255
-
256
-
257
-
258
-
259
-
260
-
261
-
262
-
263
-
264
-
265
-
266
-
267
-
268
-
269
-
270
-
271
-
272
-
273
-
274
 |
 |
18
Contents
Before Using
Getting Started
Design Center
Layout & Editing
Programmable
Stitch Creator
Quick Reference
Alphabetic Index
Step 2
Opening an Image
We are now going to open an image and convert it into an embroidery image. If the Wizard dialog
appears, click
Cancel
to close it.
1
Click
File
on the menu bar, then click
Open
on the submenu.
The
Open
dialog appears.
The image displays and is maximized to
fi
t the work area.
◆
Select the
fi
le
Flower.bmp
in the
Data
folder.
•
If the
Preview
check box is checked, the
contents of the selected file displays in
the Preview window.
◆
Click
Open
to open the
fi
le.
•
Double-clicking the file name will also
open the file and close the dialog.