Brother International PE-DESIGN Ver.5 Users Manual - English - Page 17
Getting Started, Introduction, About this Layout & Editing
 |
View all Brother International PE-DESIGN Ver.5 manuals
Add to My Manuals
Save this manual to your list of manuals |
Page 17 highlights
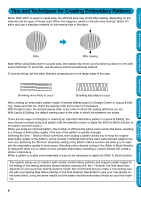
Contents Before Using Getting Started Introduction This package contains three applications. About this Chapter The next three sections of this chapter are organized as a tutorial to provide you with a hands-on introduction to the different features of the applications. First, using the Auto Punch function in Layout & Editing, you will create an embroidery pattern automatically from an image. The embroidery pattern can also be created in Design Center using the 4-stage procedure described later. Next, the pattern will be imported into Layout & Editing. You will learn how to add a few components to the embroidery image and to organize the layout. In the third section, you will then learn how to use Programmable Stitch Creator to edit a programmable stitch in order to create your own. 1. 1. The Auto Punch Design Center can be function of Layout & used create an Editing can be used to create an embroidery or embroidery pattern. → page 16 pattern automatically. → page 11 Getting Started Design Center Layout & Editing Programmable Stitch Creator Quick Reference Alphabetic Index 2. Layout & Editing will be used to combine images and text and organize the layout. → page 29 3. Programmable Stitch Creator will be used. → page 50 I Layout & Editing Layout & Editing is used to automatically create embroidery patterns from images, combine images and text, and create embroidery data that can be written to an Original card. The images may come from scanning a printed image or can be created with an application like Paint. The extension of the image files must be bmp, tif, jpg, j2k, pcx, wmf, png, eps, pcd, or fpx. In addition, the following type of embroidery data can be incorporated into the embroidery pattern. 9
-
 1
1 -
2
-
3
-
4
-
5
-
6
-
7
-
8
-
9
-
10
-
11
-
 12
12 -
 13
13 -
 14
14 -
 15
15 -
 16
16 -
 17
17 -
 18
18 -
 19
19 -
 20
20 -
 21
21 -
 22
22 -
23
-
24
-
25
-
26
-
27
-
28
-
29
-
30
-
31
-
32
-
33
-
34
-
35
-
36
-
37
-
38
-
39
-
40
-
41
-
42
-
43
-
44
-
45
-
46
-
47
-
48
-
49
-
50
-
51
-
52
-
53
-
54
-
55
-
56
-
57
-
58
-
59
-
60
-
61
-
62
-
63
-
64
-
65
-
66
-
67
-
68
-
69
-
70
-
71
-
72
-
73
-
74
-
75
-
76
-
77
-
78
-
79
-
80
-
81
-
82
-
83
-
84
-
85
-
86
-
87
-
88
-
89
-
90
-
91
-
92
-
93
-
94
-
95
-
96
-
97
-
98
-
99
-
100
-
101
-
102
-
103
-
104
-
105
-
106
-
107
-
108
-
109
-
110
-
111
-
112
-
113
-
114
-
115
-
116
-
117
-
118
-
119
-
120
-
121
-
122
-
123
-
124
-
125
-
126
-
127
-
128
-
129
-
130
-
131
-
132
-
133
-
134
-
135
-
136
-
137
-
138
-
139
-
140
-
141
-
142
-
143
-
144
-
145
-
146
-
147
-
148
-
149
-
150
-
151
-
152
-
153
-
154
-
155
-
156
-
157
-
158
-
159
-
160
-
161
-
162
-
163
-
164
-
165
-
166
-
167
-
168
-
169
-
170
-
171
-
172
-
173
-
174
-
175
-
176
-
177
-
178
-
179
-
180
-
181
-
182
-
183
-
184
-
185
-
186
-
187
-
188
-
189
-
190
-
191
-
192
-
193
-
194
-
195
-
196
-
197
-
198
-
199
-
200
-
201
-
202
-
203
-
204
-
205
-
206
-
207
-
208
-
209
-
210
-
211
-
212
-
213
-
214
-
215
-
216
-
217
-
218
-
219
-
220
-
221
-
222
-
223
-
224
-
225
-
226
-
227
-
228
-
229
-
230
-
231
-
232
-
233
-
234
-
235
-
236
-
237
-
238
-
239
-
240
-
241
-
242
-
243
-
244
-
245
-
246
-
247
-
248
-
249
-
250
-
251
-
252
-
253
-
254
-
255
-
256
-
257
-
258
-
259
-
260
-
261
-
262
-
263
-
264
-
265
-
266
-
267
-
268
-
269
-
270
-
271
-
272
-
273
-
274
 |
 |