Brother International PE-DESIGN Ver.5 Users Manual - English - Page 226
Optimize Entry/Exit points, setting is turned off
 |
View all Brother International PE-DESIGN Ver.5 manuals
Add to My Manuals
Save this manual to your list of manuals |
Page 226 highlights
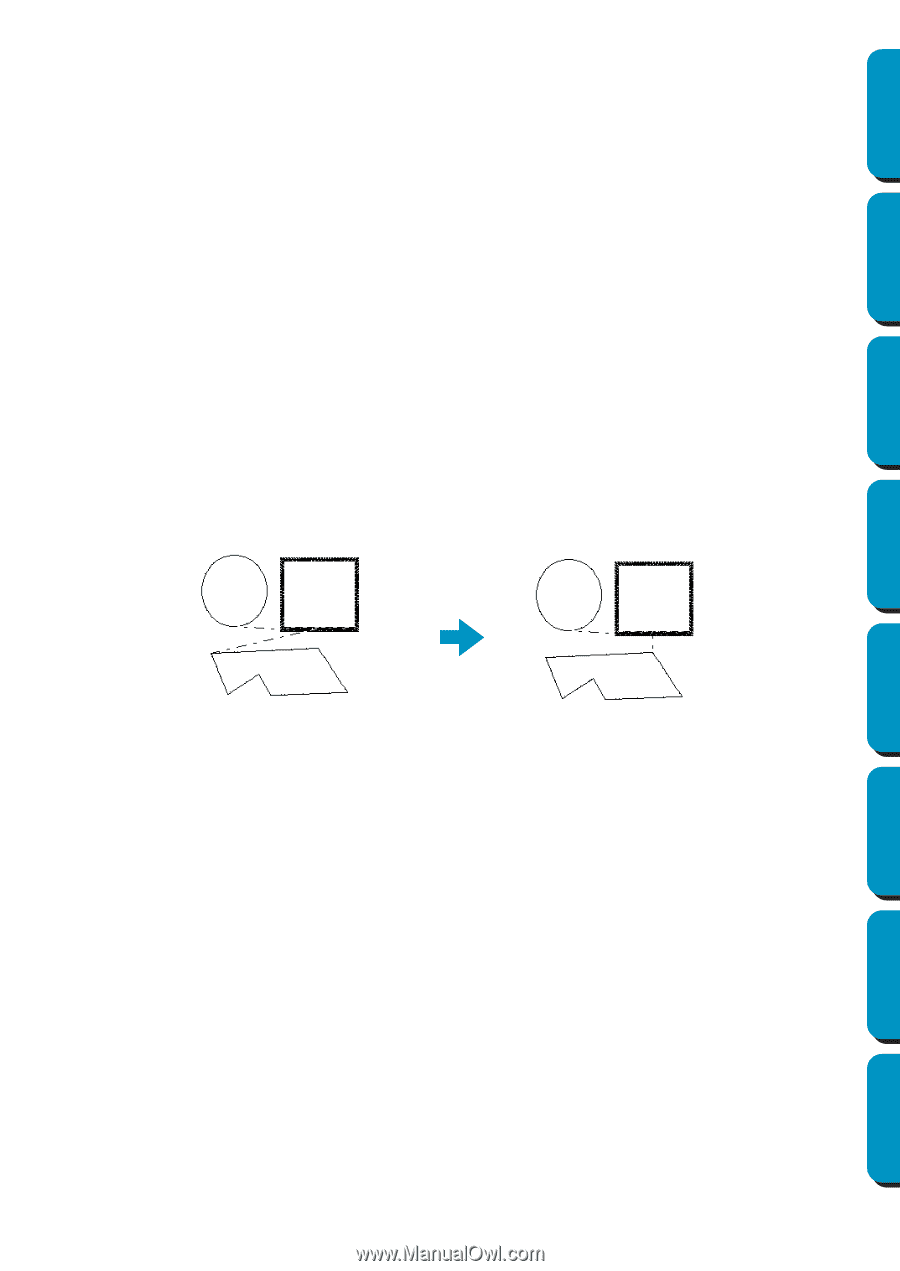
Contents Before Using Getting Started I Optimize Entry/Exit points Purpose: Optimizes the positions of the entry points and the exit points for the sewing data Shortcut key: No shortcut key for this function Toolbar: No button for this function Operation: 1 Click Sew, then Optimize Entry/Exit points. This setting can be turned on or off. A check mark appears when this setting is turned on; no check mark is displayed when this setting is turned off. When the Optimize Entry/Exit points setting is turned on: The entry points and exit points for the sewing data of connected objects with the same color are optimized (connected with the shortest distance possible). • Objects that can be optimized are data created with the Circle, Rectangle and Outline tools. • When the Optimize Entry/Exit points setting is turned on, the entry point and the exit point cannot be changed with the entry/exit point edit tool. When the Optimize Entry/Exit points setting is turned off: The entry points and exit points are not optimized. If the Optimize Entry/Exit points setting is changed from on to off, the last entry point and exit point positions are maintained. In addition, the positions of the entry points and the exit points can be manually changed with the entry/exit point edit tool. Optimize Entry/Exit points turned off Optimize Entry/Exit points turned on Design Center Layout & Editing Programmable Stitch Creator Quick Reference Alphabetic Index 218
-
 1
1 -
2
-
3
-
4
-
5
-
6
-
7
-
8
-
9
-
10
-
11
-
12
-
13
-
14
-
15
-
16
-
17
-
18
-
19
-
20
-
21
-
22
-
23
-
24
-
25
-
26
-
27
-
28
-
29
-
30
-
31
-
32
-
33
-
34
-
35
-
36
-
37
-
38
-
39
-
40
-
41
-
42
-
43
-
44
-
45
-
46
-
47
-
48
-
49
-
50
-
51
-
52
-
53
-
54
-
55
-
56
-
57
-
58
-
59
-
60
-
61
-
62
-
63
-
64
-
65
-
66
-
67
-
68
-
69
-
70
-
71
-
72
-
73
-
74
-
75
-
76
-
77
-
78
-
79
-
80
-
81
-
82
-
83
-
84
-
85
-
86
-
87
-
88
-
89
-
90
-
91
-
92
-
93
-
94
-
95
-
96
-
97
-
98
-
99
-
100
-
101
-
102
-
103
-
104
-
105
-
106
-
107
-
108
-
109
-
110
-
111
-
112
-
113
-
114
-
115
-
116
-
117
-
118
-
119
-
120
-
121
-
122
-
123
-
124
-
125
-
126
-
127
-
128
-
129
-
130
-
131
-
132
-
133
-
134
-
135
-
136
-
137
-
138
-
139
-
140
-
141
-
142
-
143
-
144
-
145
-
146
-
147
-
148
-
149
-
150
-
151
-
152
-
153
-
154
-
155
-
156
-
157
-
158
-
159
-
160
-
161
-
162
-
163
-
164
-
165
-
166
-
167
-
168
-
169
-
170
-
171
-
172
-
173
-
174
-
175
-
176
-
177
-
178
-
179
-
180
-
181
-
182
-
183
-
184
-
185
-
186
-
187
-
188
-
189
-
190
-
191
-
192
-
193
-
194
-
195
-
196
-
197
-
198
-
199
-
200
-
201
-
202
-
203
-
204
-
205
-
206
-
207
-
208
-
209
-
210
-
211
-
212
-
213
-
214
-
215
-
216
-
217
-
218
-
219
-
220
-
 221
221 -
 222
222 -
 223
223 -
 224
224 -
 225
225 -
 226
226 -
 227
227 -
 228
228 -
 229
229 -
 230
230 -
 231
231 -
232
-
233
-
234
-
235
-
236
-
237
-
238
-
239
-
240
-
241
-
242
-
243
-
244
-
245
-
246
-
247
-
248
-
249
-
250
-
251
-
252
-
253
-
254
-
255
-
256
-
257
-
258
-
259
-
260
-
261
-
262
-
263
-
264
-
265
-
266
-
267
-
268
-
269
-
270
-
271
-
272
-
273
-
274
 |
 |