HP Xw460c HP Insight Control Environment User Guide - Page 143
Installation fails with “Product RMS not installed: Service RMS error. The specified service does not exist as an installed service (0x424)” message, VPM installation fails, Cannot modify VPM acquisition settings to acquire updates from a local repository
 |
View all HP Xw460c manuals
Add to My Manuals
Save this manual to your list of manuals |
Page 143 highlights
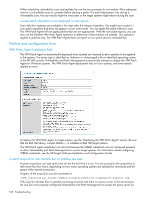
Installation fails with "Product RMS not installed: Service RMS error. The specified service does not exist as an installed service (0x424)" message If the password of the account used to install Vulnerability and Patch Management contains curly braces, "{" or "}," the Radia component installation fails. To correct this, either complete the following steps to temporarily change the install account password or create a new local account with administrator privileges to use to perform the installation. 1. Change the password to remove the invalid characters. 2. Select Start→Control Panel→Administrative Tools→Services. 3. Right-click HP Systems Insight Manager, and then select Properties. 4. Click the Log On tab, and then update with the new password. 5. Click the General tab, and then click Stop>Start to restart the HP SIM service. Proceed with the VPM installation. If necessary, the installation account credentials can be changed back after the installation completes. Repeat steps 2 through 6 after the password has been changed, and then to update the VPM password, see the "Updating VPM credentials using the Change VPM Credentials Utility" section in this guide. VPM installation fails • Be sure the VPM server can effectively communicate with other networking components, such as the database and HP SIM server (if separate). • If the VPM server has multiple IP addresses, be sure Name Resolution is used for all IP addresses • If IPv6 is enabled, uninstall from the network interface card being utilized for VPM communication. • If the VPM installation was attempted multiple times, reboot before attempting the installation again. Cannot modify VPM acquisition settings to acquire updates from a local repository A patch acquisition must have already been run using the VPM Acquisition Utility and saved to the designated directory before VPM acquisition settings can be modified to acquire updates from a local repository. For information about acquiring patches using the VPM Acquisition Utility, see the "Performing additional VPM post-installation configuration tasks" section. Required open ports IMPORTANT: If a proxy server is used, it must be configured to allow both HTTP and FTP traffic. NOTE: These ports are opened automatically when VPM is installed on a Windows XP SP2 system. By default, Internet Connection Firewall closes some of these ports. Be sure that the ports listed are open. The following ports must be open on target systems to allow successful scanning with Vulnerability and Patch Management: • TCP 22-SSH • TCP 135, 137, 138, 139, 443, and 445-NetBIOS and SSL, used by the VPM scanning components • TCP 2301 and 49400-HP Management Agents • TCP 3463, 3464, 3466, and 3465-Used by VPM patching components • The following ports must be open on the VPM server: • TCP 80-HTTP Web server, if an HTTP connection is used between the Vulnerability and Patch Management and HP SIM servers (TCP 443 must be open if an HTTPS connection is used) • TCP 445-MSDE named pipes communications • UDP 1433, 1434-MSDE Shared Instance Support • TCP (variable)-MSDE TCP/IP communications. This port, assigned at random by MSDE during installation, can be identified by selecting Start>Run, entering svrnetcn.exe, and clicking OK. From the Server Instances menu, select Computername. In the Enabled Protocols list, select Vulnerability and Patch Management Pack troubleshooting 143
-
 1
1 -
2
-
3
-
4
-
5
-
6
-
7
-
8
-
9
-
10
-
11
-
12
-
13
-
14
-
15
-
16
-
17
-
18
-
19
-
20
-
21
-
22
-
23
-
24
-
25
-
26
-
27
-
28
-
29
-
30
-
31
-
32
-
33
-
34
-
35
-
36
-
37
-
38
-
39
-
40
-
41
-
42
-
43
-
44
-
45
-
46
-
47
-
48
-
49
-
50
-
51
-
52
-
53
-
54
-
55
-
56
-
57
-
58
-
59
-
60
-
61
-
62
-
63
-
64
-
65
-
66
-
67
-
68
-
69
-
70
-
71
-
72
-
73
-
74
-
75
-
76
-
77
-
78
-
79
-
80
-
81
-
82
-
83
-
84
-
85
-
86
-
87
-
88
-
89
-
90
-
91
-
92
-
93
-
94
-
95
-
96
-
97
-
98
-
99
-
100
-
101
-
102
-
103
-
104
-
105
-
106
-
107
-
108
-
109
-
110
-
111
-
112
-
113
-
114
-
115
-
116
-
117
-
118
-
119
-
120
-
121
-
122
-
123
-
124
-
125
-
126
-
127
-
128
-
129
-
130
-
131
-
132
-
133
-
134
-
135
-
136
-
137
-
 138
138 -
 139
139 -
 140
140 -
 141
141 -
 142
142 -
 143
143 -
 144
144 -
 145
145 -
 146
146 -
 147
147 -
 148
148 -
149
-
150
-
151
-
152
-
153
-
154
-
155
-
156
-
157
-
158
-
159
-
160
-
161
-
162
-
163
-
164
-
165
-
166
-
167
-
168
-
169
-
170
-
171
-
172
-
173
-
174
-
175
-
176
-
177
-
178
-
179
-
180
-
181
 |
 |