HP Xw460c HP Insight Control Environment User Guide - Page 80
Viewing, modifying, or canceling a scheduled task, Viewing vulnerability scan results
 |
View all HP Xw460c manuals
Add to My Manuals
Save this manual to your list of manuals |
Page 80 highlights
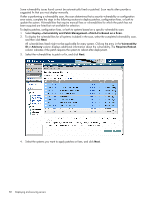
5. Click Next. 6. Enter a name for the vulnerability scan, and select a scan definition from the list. 7. To deploy patches immediately, click Run Now. To schedule the patch deployment, click Schedule and complete the following instructions: a. Enter a name for the deployment task or accept the default name, and select Once. b. Designate a time and date to run the patch deployment task, and click Done. You can view scan results after the task completes either by clicking the system status icon or viewing the VPM Events list. Viewing, modifying, or canceling a scheduled task 1. Select Tasks & Logs→View All Scheduled Tasks. 2. Select the appropriate task from the list, and then click Edit. 3. Review the event details to modify. If necessary, you can change the target systems on which the task is scheduled to run by clicking either Add Targets or Remove Targets, and then click Next. 4. Review the task schedule, modify as necessary, and then click Done. Viewing vulnerability scan results You can view VPM scan results for a specified vulnerability scan or for an individual system. When a vulnerability scan is run for a group of target systems, results are generated for the group as well as for each individual system. You can view vulnerability scan results as .pdf files in any of the following formats: • Executive Summary-A high-level summary of all vulnerabilities found in a scan • Detailed Listing-A list of vulnerabilities found on each system, as well as a description and risk evaluation of each • Simple Listing-A list of vulnerabilities found on each system sorted by vulnerability name • Scan Summary-A list of scans performed and vulnerabilities found, sorted by system name • Ports and Services-A list of ports, services, and unknown services, sorted by system name Vulnerability scan results guidelines • Vulnerability scan results cannot be viewed or deleted while status displays "Scanning" or "Pending". Vulnerability scan results for an aborted scan might not be accurate. • If the vulnerability scan results display the message, "No file access", check the WBEM settings in HP SIM for appropriate credentials to the target systems. For additional information, see the user guide. • Scan results can also be accessed from the links in the completed scan event in HP SIM. • Vulnerabilities listed are the total vulnerabilities found in the group of systems scanned. Individual systems in the group might not have every vulnerability listed. Viewing vulnerability scan results by scan name 1. Select Diagnose→Vulnerability and Patch Management→Scan→View Results by Scan Name. 2. Select the appropriate vulnerability scan, select the format in which to view the results from the list, and click View. The vulnerability scan results appear in a separate window. Viewing vulnerability scan results by scan system 1. Select Diagnose→Vulnerability and Patch Management→Scan→View Results by System. 2. Select individual system for which to view scan results, and click Apply. 3. Verify that the correct target systems appear in the lists, and click Next. If you need to reselect the target systems, click Add Targets or Remove Targets, verify the target systems, and then click Next. 80 Deploying and securing servers
-
 1
1 -
2
-
3
-
4
-
5
-
6
-
7
-
8
-
9
-
10
-
11
-
12
-
13
-
14
-
15
-
16
-
17
-
18
-
19
-
20
-
21
-
22
-
23
-
24
-
25
-
26
-
27
-
28
-
29
-
30
-
31
-
32
-
33
-
34
-
35
-
36
-
37
-
38
-
39
-
40
-
41
-
42
-
43
-
44
-
45
-
46
-
47
-
48
-
49
-
50
-
51
-
52
-
53
-
54
-
55
-
56
-
57
-
58
-
59
-
60
-
61
-
62
-
63
-
64
-
65
-
66
-
67
-
68
-
69
-
70
-
71
-
72
-
73
-
74
-
 75
75 -
 76
76 -
 77
77 -
 78
78 -
 79
79 -
 80
80 -
 81
81 -
 82
82 -
 83
83 -
 84
84 -
 85
85 -
86
-
87
-
88
-
89
-
90
-
91
-
92
-
93
-
94
-
95
-
96
-
97
-
98
-
99
-
100
-
101
-
102
-
103
-
104
-
105
-
106
-
107
-
108
-
109
-
110
-
111
-
112
-
113
-
114
-
115
-
116
-
117
-
118
-
119
-
120
-
121
-
122
-
123
-
124
-
125
-
126
-
127
-
128
-
129
-
130
-
131
-
132
-
133
-
134
-
135
-
136
-
137
-
138
-
139
-
140
-
141
-
142
-
143
-
144
-
145
-
146
-
147
-
148
-
149
-
150
-
151
-
152
-
153
-
154
-
155
-
156
-
157
-
158
-
159
-
160
-
161
-
162
-
163
-
164
-
165
-
166
-
167
-
168
-
169
-
170
-
171
-
172
-
173
-
174
-
175
-
176
-
177
-
178
-
179
-
180
-
181
 |
 |