HP Xw460c HP Insight Control Environment User Guide - Page 81
Customizing vulnerability scan definitions, Deleting scan results, Deleting scan results by scan name
 |
View all HP Xw460c manuals
Add to My Manuals
Save this manual to your list of manuals |
Page 81 highlights
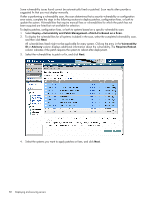
Results for all scans performed on the selected system appear. 4. Select the scan results to view, and click View. Customizing vulnerability scan definitions You can create custom scans from the default system scans. Custom scans are updated automatically with the corresponding vulnerability updates when the default system scans are updated. To customize the provided vulnerability scans or previously created custom vulnerability scans: 1. Select Diagnose→Vulnerability and Patch Management→Customize Scan. 2. Select a default system scan or a previously created custom scan to modify, and then click Edit. A list of vulnerabilities appears. Clicking the entry in either the Vulnerability ID or Advisory column displays additional information about the vulnerability. 3. Select one or more vulnerabilities to include in the custom scan definition. 4. Enter a name and description for the new customized scan, and click Save. You must rename the customized vulnerability scan. You cannot save a modified default Vulnerability and Patch Management scan using the original scan name. You can delete only custom vulnerability scans. You cannot delete the default system scans provided with VPM. To delete a customized scan: 1. Select Diagnose→Vulnerability and Patch Management→Customize Scan. 2. Select the custom vulnerability scan to delete, and click Delete. 3. To confirm the deletion, click OK when prompted. Deleting scan results Vulnerability and Patch Management scan results can be deleted for a specified scan or for an individual system. Removing results breaks the links to the results in the events and the system list. Run another scan to create new results for the system. Deleting scan results by scan name 1. Select Diagnose→Vulnerability and Patch Management→Scan→View Results by Scan Name. 2. Select the appropriate scan or scans, and then click Delete. All results associated with the selected scan are deleted. Deleting scan results by system 1. Select Diagnose→Vulnerability and Patch Management→Scan→View Results by System. 2. Select the individual system for which you want to delete the results from, and then click Apply. 3. Verify that the correct target systems appear in the lists. To reselect target systems, click Add Targets or Remove Targets, and then click Next. 4. Results from all scans performed on the selected system appear. Select the scan results to delete, and then click Delete. Deploying patches and fixes The following sections describe deploying HP Vulnerability and Patch Management Pack patches and fixes. Deploying patches and fixes based on a vulnerability scan You can deploy patch and configuration fixes immediately or schedule them for deployment later. You can select patches individually from the database for deployment to all systems or any combination of specified systems without performing a scan, or deploy patches and fixes for all vulnerabilities identified in a particular scan. Patches that come from software vendors can update existing software, registry, or configuration settings or files. Configuration fixes resolve incorrect system settings that can leave the system open to security threats, such as open ports or services running that are not required. Vulnerability scanning and deploying patches and fixes 81
-
 1
1 -
2
-
3
-
4
-
5
-
6
-
7
-
8
-
9
-
10
-
11
-
12
-
13
-
14
-
15
-
16
-
17
-
18
-
19
-
20
-
21
-
22
-
23
-
24
-
25
-
26
-
27
-
28
-
29
-
30
-
31
-
32
-
33
-
34
-
35
-
36
-
37
-
38
-
39
-
40
-
41
-
42
-
43
-
44
-
45
-
46
-
47
-
48
-
49
-
50
-
51
-
52
-
53
-
54
-
55
-
56
-
57
-
58
-
59
-
60
-
61
-
62
-
63
-
64
-
65
-
66
-
67
-
68
-
69
-
70
-
71
-
72
-
73
-
74
-
75
-
 76
76 -
 77
77 -
 78
78 -
 79
79 -
 80
80 -
 81
81 -
 82
82 -
 83
83 -
 84
84 -
 85
85 -
 86
86 -
87
-
88
-
89
-
90
-
91
-
92
-
93
-
94
-
95
-
96
-
97
-
98
-
99
-
100
-
101
-
102
-
103
-
104
-
105
-
106
-
107
-
108
-
109
-
110
-
111
-
112
-
113
-
114
-
115
-
116
-
117
-
118
-
119
-
120
-
121
-
122
-
123
-
124
-
125
-
126
-
127
-
128
-
129
-
130
-
131
-
132
-
133
-
134
-
135
-
136
-
137
-
138
-
139
-
140
-
141
-
142
-
143
-
144
-
145
-
146
-
147
-
148
-
149
-
150
-
151
-
152
-
153
-
154
-
155
-
156
-
157
-
158
-
159
-
160
-
161
-
162
-
163
-
164
-
165
-
166
-
167
-
168
-
169
-
170
-
171
-
172
-
173
-
174
-
175
-
176
-
177
-
178
-
179
-
180
-
181
 |
 |