Pioneer AVIC-5100NEX Owner's Manual - Page 119
Using the touch panel keys, Reading the screen, Starting procedure, Playing compressed still image
 |
View all Pioneer AVIC-5100NEX manuals
Add to My Manuals
Save this manual to your list of manuals |
Page 119 highlights
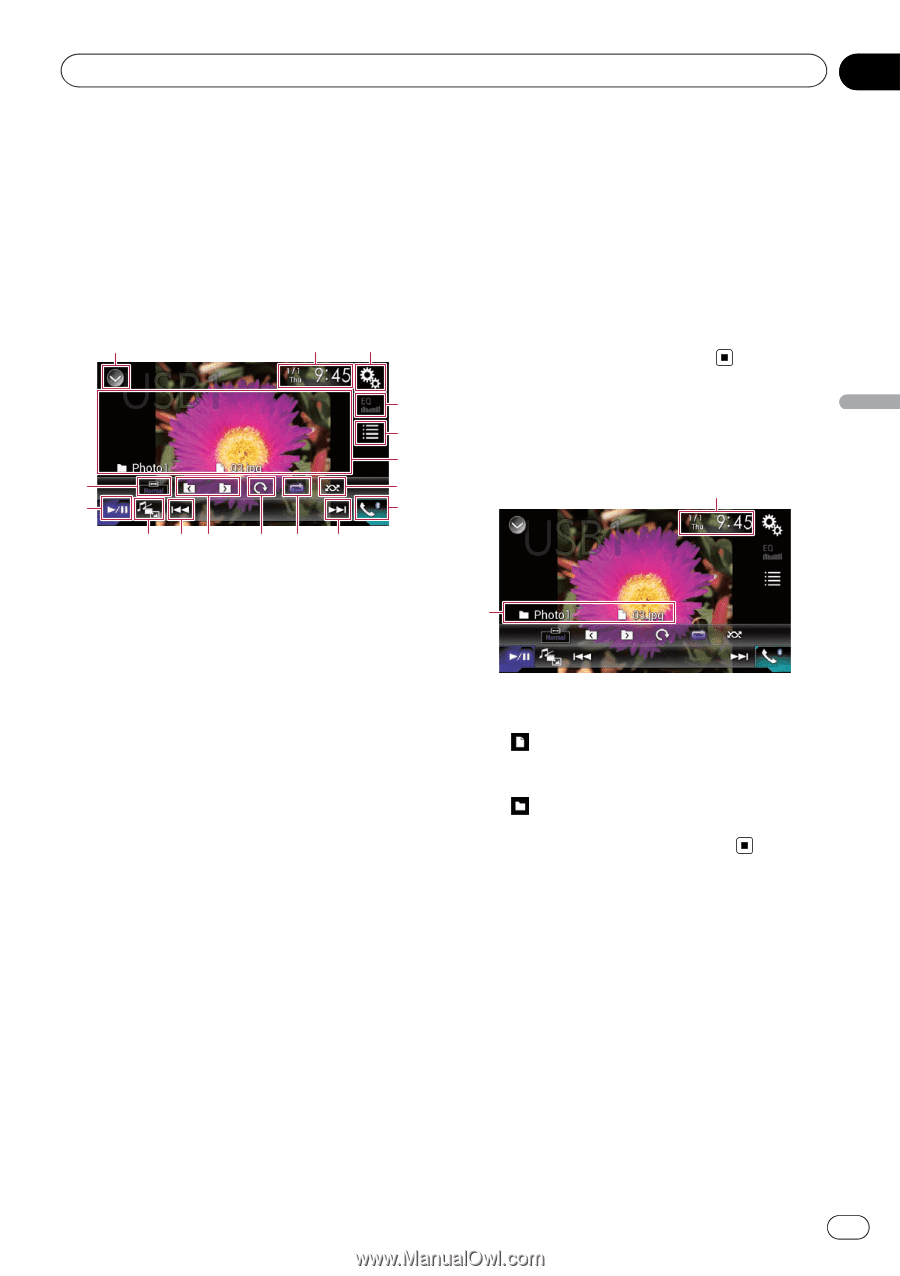
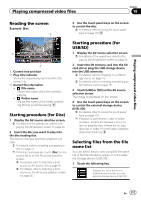
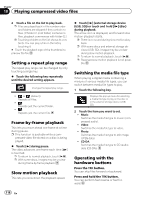
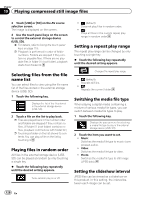
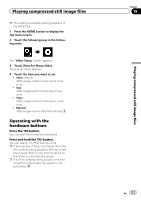
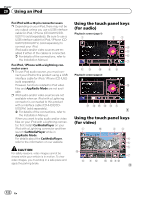
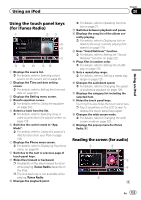
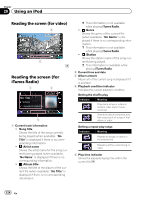
Playing compressed still image files Chapter 19 Playing compressed still image files You can view still images (JPEG images) stored in an external storage device (USB, SD) using the built-in drive of this product. This section describes how. Using the touch panel keys Example: USB 1 23 4 5 6 f 7 e 8 d 9c b a 9 1 Displays the source list. = For details, refer to Selecting a front source on the source list on page 25. 2 Displays the Time and date setting screen. = For details, refer to Setting the time and date on page 221. 3 Displays the Setting menu screen. 4 Recalls equalizer curves. p This key is not available while you are viewing still images stored in an external storage device (USB, SD). 5 Selects a file from the list. = For details, refer to Selecting files from the file name list on page 120. 6 Hides the touch panel keys. Touching this area hides the touch panel keys. p Touch anywhere on the LCD screen to display the touch panel keys again. 7 Plays files in random order. = For details, refer to Playing files in random order on page 120. 8 Displays the Phone menu screen. = For details, refer to Displaying the phone menu on page 80. 9 Skips files forward or backward. a Sets a repeat play range. = For details, refer to Setting a repeat play range on page 120. b Rotates the displayed picture 90° clockwise. c Selects the previous folder or the next folder. d Switches the media file type. = For details, refer to Switching the media file type on page 120. e Switches between playback and pause. f Changes the wide screen mode. = For details, refer to Changing the wide screen mode on page 223. Reading the screen Example: USB 1 2 1 Current time and date 2 Current file information ! : File name Shows the name of the file currently playing. ! : Folder name Shows the name of the folder containing the file currently playing. Starting procedure 1 Display the AV source selection screen. = For details of the operations, refer to Displaying the AV operation screen on page 24. 2 Insert the SD memory card into the SD card slot or plug the USB storage device into the USB connector. = For details, refer to Plugging in a USB storage device on page 19. = For details, refer to Inserting and ejecting an SD memory card on page 18. En 119
-
 1
1 -
2
-
3
-
4
-
5
-
6
-
7
-
8
-
9
-
10
-
11
-
12
-
13
-
14
-
15
-
16
-
17
-
18
-
19
-
20
-
21
-
22
-
23
-
24
-
25
-
26
-
27
-
28
-
29
-
30
-
31
-
32
-
33
-
34
-
35
-
36
-
37
-
38
-
39
-
40
-
41
-
42
-
43
-
44
-
45
-
46
-
47
-
48
-
49
-
50
-
51
-
52
-
53
-
54
-
55
-
56
-
57
-
58
-
59
-
60
-
61
-
62
-
63
-
64
-
65
-
66
-
67
-
68
-
69
-
70
-
71
-
72
-
73
-
74
-
75
-
76
-
77
-
78
-
79
-
80
-
81
-
82
-
83
-
84
-
85
-
86
-
87
-
88
-
89
-
90
-
91
-
92
-
93
-
94
-
95
-
96
-
97
-
98
-
99
-
100
-
101
-
102
-
103
-
104
-
105
-
106
-
107
-
108
-
109
-
110
-
111
-
112
-
113
-
 114
114 -
 115
115 -
 116
116 -
 117
117 -
 118
118 -
 119
119 -
 120
120 -
 121
121 -
 122
122 -
 123
123 -
 124
124 -
125
-
126
-
127
-
128
-
129
-
130
-
131
-
132
-
133
-
134
-
135
-
136
-
137
-
138
-
139
-
140
-
141
-
142
-
143
-
144
-
145
-
146
-
147
-
148
-
149
-
150
-
151
-
152
-
153
-
154
-
155
-
156
-
157
-
158
-
159
-
160
-
161
-
162
-
163
-
164
-
165
-
166
-
167
-
168
-
169
-
170
-
171
-
172
-
173
-
174
-
175
-
176
-
177
-
178
-
179
-
180
-
181
-
182
-
183
-
184
-
185
-
186
-
187
-
188
-
189
-
190
-
191
-
192
-
193
-
194
-
195
-
196
-
197
-
198
-
199
-
200
-
201
-
202
-
203
-
204
-
205
-
206
-
207
-
208
-
209
-
210
-
211
-
212
-
213
-
214
-
215
-
216
-
217
-
218
-
219
-
220
-
221
-
222
-
223
-
224
-
225
-
226
-
227
-
228
-
229
-
230
-
231
-
232
-
233
-
234
-
235
-
236
-
237
-
238
-
239
-
240
-
241
-
242
-
243
-
244
-
245
-
246
-
247
-
248
-
249
-
250
-
251
-
252
-
253
-
254
-
255
-
256
-
257
-
258
-
259
-
260
-
261
-
262
-
263
-
264
 |
 |