Pioneer AVIC-5100NEX Owner's Manual - Page 29
Operating the Navigation, menu screen, How to use the Navigation menu screen
 |
View all Pioneer AVIC-5100NEX manuals
Add to My Manuals
Save this manual to your list of manuals |
Page 29 highlights
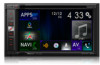
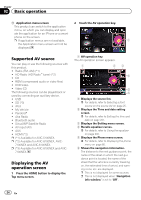
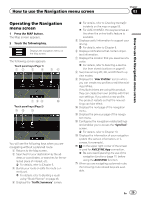
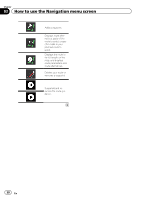
How to use the Navigation menu screen Chapter 03 How to use the Navigation menu screen Operating the Navigation menu screen 1 Press the MAP button. The Map screen appears. 2 Touch the following key. Displays the navigation menu on the Map screen. The following screen appears. Touch panel keys (Page 1) 12 3 4 56 789 a Touch panel keys (Page 2) bc d You will see the following keys when you are navigating without a planned route. 1 Returns to the Map screen. 2 Searches for your destination by the ad- dress or coordinates, or searches for the selected place of interest, etc. = For details, refer to Chapter 5. 3 Builds your route or edits the route currently set. = For details, refer to Building a route using "Route Planner" on page 46. 4 Displays the "Traffic Summary" screen. = For details, refer to Checking the traffic incidents on the map on page 55. p For AVIC-5100NEX, this key becomes active when the online traffic feature is available. 5 Displays useful information to support your driving. = For details, refer to Chapter 9. 6 Displays notifications that contain important information. 7 Displays the location that you saved as a favorite. = For details, refer to Selecting a destination from stored locations on page 41. 8 Switches among 2D, 3D, and 2D North up view modes. 9 Displays the "User Profiles" screen where you can create new profiles or edit the existing profiles. If multiple drivers are using this product, they can create their own profiles with their own settings. If you select a new profile, this product restarts so that the new settings can take effect. a Displays the next page of the navigation menu. b Displays the previous page of the navigation menu. c Configures the navigation-related settings and enables you to access the "SyncTool" screen. = For details, refer to Chapter 10. d Displays the information of your navigation system (the version information, or licenses, for example). p on the upper right corner of the screen is used for AVICSYNC App connection. = Be sure read Expanding the use of the navigation functions (page 71) before using the AVICSYNC function. p When you are navigating a planned route, the following route-related keys are available. En 29
-
 1
1 -
2
-
3
-
4
-
5
-
6
-
7
-
8
-
9
-
10
-
11
-
12
-
13
-
14
-
15
-
16
-
17
-
18
-
19
-
20
-
21
-
22
-
23
-
 24
24 -
 25
25 -
 26
26 -
 27
27 -
 28
28 -
 29
29 -
 30
30 -
 31
31 -
 32
32 -
 33
33 -
 34
34 -
35
-
36
-
37
-
38
-
39
-
40
-
41
-
42
-
43
-
44
-
45
-
46
-
47
-
48
-
49
-
50
-
51
-
52
-
53
-
54
-
55
-
56
-
57
-
58
-
59
-
60
-
61
-
62
-
63
-
64
-
65
-
66
-
67
-
68
-
69
-
70
-
71
-
72
-
73
-
74
-
75
-
76
-
77
-
78
-
79
-
80
-
81
-
82
-
83
-
84
-
85
-
86
-
87
-
88
-
89
-
90
-
91
-
92
-
93
-
94
-
95
-
96
-
97
-
98
-
99
-
100
-
101
-
102
-
103
-
104
-
105
-
106
-
107
-
108
-
109
-
110
-
111
-
112
-
113
-
114
-
115
-
116
-
117
-
118
-
119
-
120
-
121
-
122
-
123
-
124
-
125
-
126
-
127
-
128
-
129
-
130
-
131
-
132
-
133
-
134
-
135
-
136
-
137
-
138
-
139
-
140
-
141
-
142
-
143
-
144
-
145
-
146
-
147
-
148
-
149
-
150
-
151
-
152
-
153
-
154
-
155
-
156
-
157
-
158
-
159
-
160
-
161
-
162
-
163
-
164
-
165
-
166
-
167
-
168
-
169
-
170
-
171
-
172
-
173
-
174
-
175
-
176
-
177
-
178
-
179
-
180
-
181
-
182
-
183
-
184
-
185
-
186
-
187
-
188
-
189
-
190
-
191
-
192
-
193
-
194
-
195
-
196
-
197
-
198
-
199
-
200
-
201
-
202
-
203
-
204
-
205
-
206
-
207
-
208
-
209
-
210
-
211
-
212
-
213
-
214
-
215
-
216
-
217
-
218
-
219
-
220
-
221
-
222
-
223
-
224
-
225
-
226
-
227
-
228
-
229
-
230
-
231
-
232
-
233
-
234
-
235
-
236
-
237
-
238
-
239
-
240
-
241
-
242
-
243
-
244
-
245
-
246
-
247
-
248
-
249
-
250
-
251
-
252
-
253
-
254
-
255
-
256
-
257
-
258
-
259
-
260
-
261
-
262
-
263
-
264
 |
 |