Pioneer AVIC-5100NEX Owner's Manual - Page 190
Displaying the firmware, version, Updating firmware, System settings
 |
View all Pioneer AVIC-5100NEX manuals
Add to My Manuals
Save this manual to your list of manuals |
Page 190 highlights
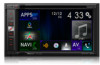
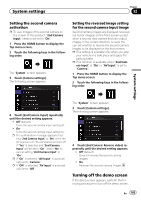
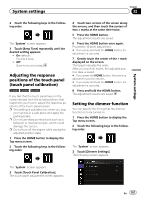
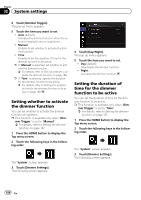
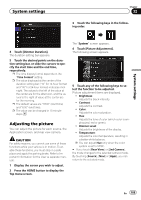
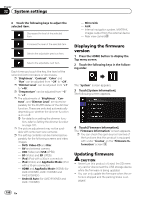
Chapter 32 System settings 6 Touch the following keys to adjust the selected item. Decreases the level of the selected item. - MirrorLink - AUX - Internal navigation system, MIXTRAX, images output from the external device - Rear view camera Increases the level of the selected item. Selects the adjustable previous item. Selects the adjustable next item. Each time you touch the key, the level of the selected item increases or decreases. p "Brightness", "Contrast", "Color" and "Hue" can be adjusted from "-24" to "+24". p "Dimmer Level" can be adjusted from "+1" to "+48". p "Temperature" can be adjusted from "-3" to "+3". p The adjustments of "Brightness", "Contrast", and "Dimmer Level" are stored separately for the On/Off status of the dimmer function. These are switched automatically depending on whether the dimmer function is on or off. = For details on setting the dimmer function, refer to Setting the dimmer function on page 187. p The picture adjustment may not be available with some rear view cameras. p The setting contents can be memorized separately for the following screens and video images. - DVD, Video-CD and Disc - AV and external camera - USB (Video) and USB (JPEG) - SD (Video) and SD (JPEG) - iPod (iPod with a 30-pin connector) - iPod (Video) and AppRadio Mode (iPod with a 30-pin connector) - HDMI and AppRadio Mode (HDMI) (for AVIC-8100NEX, AVIC-7100NEX and AVIC-6100NEX) - Android Auto (for AVIC-8100NEX and AVIC-7100NEX) Displaying the firmware version 1 Press the HOME button to display the Top menu screen. 2 Touch the following keys in the following order. The "System" screen appears. 3 Touch [System Information]. The following screen appears. 4 Touch [Firmware Information]. The "Firmware Information" screen appears. p You can check the open source licenses of the functions that this product is equipped with under "License" on the "Firmware Information" screen. Updating firmware CAUTION ! Never turn this product off, eject the SD mem- ory card or disconnect the USB storage device while the firmware is being updated. ! You can only update the firmware when the vehicle is stopped and the parking brake is engaged. 190 En
-
 1
1 -
2
-
3
-
4
-
5
-
6
-
7
-
8
-
9
-
10
-
11
-
12
-
13
-
14
-
15
-
16
-
17
-
18
-
19
-
20
-
21
-
22
-
23
-
24
-
25
-
26
-
27
-
28
-
29
-
30
-
31
-
32
-
33
-
34
-
35
-
36
-
37
-
38
-
39
-
40
-
41
-
42
-
43
-
44
-
45
-
46
-
47
-
48
-
49
-
50
-
51
-
52
-
53
-
54
-
55
-
56
-
57
-
58
-
59
-
60
-
61
-
62
-
63
-
64
-
65
-
66
-
67
-
68
-
69
-
70
-
71
-
72
-
73
-
74
-
75
-
76
-
77
-
78
-
79
-
80
-
81
-
82
-
83
-
84
-
85
-
86
-
87
-
88
-
89
-
90
-
91
-
92
-
93
-
94
-
95
-
96
-
97
-
98
-
99
-
100
-
101
-
102
-
103
-
104
-
105
-
106
-
107
-
108
-
109
-
110
-
111
-
112
-
113
-
114
-
115
-
116
-
117
-
118
-
119
-
120
-
121
-
122
-
123
-
124
-
125
-
126
-
127
-
128
-
129
-
130
-
131
-
132
-
133
-
134
-
135
-
136
-
137
-
138
-
139
-
140
-
141
-
142
-
143
-
144
-
145
-
146
-
147
-
148
-
149
-
150
-
151
-
152
-
153
-
154
-
155
-
156
-
157
-
158
-
159
-
160
-
161
-
162
-
163
-
164
-
165
-
166
-
167
-
168
-
169
-
170
-
171
-
172
-
173
-
174
-
175
-
176
-
177
-
178
-
179
-
180
-
181
-
182
-
183
-
184
-
 185
185 -
 186
186 -
 187
187 -
 188
188 -
 189
189 -
 190
190 -
 191
191 -
 192
192 -
 193
193 -
 194
194 -
 195
195 -
196
-
197
-
198
-
199
-
200
-
201
-
202
-
203
-
204
-
205
-
206
-
207
-
208
-
209
-
210
-
211
-
212
-
213
-
214
-
215
-
216
-
217
-
218
-
219
-
220
-
221
-
222
-
223
-
224
-
225
-
226
-
227
-
228
-
229
-
230
-
231
-
232
-
233
-
234
-
235
-
236
-
237
-
238
-
239
-
240
-
241
-
242
-
243
-
244
-
245
-
246
-
247
-
248
-
249
-
250
-
251
-
252
-
253
-
254
-
255
-
256
-
257
-
258
-
259
-
260
-
261
-
262
-
263
-
264
 |
 |