Pioneer AVIC-5100NEX Owner's Manual - Page 13
Checking part names and, functions, Basic operation - reset
 |
View all Pioneer AVIC-5100NEX manuals
Add to My Manuals
Save this manual to your list of manuals |
Page 13 highlights
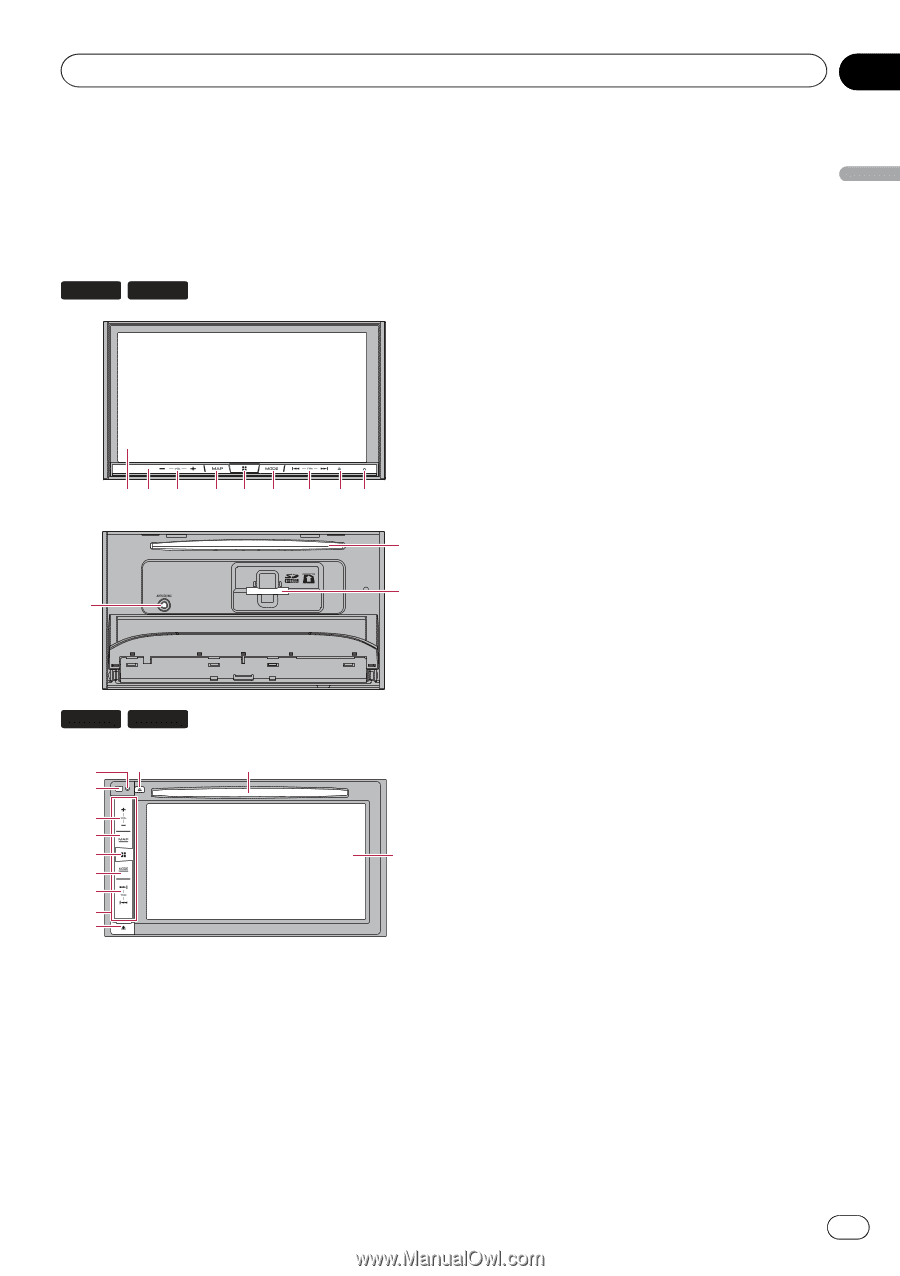
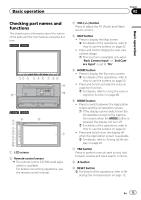
Basic operation Chapter 02 Basic operation Checking part names and functions This chapter gives information about the names of the parts and the main features using the buttons. 8100NEX 7100NEX 12 3 4 5 6 7 8 9 b c a 6100NEX 5100NEX 9 8 b 2 3 4 5 1 6 7 d e 1 LCD screen 2 Remote control sensor p The remote control CD-R33 (sold separately) is available. For details concerning operations, see the remote control manual. 3 VOL (+/-) button Press to adjust the AV (Audio and Video) source volume. 4 MAP button ! Press to display the Map screen. = For details of the operations, refer to How to use the screens on page 22. ! Press and hold to display the rear view camera image. p This function is available only when "Back Camera Input" or "2nd Camera Input" is set to "On". 5 HOME button ! Press to display the Top menu screen. = For details of the operations, refer to How to use the screens on page 22. ! Press and hold to activate the voice recognition function. = For details, refer to Using the voice recognition function on page 86. 6 MODE button ! Press to switch between the Application screen and the AV operation screen. p If the display cannot switch from the AV operation screen to the Application screen when the MODE button is pressed, the display will turn off. = For details of the operations, refer to How to use the screens on page 22. ! Press and hold to turn the display off when the Application screen is available. = For details, refer to Turning off the display on page 20. 7 TRK button Press to perform manual seek tuning, fast forward, reverse and track search controls. 8 h button 9 RESET button = For details of the operations, refer to Resetting the microprocessor on page 12. En 13
-
 1
1 -
2
-
3
-
4
-
5
-
6
-
7
-
 8
8 -
 9
9 -
 10
10 -
 11
11 -
 12
12 -
 13
13 -
 14
14 -
 15
15 -
 16
16 -
 17
17 -
 18
18 -
19
-
20
-
21
-
22
-
23
-
24
-
25
-
26
-
27
-
28
-
29
-
30
-
31
-
32
-
33
-
34
-
35
-
36
-
37
-
38
-
39
-
40
-
41
-
42
-
43
-
44
-
45
-
46
-
47
-
48
-
49
-
50
-
51
-
52
-
53
-
54
-
55
-
56
-
57
-
58
-
59
-
60
-
61
-
62
-
63
-
64
-
65
-
66
-
67
-
68
-
69
-
70
-
71
-
72
-
73
-
74
-
75
-
76
-
77
-
78
-
79
-
80
-
81
-
82
-
83
-
84
-
85
-
86
-
87
-
88
-
89
-
90
-
91
-
92
-
93
-
94
-
95
-
96
-
97
-
98
-
99
-
100
-
101
-
102
-
103
-
104
-
105
-
106
-
107
-
108
-
109
-
110
-
111
-
112
-
113
-
114
-
115
-
116
-
117
-
118
-
119
-
120
-
121
-
122
-
123
-
124
-
125
-
126
-
127
-
128
-
129
-
130
-
131
-
132
-
133
-
134
-
135
-
136
-
137
-
138
-
139
-
140
-
141
-
142
-
143
-
144
-
145
-
146
-
147
-
148
-
149
-
150
-
151
-
152
-
153
-
154
-
155
-
156
-
157
-
158
-
159
-
160
-
161
-
162
-
163
-
164
-
165
-
166
-
167
-
168
-
169
-
170
-
171
-
172
-
173
-
174
-
175
-
176
-
177
-
178
-
179
-
180
-
181
-
182
-
183
-
184
-
185
-
186
-
187
-
188
-
189
-
190
-
191
-
192
-
193
-
194
-
195
-
196
-
197
-
198
-
199
-
200
-
201
-
202
-
203
-
204
-
205
-
206
-
207
-
208
-
209
-
210
-
211
-
212
-
213
-
214
-
215
-
216
-
217
-
218
-
219
-
220
-
221
-
222
-
223
-
224
-
225
-
226
-
227
-
228
-
229
-
230
-
231
-
232
-
233
-
234
-
235
-
236
-
237
-
238
-
239
-
240
-
241
-
242
-
243
-
244
-
245
-
246
-
247
-
248
-
249
-
250
-
251
-
252
-
253
-
254
-
255
-
256
-
257
-
258
-
259
-
260
-
261
-
262
-
263
-
264
 |
 |