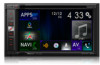
Pioneer AVIC-5100NEX Owner's Manual - Page 41
Selecting a destination, from stored locations, from stored routes, Searching for a destination
 |
View all Pioneer AVIC-5100NEX manuals
Add to My Manuals
Save this manual to your list of manuals |
Page 41 highlights
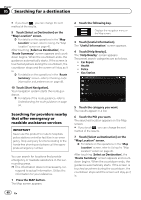
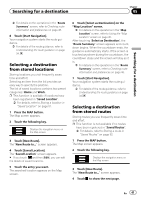
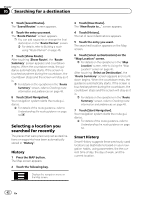
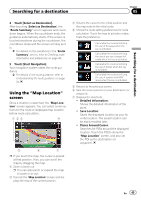
Searching for a destination Chapter 05 Searching for a destination = For details on the operations in the "Route Summary" screen, refer to Checking route information and preferences on page 48. 8 Touch [Start Navigation]. Your navigation system starts the route guidance. = For details of the route guidance, refer to Understanding the route guidance on page 34. Selecting a destination from stored locations Storing locations you visit frequently saves time and effort. Selecting an item from the list provides an easy way to specify the position. The list of saved locations contains two preset categories: Home and Work. p This function is available if locations have been registered in "Saved Location". = For details, refer to Storing a location in "Saved Location" on page 51. 1 Press the MAP button. The Map screen appears. 2 Touch the following key. Displays the navigation menu on the Map screen. 3 Touch [New Route]. The "New Route to..." screen appears. 4 Touch [Saved Location]. The "Saved Location" screen appears. # If you touch and then [Edit], you can edit the details of saved locations. 5 Touch the entry you want. The searched location appears on the Map screen. 6 Touch [Select as Destination] on the "Map Location" screen. = For details on the operations in the "Map Location" screen, refer to Using the "Map Location" screen on page 45. After touching [Select as Destination], the "Route Summary" screen appears and countdown begins. When the countdown ends, the guidance automatically starts. If the screen is touched anywhere during the countdown, the countdown stops and the screen will stay as it is. = For details on the operations in the "Route Summary" screen, refer to Checking route information and preferences on page 48. 7 Touch [Start Navigation]. Your navigation system starts the route guidance. = For details of the route guidance, refer to Understanding the route guidance on page 34. Selecting a destination from stored routes Storing routes you use frequently saves time and effort. p This function is not available if no routes have been registered in "Saved Routes". = For details, refer to Storing a route in "Saved Routes" on page 52. 1 Press the MAP button. The Map screen appears. 2 Touch the following key. Displays the navigation menu on the Map screen. 3 Touch [New Route]. The "New Route to..." screen appears. 4 Touch to show the next page. En 41
-
 1
1 -
2
-
3
-
4
-
5
-
6
-
7
-
8
-
9
-
10
-
11
-
12
-
13
-
14
-
15
-
16
-
17
-
18
-
19
-
20
-
21
-
22
-
23
-
24
-
25
-
26
-
27
-
28
-
29
-
30
-
31
-
32
-
33
-
34
-
35
-
 36
36 -
 37
37 -
 38
38 -
 39
39 -
 40
40 -
 41
41 -
 42
42 -
 43
43 -
 44
44 -
 45
45 -
 46
46 -
47
-
48
-
49
-
50
-
51
-
52
-
53
-
54
-
55
-
56
-
57
-
58
-
59
-
60
-
61
-
62
-
63
-
64
-
65
-
66
-
67
-
68
-
69
-
70
-
71
-
72
-
73
-
74
-
75
-
76
-
77
-
78
-
79
-
80
-
81
-
82
-
83
-
84
-
85
-
86
-
87
-
88
-
89
-
90
-
91
-
92
-
93
-
94
-
95
-
96
-
97
-
98
-
99
-
100
-
101
-
102
-
103
-
104
-
105
-
106
-
107
-
108
-
109
-
110
-
111
-
112
-
113
-
114
-
115
-
116
-
117
-
118
-
119
-
120
-
121
-
122
-
123
-
124
-
125
-
126
-
127
-
128
-
129
-
130
-
131
-
132
-
133
-
134
-
135
-
136
-
137
-
138
-
139
-
140
-
141
-
142
-
143
-
144
-
145
-
146
-
147
-
148
-
149
-
150
-
151
-
152
-
153
-
154
-
155
-
156
-
157
-
158
-
159
-
160
-
161
-
162
-
163
-
164
-
165
-
166
-
167
-
168
-
169
-
170
-
171
-
172
-
173
-
174
-
175
-
176
-
177
-
178
-
179
-
180
-
181
-
182
-
183
-
184
-
185
-
186
-
187
-
188
-
189
-
190
-
191
-
192
-
193
-
194
-
195
-
196
-
197
-
198
-
199
-
200
-
201
-
202
-
203
-
204
-
205
-
206
-
207
-
208
-
209
-
210
-
211
-
212
-
213
-
214
-
215
-
216
-
217
-
218
-
219
-
220
-
221
-
222
-
223
-
224
-
225
-
226
-
227
-
228
-
229
-
230
-
231
-
232
-
233
-
234
-
235
-
236
-
237
-
238
-
239
-
240
-
241
-
242
-
243
-
244
-
245
-
246
-
247
-
248
-
249
-
250
-
251
-
252
-
253
-
254
-
255
-
256
-
257
-
258
-
259
-
260
-
261
-
262
-
263
-
264
 |
 |
