Pioneer AVIC-5100NEX Owner's Manual - Page 40
Searching for providers nearby, that offer emergency or, roadside assistance services
 |
View all Pioneer AVIC-5100NEX manuals
Add to My Manuals
Save this manual to your list of manuals |
Page 40 highlights
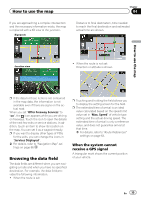
Chapter 05 Searching for a destination # If you touch , you can change the sort method of the results. 9 Touch [Select as Destination] on the "Map Location" screen. = For details on the operations in the "Map Location" screen, refer to Using the "Map Location" screen on page 45. After touching [Select as Destination], the "Route Summary" screen appears and countdown begins. When the countdown ends, the guidance automatically starts. If the screen is touched anywhere during the countdown, the countdown stops and the screen will stay as it is. = For details on the operations in the "Route Summary" screen, refer to Checking route information and preferences on page 48. 10 Touch [Start Navigation]. Your navigation system starts the route guidance. = For details of the route guidance, refer to Understanding the route guidance on page 34. Searching for providers nearby that offer emergency or roadside assistance services IMPORTANT Never use this product to route to hospitals, police stations or similar facilities in an emergency. Stop using any functions relating to the hands-free phoning and please call the appropriate emergency number. You can search for locations that provide emergency or roadside assistance in the surrounding areas. p This information does not necessarily cor- respond to actual information. Utilize the information for your reference. 1 Press the MAP button. The Map screen appears. 2 Touch the following key. Displays the navigation menu on the Map screen. 3 Touch [Useful Information]. The "Useful Information" screen appears. 4 Touch [Help Nearby]. The "Help Nearby" screen appears. The preset search categories are as follows. ! Car Repair ! Health ! Police ! Gas Station 5 Touch the category you want. The results appear in a list. 6 Touch the POI you want. The searched location appears on the Map screen. # If you touch , you can change the sort method of the results. 7 Touch [Select as Destination] on the "Map Location" screen. = For details on the operations in the "Map Location" screen, refer to Using the "Map Location" screen on page 45. After touching [Select as Destination], the "Route Summary" screen appears and countdown begins. When the countdown ends, the guidance automatically starts. If the screen is touched anywhere during the countdown, the countdown stops and the screen will stay as it is. 40 En
-
 1
1 -
2
-
3
-
4
-
5
-
6
-
7
-
8
-
9
-
10
-
11
-
12
-
13
-
14
-
15
-
16
-
17
-
18
-
19
-
20
-
21
-
22
-
23
-
24
-
25
-
26
-
27
-
28
-
29
-
30
-
31
-
32
-
33
-
34
-
 35
35 -
 36
36 -
 37
37 -
 38
38 -
 39
39 -
 40
40 -
 41
41 -
 42
42 -
 43
43 -
 44
44 -
 45
45 -
46
-
47
-
48
-
49
-
50
-
51
-
52
-
53
-
54
-
55
-
56
-
57
-
58
-
59
-
60
-
61
-
62
-
63
-
64
-
65
-
66
-
67
-
68
-
69
-
70
-
71
-
72
-
73
-
74
-
75
-
76
-
77
-
78
-
79
-
80
-
81
-
82
-
83
-
84
-
85
-
86
-
87
-
88
-
89
-
90
-
91
-
92
-
93
-
94
-
95
-
96
-
97
-
98
-
99
-
100
-
101
-
102
-
103
-
104
-
105
-
106
-
107
-
108
-
109
-
110
-
111
-
112
-
113
-
114
-
115
-
116
-
117
-
118
-
119
-
120
-
121
-
122
-
123
-
124
-
125
-
126
-
127
-
128
-
129
-
130
-
131
-
132
-
133
-
134
-
135
-
136
-
137
-
138
-
139
-
140
-
141
-
142
-
143
-
144
-
145
-
146
-
147
-
148
-
149
-
150
-
151
-
152
-
153
-
154
-
155
-
156
-
157
-
158
-
159
-
160
-
161
-
162
-
163
-
164
-
165
-
166
-
167
-
168
-
169
-
170
-
171
-
172
-
173
-
174
-
175
-
176
-
177
-
178
-
179
-
180
-
181
-
182
-
183
-
184
-
185
-
186
-
187
-
188
-
189
-
190
-
191
-
192
-
193
-
194
-
195
-
196
-
197
-
198
-
199
-
200
-
201
-
202
-
203
-
204
-
205
-
206
-
207
-
208
-
209
-
210
-
211
-
212
-
213
-
214
-
215
-
216
-
217
-
218
-
219
-
220
-
221
-
222
-
223
-
224
-
225
-
226
-
227
-
228
-
229
-
230
-
231
-
232
-
233
-
234
-
235
-
236
-
237
-
238
-
239
-
240
-
241
-
242
-
243
-
244
-
245
-
246
-
247
-
248
-
249
-
250
-
251
-
252
-
253
-
254
-
255
-
256
-
257
-
258
-
259
-
260
-
261
-
262
-
263
-
264
 |
 |