Pioneer AVIC-5100NEX Owner's Manual - Page 212
Theme menu
 |
View all Pioneer AVIC-5100NEX manuals
Add to My Manuals
Save this manual to your list of manuals |
Page 212 highlights
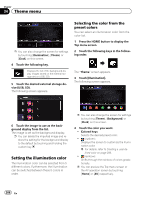
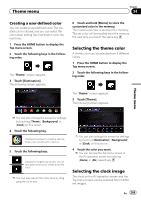
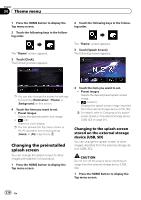
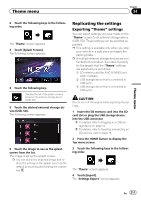
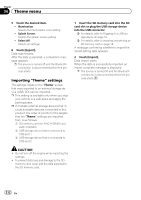
Chapter 34 Theme menu 5 Touch the desired item. ! Illumination: Selects the illumination color setting. ! Splash Screen: Selects the splash screen setting. ! Select All: Selects all settings. 6 Touch [Export]. Data export starts. After the data is exported, a completion message appears. p The source is turned off and the Bluetooth connection is disconnected before the process starts. Importing "Theme" settings The settings made on the "Theme" screen that were exported to an external storage device (USB, SD) can be imported. p This setting is available only when you stop your vehicle in a safe place and apply the parking brake. p If multiple external storage devices that include available data are connected to this product, the order of priority for the targets that the "Theme" settings are imported from is as follows: 1 SD memory card (for AVIC-8100NEX and AVIC-7100NEX) 2 USB storage device that is connected to USB port 1 3 USB storage device that is connected to USB port 2 1 Insert the SD memory card into the SD card slot or plug the USB storage device into the USB connector. = For details, refer to Plugging in a USB storage device on page 19. = For details, refer to Inserting and ejecting an SD memory card on page 18. A message confirming whether to import the stored setting data appears. 2 Touch [Import]. Data import starts. When the data is successfully imported, an import complete message is displayed. p The source is turned off and the Bluetooth connection is disconnected before the process starts. CAUTION ! Do not turn off the engine while importing the settings. ! To prevent data loss and damage to the SD memory card, never edit the data exported to the SD memory card. 212 En
-
 1
1 -
2
-
3
-
4
-
5
-
6
-
7
-
8
-
9
-
10
-
11
-
12
-
13
-
14
-
15
-
16
-
17
-
18
-
19
-
20
-
21
-
22
-
23
-
24
-
25
-
26
-
27
-
28
-
29
-
30
-
31
-
32
-
33
-
34
-
35
-
36
-
37
-
38
-
39
-
40
-
41
-
42
-
43
-
44
-
45
-
46
-
47
-
48
-
49
-
50
-
51
-
52
-
53
-
54
-
55
-
56
-
57
-
58
-
59
-
60
-
61
-
62
-
63
-
64
-
65
-
66
-
67
-
68
-
69
-
70
-
71
-
72
-
73
-
74
-
75
-
76
-
77
-
78
-
79
-
80
-
81
-
82
-
83
-
84
-
85
-
86
-
87
-
88
-
89
-
90
-
91
-
92
-
93
-
94
-
95
-
96
-
97
-
98
-
99
-
100
-
101
-
102
-
103
-
104
-
105
-
106
-
107
-
108
-
109
-
110
-
111
-
112
-
113
-
114
-
115
-
116
-
117
-
118
-
119
-
120
-
121
-
122
-
123
-
124
-
125
-
126
-
127
-
128
-
129
-
130
-
131
-
132
-
133
-
134
-
135
-
136
-
137
-
138
-
139
-
140
-
141
-
142
-
143
-
144
-
145
-
146
-
147
-
148
-
149
-
150
-
151
-
152
-
153
-
154
-
155
-
156
-
157
-
158
-
159
-
160
-
161
-
162
-
163
-
164
-
165
-
166
-
167
-
168
-
169
-
170
-
171
-
172
-
173
-
174
-
175
-
176
-
177
-
178
-
179
-
180
-
181
-
182
-
183
-
184
-
185
-
186
-
187
-
188
-
189
-
190
-
191
-
192
-
193
-
194
-
195
-
196
-
197
-
198
-
199
-
200
-
201
-
202
-
203
-
204
-
205
-
206
-
 207
207 -
 208
208 -
 209
209 -
 210
210 -
 211
211 -
 212
212 -
 213
213 -
 214
214 -
 215
215 -
 216
216 -
 217
217 -
218
-
219
-
220
-
221
-
222
-
223
-
224
-
225
-
226
-
227
-
228
-
229
-
230
-
231
-
232
-
233
-
234
-
235
-
236
-
237
-
238
-
239
-
240
-
241
-
242
-
243
-
244
-
245
-
246
-
247
-
248
-
249
-
250
-
251
-
252
-
253
-
254
-
255
-
256
-
257
-
258
-
259
-
260
-
261
-
262
-
263
-
264
 |
 |