Pioneer AVIC-5100NEX Owner's Manual - Page 59
Using the Trip Computer mode, Checking useful information about your trip
 |
View all Pioneer AVIC-5100NEX manuals
Add to My Manuals
Save this manual to your list of manuals |
Page 59 highlights
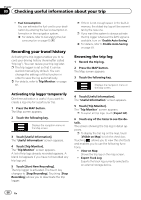
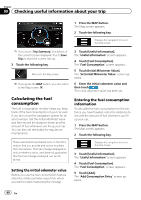
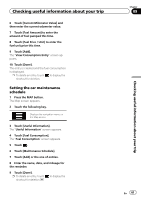
Checking useful information about your trip Chapter 09 Checking useful information about your trip Setting the trip logger 1 Record the trip log. 2 Press the MAP button. The Map screen appears. 3 Touch the following key. Displays the navigation menu on the Map screen. 4 Touch [Useful Information]. The "Useful Information" screen appears. 5 Touch [Trip Monitor]. The "Trip Monitor" screen appears. 6 Touch and then touch [Trip Monitor Settings]. The setting screen appears. 7 Touch any of the items to change the settings. ! Enable Auto-Saving: Sets whether automatic trip logging is activated or not. ! Save Track Log: Track logs, the sequence of the positions given by the GPS receiver, can be saved together with trip logs. You can activate the track logger whenever the trip logger is activated. p "Trip Database Size" indicates the current data size of the trip log (track log included). 3 Touch [Useful Information]. The "Useful Information" screen appears. 4 Touch [Trip Monitor]. The "Trip Monitor" screen appears. 5 Touch and then touch [Edit]. The "Select Trip to Edit" screen appears. 6 Touch any of the items to edit. ! Delete: Deletes the trip log. ! Rename: Renames the trip log. ! Change Color: Changes the color by selecting another color from the color table. p If you touch and then touch [Delete All], all entries can be deleted. 7 Touch [Done]. Using the Trip Computer mode In the trip computer screen, the information received from the GPS receiver and your vehicle is displayed like a meter for a vehicle. 1 Press the MAP button. The Map screen appears. 2 Touch the data field key. Editing a trip log 1 Press the MAP button. The Map screen appears. 2 Touch the following key. Displays the navigation menu on the Map screen. The "Trip Computer" screen appears. En 59
-
 1
1 -
2
-
3
-
4
-
5
-
6
-
7
-
8
-
9
-
10
-
11
-
12
-
13
-
14
-
15
-
16
-
17
-
18
-
19
-
20
-
21
-
22
-
23
-
24
-
25
-
26
-
27
-
28
-
29
-
30
-
31
-
32
-
33
-
34
-
35
-
36
-
37
-
38
-
39
-
40
-
41
-
42
-
43
-
44
-
45
-
46
-
47
-
48
-
49
-
50
-
51
-
52
-
53
-
 54
54 -
 55
55 -
 56
56 -
 57
57 -
 58
58 -
 59
59 -
 60
60 -
 61
61 -
 62
62 -
 63
63 -
 64
64 -
65
-
66
-
67
-
68
-
69
-
70
-
71
-
72
-
73
-
74
-
75
-
76
-
77
-
78
-
79
-
80
-
81
-
82
-
83
-
84
-
85
-
86
-
87
-
88
-
89
-
90
-
91
-
92
-
93
-
94
-
95
-
96
-
97
-
98
-
99
-
100
-
101
-
102
-
103
-
104
-
105
-
106
-
107
-
108
-
109
-
110
-
111
-
112
-
113
-
114
-
115
-
116
-
117
-
118
-
119
-
120
-
121
-
122
-
123
-
124
-
125
-
126
-
127
-
128
-
129
-
130
-
131
-
132
-
133
-
134
-
135
-
136
-
137
-
138
-
139
-
140
-
141
-
142
-
143
-
144
-
145
-
146
-
147
-
148
-
149
-
150
-
151
-
152
-
153
-
154
-
155
-
156
-
157
-
158
-
159
-
160
-
161
-
162
-
163
-
164
-
165
-
166
-
167
-
168
-
169
-
170
-
171
-
172
-
173
-
174
-
175
-
176
-
177
-
178
-
179
-
180
-
181
-
182
-
183
-
184
-
185
-
186
-
187
-
188
-
189
-
190
-
191
-
192
-
193
-
194
-
195
-
196
-
197
-
198
-
199
-
200
-
201
-
202
-
203
-
204
-
205
-
206
-
207
-
208
-
209
-
210
-
211
-
212
-
213
-
214
-
215
-
216
-
217
-
218
-
219
-
220
-
221
-
222
-
223
-
224
-
225
-
226
-
227
-
228
-
229
-
230
-
231
-
232
-
233
-
234
-
235
-
236
-
237
-
238
-
239
-
240
-
241
-
242
-
243
-
244
-
245
-
246
-
247
-
248
-
249
-
250
-
251
-
252
-
253
-
254
-
255
-
256
-
257
-
258
-
259
-
260
-
261
-
262
-
263
-
264
 |
 |