Pioneer AVIC-5100NEX Owner's Manual - Page 58
Recording your travel history, Checking useful information about your trip - review
 |
View all Pioneer AVIC-5100NEX manuals
Add to My Manuals
Save this manual to your list of manuals |
Page 58 highlights
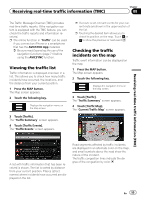
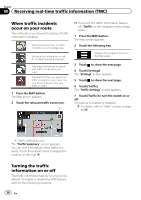
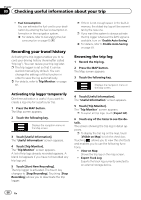
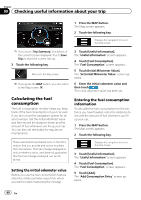
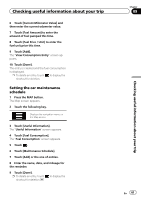
Chapter 09 Checking useful information about your trip ! Fuel Consumption: You can estimate the fuel cost to your destination by entering the fuel consumption information in the navigation system. = For details, refer to Calculating the fuel consumption on page 60. Recording your travel history Activating the trip logger enables you to record your driving history (hereinafter called "trip log"). You can review your trip log later. p The trip logger is set so that it can be started manually by default. You can change the settings of this function in order to save the log automatically. = For details, refer to Trip Monitor: on page 62. Activating trip logger temporarily One-time activation is useful if you want to create a log only for a particular trip. 1 Press the MAP button. The Map screen appears. 2 Touch the following key. Displays the navigation menu on the Map screen. 3 Touch [Useful Information]. The "Useful Information" screen appears. 4 Touch [Trip Monitor]. The "Trip Monitor" screen appears. A list of trip logs already recorded appears. A blank list appears if you have not recorded any trip logs yet. 5 Touch [Start New Recording]. The trip logger is activated. The touch key changes to [Stop Recording]. Touching [Stop Recording] allows you to deactivate the trip logger. p If there is not enough space in the built-in memory, the oldest trip log will be overwritten by the new one. p If you want the system to always activate the trip logger whenever the GPS signal is available, turn on "Enable Auto-Saving". = For details, refer to Enable Auto-Saving: on page 59. Browsing the trip log 1 Record the trip log. 2 Press the MAP button. The Map screen appears. 3 Touch the following key. Displays the navigation menu on the Map screen. 4 Touch [Useful Information]. The "Useful Information" screen appears. 5 Touch [Trip Monitor]. The "Trip Monitor" screen appears. p To export all trip logs, touch [Export All]. 6 Touch any of the items to see the details. The screen showing the trip log in detail appears. p To display the trip log on the map, touch [Visible on Map] to tick the check box. Touching allows you to view the shortcuts and enables you to use the following functions. ! View on Map Shows the trip log on the map screen. ! Export Track Log: Exports the track log currently selected to an external storage device. 58 En
-
 1
1 -
2
-
3
-
4
-
5
-
6
-
7
-
8
-
9
-
10
-
11
-
12
-
13
-
14
-
15
-
16
-
17
-
18
-
19
-
20
-
21
-
22
-
23
-
24
-
25
-
26
-
27
-
28
-
29
-
30
-
31
-
32
-
33
-
34
-
35
-
36
-
37
-
38
-
39
-
40
-
41
-
42
-
43
-
44
-
45
-
46
-
47
-
48
-
49
-
50
-
51
-
52
-
 53
53 -
 54
54 -
 55
55 -
 56
56 -
 57
57 -
 58
58 -
 59
59 -
 60
60 -
 61
61 -
 62
62 -
 63
63 -
64
-
65
-
66
-
67
-
68
-
69
-
70
-
71
-
72
-
73
-
74
-
75
-
76
-
77
-
78
-
79
-
80
-
81
-
82
-
83
-
84
-
85
-
86
-
87
-
88
-
89
-
90
-
91
-
92
-
93
-
94
-
95
-
96
-
97
-
98
-
99
-
100
-
101
-
102
-
103
-
104
-
105
-
106
-
107
-
108
-
109
-
110
-
111
-
112
-
113
-
114
-
115
-
116
-
117
-
118
-
119
-
120
-
121
-
122
-
123
-
124
-
125
-
126
-
127
-
128
-
129
-
130
-
131
-
132
-
133
-
134
-
135
-
136
-
137
-
138
-
139
-
140
-
141
-
142
-
143
-
144
-
145
-
146
-
147
-
148
-
149
-
150
-
151
-
152
-
153
-
154
-
155
-
156
-
157
-
158
-
159
-
160
-
161
-
162
-
163
-
164
-
165
-
166
-
167
-
168
-
169
-
170
-
171
-
172
-
173
-
174
-
175
-
176
-
177
-
178
-
179
-
180
-
181
-
182
-
183
-
184
-
185
-
186
-
187
-
188
-
189
-
190
-
191
-
192
-
193
-
194
-
195
-
196
-
197
-
198
-
199
-
200
-
201
-
202
-
203
-
204
-
205
-
206
-
207
-
208
-
209
-
210
-
211
-
212
-
213
-
214
-
215
-
216
-
217
-
218
-
219
-
220
-
221
-
222
-
223
-
224
-
225
-
226
-
227
-
228
-
229
-
230
-
231
-
232
-
233
-
234
-
235
-
236
-
237
-
238
-
239
-
240
-
241
-
242
-
243
-
244
-
245
-
246
-
247
-
248
-
249
-
250
-
251
-
252
-
253
-
254
-
255
-
256
-
257
-
258
-
259
-
260
-
261
-
262
-
263
-
264
 |
 |