D-Link DES-3528 Product Manual - Page 138
ERPS Settings - Detail Information window
 |
UPC - 790069314346
View all D-Link DES-3528 manuals
Add to My Manuals
Save this manual to your list of manuals |
Page 138 highlights
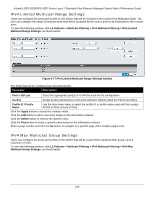
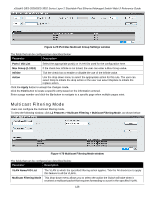
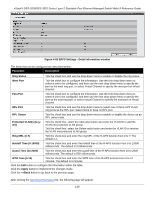
xStack® DES-3528/DES-3552 Series Layer 2 Stackable Fast Ethernet Managed Switch Web UI Reference Guide Figure 4-82 ERPS Settings - Detail Information window The fields that can be configured are described below: Parameter Description Ring Status Tick the check box and use the drop-down menu to enable or disable the ring status. West Port Tick the check box to configure the information. Use the Unit drop-down menu to select a unit to be configured, and then use the next drop-down menu to specify the port as the west ring port, or select Virtual Channel to specify the west port on virtual channel. East Port Tick the check box to configure the information. Use the Unit drop-down menu to select a unit to be configured, and then use the next drop-down menu to specify the port as the east ring port, or select Virtual Channel to specify the east port on virtual channel. RPL Port Tick the check box and use the drop-down menu to select one of the R-APS VLAN ring ports as the RPL port. Select None to have no RPL port. RPL Owner Tick the check box and use the drop-down menu to enable or disable the device as an RPL owner node. Protected VLAN(s) (e.g.: 4-6) Tick the check box, select the Add radio button and enter the VLAN ID to add the VLAN into protected VLAN group. Tick the check box, select the Delete radio button and enter the VLAN ID to remove the VLAN into protected VLAN group. Ring MEL (0-7) Tick the check box and enter the ring MEL of the R-APS function from 0 to 7. The default is 1. Holdoff Time (0-10000) Tick the check box and enter the holdoff time of the R-APS function from 0 to 10000 milliseconds. The default is 0 milliseconds. Guard Time (10-2000) Tick the check box and enter the guard time of the R-APS function from 10 to 2000 milliseconds. The default is 500 milliseconds. WTR Time (5-12) Tick the check box and enter the WTR time of the R-APS function from 5 to 12 minutes. The default is 5 minutes. Click the Edit button to configure the information within the table. Click the Apply button to implement the changes made. Click the
-
 1
1 -
2
-
3
-
4
-
5
-
6
-
7
-
8
-
9
-
10
-
11
-
12
-
13
-
14
-
15
-
16
-
17
-
18
-
19
-
20
-
21
-
22
-
23
-
24
-
25
-
26
-
27
-
28
-
29
-
30
-
31
-
32
-
33
-
34
-
35
-
36
-
37
-
38
-
39
-
40
-
41
-
42
-
43
-
44
-
45
-
46
-
47
-
48
-
49
-
50
-
51
-
52
-
53
-
54
-
55
-
56
-
57
-
58
-
59
-
60
-
61
-
62
-
63
-
64
-
65
-
66
-
67
-
68
-
69
-
70
-
71
-
72
-
73
-
74
-
75
-
76
-
77
-
78
-
79
-
80
-
81
-
82
-
83
-
84
-
85
-
86
-
87
-
88
-
89
-
90
-
91
-
92
-
93
-
94
-
95
-
96
-
97
-
98
-
99
-
100
-
101
-
102
-
103
-
104
-
105
-
106
-
107
-
108
-
109
-
110
-
111
-
112
-
113
-
114
-
115
-
116
-
117
-
118
-
119
-
120
-
121
-
122
-
123
-
124
-
125
-
126
-
127
-
128
-
129
-
130
-
131
-
132
-
 133
133 -
 134
134 -
 135
135 -
 136
136 -
 137
137 -
 138
138 -
 139
139 -
 140
140 -
 141
141 -
 142
142 -
 143
143 -
144
-
145
-
146
-
147
-
148
-
149
-
150
-
151
-
152
-
153
-
154
-
155
-
156
-
157
-
158
-
159
-
160
-
161
-
162
-
163
-
164
-
165
-
166
-
167
-
168
-
169
-
170
-
171
-
172
-
173
-
174
-
175
-
176
-
177
-
178
-
179
-
180
-
181
-
182
-
183
-
184
-
185
-
186
-
187
-
188
-
189
-
190
-
191
-
192
-
193
-
194
-
195
-
196
-
197
-
198
-
199
-
200
-
201
-
202
-
203
-
204
-
205
-
206
-
207
-
208
-
209
-
210
-
211
-
212
-
213
-
214
-
215
-
216
-
217
-
218
-
219
-
220
-
221
-
222
-
223
-
224
-
225
-
226
-
227
-
228
-
229
-
230
-
231
-
232
-
233
-
234
-
235
-
236
-
237
-
238
-
239
-
240
-
241
-
242
-
243
-
244
-
245
-
246
-
247
-
248
-
249
-
250
-
251
-
252
-
253
-
254
-
255
-
256
-
257
-
258
-
259
-
260
-
261
-
262
-
263
-
264
-
265
-
266
-
267
-
268
-
269
-
270
-
271
-
272
-
273
-
274
-
275
-
276
-
277
-
278
-
279
-
280
-
281
-
282
-
283
-
284
-
285
-
286
-
287
-
288
-
289
-
290
-
291
-
292
-
293
-
294
-
295
-
296
-
297
-
298
-
299
-
300
-
301
-
302
-
303
-
304
-
305
-
306
-
307
-
308
-
309
-
310
-
311
-
312
-
313
-
314
-
315
-
316
-
317
-
318
-
319
-
320
-
321
-
322
-
323
-
324
-
325
-
326
-
327
-
328
-
329
-
330
-
331
-
332
-
333
-
334
-
335
-
336
-
337
-
338
-
339
-
340
-
341
-
342
-
343
-
344
-
345
-
346
-
347
-
348
-
349
-
350
-
351
-
352
-
353
-
354
-
355
-
356
-
357
-
358
-
359
-
360
-
361
-
362
-
363
-
364
-
365
-
366
-
367
 |
 |
