D-Link DES-3528 Product Manual - Page 208
ACL Flow Meter, ACL Flow Meter window, Profile ID, Profile Name, Access ID 1-128, View All
 |
UPC - 790069314346
View all D-Link DES-3528 manuals
Add to My Manuals
Save this manual to your list of manuals |
Page 208 highlights
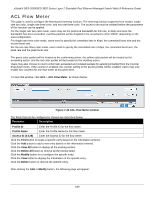
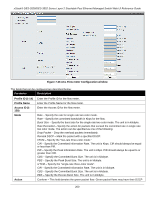
xStack® DES-3528/DES-3552 Series Layer 2 Stackable Fast Ethernet Managed Switch Web UI Reference Guide ACL Flow Meter This page is used to configure the flow-based metering function. The metering function supports three modes: single rate two color, single rate three color, and two rate three color. The access rule must be created before the parameters of this function can be applied. For the single rate two color mode, users may set the preferred bandwidth for this rule, in Kbps and once the bandwidth has been exceeded, overflow packets will be dropped or be remarked to other DSCP, depending on the user configuration. For single rate three color mode, users need to specify the committed rate in Kbps, the committed burst size and the excess burst size. For the two rate three color mode, users need to specify the committed rate in Kbps, the committed burst size, the peak rate and the peak burst size. The green color packet will be treated as the conforming action, the yellow color packet will be treated as the exceeding action, and the red color packet will be treated as the violating action. Users may also choose to count conformed, exceeded and violated packets by selecting Enabled from the Counter drop-down menu. If the counter is enabled, the counter setting in the access profile will be enabled. Users may only enable two counters for one flow meter at any given time. To view this window, click ACL > ACL Flow Meter, as shown below: Figure 7-45 ACL Flow Meter window The fields that can be configured or Viewed are described below: Parameter Description Profile ID Enter the Profile ID for the flow meter. Profile Name Enter the Profile Name for the flow meter. Access ID (1-128) Enter the Access ID for the flow meter. Click the Find button to locate a specific entry based on the information entered. Click the Add button to add a new entry based on the information entered. Click the View All button to display all the existing entries. Click the Delete All button to remove all the entries listed. Click the Modify button to re-configure the specific entry. Click the View button to display the information of the specific entry. Click the Delete button to remove the specific entry. After clicking the Add or Modify button, the following page will appear: 199
-
 1
1 -
2
-
3
-
4
-
5
-
6
-
7
-
8
-
9
-
10
-
11
-
12
-
13
-
14
-
15
-
16
-
17
-
18
-
19
-
20
-
21
-
22
-
23
-
24
-
25
-
26
-
27
-
28
-
29
-
30
-
31
-
32
-
33
-
34
-
35
-
36
-
37
-
38
-
39
-
40
-
41
-
42
-
43
-
44
-
45
-
46
-
47
-
48
-
49
-
50
-
51
-
52
-
53
-
54
-
55
-
56
-
57
-
58
-
59
-
60
-
61
-
62
-
63
-
64
-
65
-
66
-
67
-
68
-
69
-
70
-
71
-
72
-
73
-
74
-
75
-
76
-
77
-
78
-
79
-
80
-
81
-
82
-
83
-
84
-
85
-
86
-
87
-
88
-
89
-
90
-
91
-
92
-
93
-
94
-
95
-
96
-
97
-
98
-
99
-
100
-
101
-
102
-
103
-
104
-
105
-
106
-
107
-
108
-
109
-
110
-
111
-
112
-
113
-
114
-
115
-
116
-
117
-
118
-
119
-
120
-
121
-
122
-
123
-
124
-
125
-
126
-
127
-
128
-
129
-
130
-
131
-
132
-
133
-
134
-
135
-
136
-
137
-
138
-
139
-
140
-
141
-
142
-
143
-
144
-
145
-
146
-
147
-
148
-
149
-
150
-
151
-
152
-
153
-
154
-
155
-
156
-
157
-
158
-
159
-
160
-
161
-
162
-
163
-
164
-
165
-
166
-
167
-
168
-
169
-
170
-
171
-
172
-
173
-
174
-
175
-
176
-
177
-
178
-
179
-
180
-
181
-
182
-
183
-
184
-
185
-
186
-
187
-
188
-
189
-
190
-
191
-
192
-
193
-
194
-
195
-
196
-
197
-
198
-
199
-
200
-
201
-
202
-
 203
203 -
 204
204 -
 205
205 -
 206
206 -
 207
207 -
 208
208 -
 209
209 -
 210
210 -
 211
211 -
 212
212 -
 213
213 -
214
-
215
-
216
-
217
-
218
-
219
-
220
-
221
-
222
-
223
-
224
-
225
-
226
-
227
-
228
-
229
-
230
-
231
-
232
-
233
-
234
-
235
-
236
-
237
-
238
-
239
-
240
-
241
-
242
-
243
-
244
-
245
-
246
-
247
-
248
-
249
-
250
-
251
-
252
-
253
-
254
-
255
-
256
-
257
-
258
-
259
-
260
-
261
-
262
-
263
-
264
-
265
-
266
-
267
-
268
-
269
-
270
-
271
-
272
-
273
-
274
-
275
-
276
-
277
-
278
-
279
-
280
-
281
-
282
-
283
-
284
-
285
-
286
-
287
-
288
-
289
-
290
-
291
-
292
-
293
-
294
-
295
-
296
-
297
-
298
-
299
-
300
-
301
-
302
-
303
-
304
-
305
-
306
-
307
-
308
-
309
-
310
-
311
-
312
-
313
-
314
-
315
-
316
-
317
-
318
-
319
-
320
-
321
-
322
-
323
-
324
-
325
-
326
-
327
-
328
-
329
-
330
-
331
-
332
-
333
-
334
-
335
-
336
-
337
-
338
-
339
-
340
-
341
-
342
-
343
-
344
-
345
-
346
-
347
-
348
-
349
-
350
-
351
-
352
-
353
-
354
-
355
-
356
-
357
-
358
-
359
-
360
-
361
-
362
-
363
-
364
-
365
-
366
-
367
 |
 |