HTC Tilt User Manual - Page 115
Self Service Xpress Mail, Register Now, Download
 |
View all HTC Tilt manuals
Add to My Manuals
Save this manual to your list of manuals |
Page 115 highlights
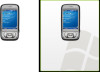
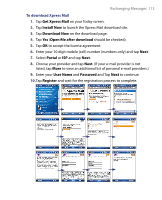
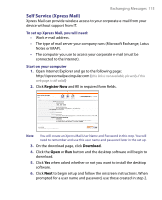
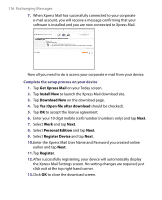
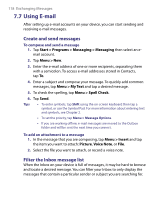
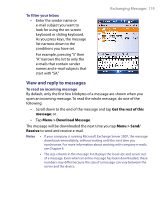
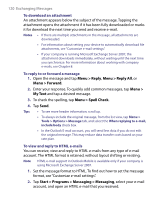
Exchanging Messages 115 Self Service (Xpress Mail) Xpress Mail can provide wireless access to your corporate e-mail from your device without support from IT. To set up Xpress Mail, you will need: • Work e-mail address. • The type of mail server your company runs (Microsoft Exchange, Lotus Notes or IMAP). • The computer you use to access your corporate e-mail (must be connected to the Internet). Start on your computer 1. Open Internet Explorer and go to the following page: http://xpressmailpe.cingular.com ((this link is not available, pls verify if this web page is still valid)) 2. Click Register Now and fill in required form fields. Note You will create an Xpress Mail User Name and Password in this step. You will need to remember and use this user name and password later in the set up. 3. On the download page, click Download. 4. Click the Open or Run button and the desktop software will begin to download. 5. Click Yes when asked whether or not you want to install the desktop software. 6. Click Next to begin setup and follow the onscreen instructions. When prompted for a user name and password, use those created in step 2.
-
 1
1 -
2
-
3
-
4
-
5
-
6
-
7
-
8
-
9
-
10
-
11
-
12
-
13
-
14
-
15
-
16
-
17
-
18
-
19
-
20
-
21
-
22
-
23
-
24
-
25
-
26
-
27
-
28
-
29
-
30
-
31
-
32
-
33
-
34
-
35
-
36
-
37
-
38
-
39
-
40
-
41
-
42
-
43
-
44
-
45
-
46
-
47
-
48
-
49
-
50
-
51
-
52
-
53
-
54
-
55
-
56
-
57
-
58
-
59
-
60
-
61
-
62
-
63
-
64
-
65
-
66
-
67
-
68
-
69
-
70
-
71
-
72
-
73
-
74
-
75
-
76
-
77
-
78
-
79
-
80
-
81
-
82
-
83
-
84
-
85
-
86
-
87
-
88
-
89
-
90
-
91
-
92
-
93
-
94
-
95
-
96
-
97
-
98
-
99
-
100
-
101
-
102
-
103
-
104
-
105
-
106
-
107
-
108
-
109
-
 110
110 -
 111
111 -
 112
112 -
 113
113 -
 114
114 -
 115
115 -
 116
116 -
 117
117 -
 118
118 -
 119
119 -
 120
120 -
121
-
122
-
123
-
124
-
125
-
126
-
127
-
128
-
129
-
130
-
131
-
132
-
133
-
134
-
135
-
136
-
137
-
138
-
139
-
140
-
141
-
142
-
143
-
144
-
145
-
146
-
147
-
148
-
149
-
150
-
151
-
152
-
153
-
154
-
155
-
156
-
157
-
158
-
159
-
160
-
161
-
162
-
163
-
164
-
165
-
166
-
167
-
168
-
169
-
170
-
171
-
172
-
173
-
174
-
175
-
176
-
177
-
178
-
179
-
180
-
181
-
182
-
183
-
184
-
185
-
186
-
187
-
188
-
189
-
190
-
191
-
192
-
193
-
194
-
195
-
196
-
197
-
198
-
199
-
200
-
201
-
202
-
203
-
204
-
205
-
206
-
207
-
208
-
209
-
210
-
211
-
212
-
213
-
214
-
215
-
216
-
217
-
218
-
219
-
220
-
221
-
222
-
223
-
224
-
225
-
226
-
227
-
228
-
229
-
230
-
231
-
232
-
233
-
234
-
235
-
236
-
237
-
238
-
239
-
240
 |
 |