HTC Tilt User Manual - Page 134
Finding Contacts in the Company Directory, Start > Calendar, Attendees
 |
View all HTC Tilt manuals
Add to My Manuals
Save this manual to your list of manuals |
Page 134 highlights
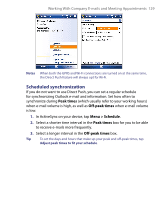
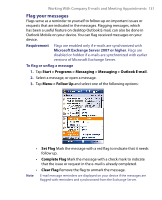
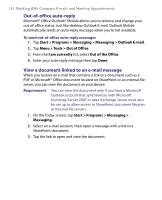
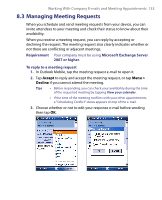
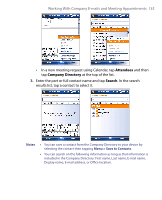
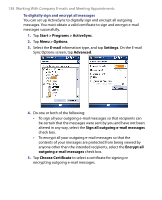
134 Working With Company E-mails and Meeting Appointments 4. If you accepted the meeting request, it will automatically be added as an appointment in Calendar on your device. To view the list of meeting participants 1. Tap Start > Calendar. 2. Tap a meeting request that you previously sent, then tap Attendees. The list of required and optional attendees will be listed. Notes • For information about creating a meeting request, see "To send a meeting request" in Chapter 6. • If you select a meeting that you have organized, the list shows who has accepted or declined the meeting. • To view an attendee's contact information, tap the attendee's name. If the attendee is included in your contacts list, you will see the contact information immediately. If the attendee is not in your contacts list, tap Company Directory to view the contact information. 8.4 Finding Contacts in the Company Directory In addition to having contacts on your device, you can access contact information from your organization's Company Directory. By having over-the-air access to the Company Directory, you can easily send e-mail messages and meeting requests to anyone in your company. Requirement Access to the Company Directory is available only if your organization is running Microsoft Exchange Server 2003 SP2 or higher, and you have completed your first synchronization with the Exchange Server. 1. Synchronize with Exchange Server if you have never done so. 2. Do any of the following: • In Contacts, tap Menu > Company Directory. • In a new message, tap the To box. • Tap Menu > Add Recipient then tap Company Directory.
-
 1
1 -
2
-
3
-
4
-
5
-
6
-
7
-
8
-
9
-
10
-
11
-
12
-
13
-
14
-
15
-
16
-
17
-
18
-
19
-
20
-
21
-
22
-
23
-
24
-
25
-
26
-
27
-
28
-
29
-
30
-
31
-
32
-
33
-
34
-
35
-
36
-
37
-
38
-
39
-
40
-
41
-
42
-
43
-
44
-
45
-
46
-
47
-
48
-
49
-
50
-
51
-
52
-
53
-
54
-
55
-
56
-
57
-
58
-
59
-
60
-
61
-
62
-
63
-
64
-
65
-
66
-
67
-
68
-
69
-
70
-
71
-
72
-
73
-
74
-
75
-
76
-
77
-
78
-
79
-
80
-
81
-
82
-
83
-
84
-
85
-
86
-
87
-
88
-
89
-
90
-
91
-
92
-
93
-
94
-
95
-
96
-
97
-
98
-
99
-
100
-
101
-
102
-
103
-
104
-
105
-
106
-
107
-
108
-
109
-
110
-
111
-
112
-
113
-
114
-
115
-
116
-
117
-
118
-
119
-
120
-
121
-
122
-
123
-
124
-
125
-
126
-
127
-
128
-
 129
129 -
 130
130 -
 131
131 -
 132
132 -
 133
133 -
 134
134 -
 135
135 -
 136
136 -
 137
137 -
 138
138 -
 139
139 -
140
-
141
-
142
-
143
-
144
-
145
-
146
-
147
-
148
-
149
-
150
-
151
-
152
-
153
-
154
-
155
-
156
-
157
-
158
-
159
-
160
-
161
-
162
-
163
-
164
-
165
-
166
-
167
-
168
-
169
-
170
-
171
-
172
-
173
-
174
-
175
-
176
-
177
-
178
-
179
-
180
-
181
-
182
-
183
-
184
-
185
-
186
-
187
-
188
-
189
-
190
-
191
-
192
-
193
-
194
-
195
-
196
-
197
-
198
-
199
-
200
-
201
-
202
-
203
-
204
-
205
-
206
-
207
-
208
-
209
-
210
-
211
-
212
-
213
-
214
-
215
-
216
-
217
-
218
-
219
-
220
-
221
-
222
-
223
-
224
-
225
-
226
-
227
-
228
-
229
-
230
-
231
-
232
-
233
-
234
-
235
-
236
-
237
-
238
-
239
-
240
 |
 |
