HTC Tilt User Manual - Page 185
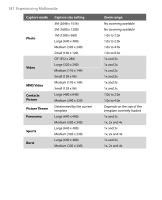
Storage menu, Panorama Settings menu, Ambience menu, Capture Settings menu, White Balance
 |
View all HTC Tilt manuals
Add to My Manuals
Save this manual to your list of manuals |
Page 185 highlights
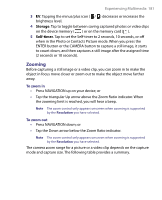
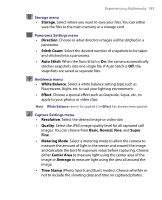
Experiencing Multimedia 185 Storage menu • Storage. Select where you want to save your files. You can either save the files to the main memory or a storage card. Panorama Settings menu • Direction. Choose in what direction images will be stitched in a panorama. • Stitch Count. Select the desired number of snapshots to be taken and stitched into a panorama. • Auto Stitch. When the Auto Stitch is On, the camera automatically stitches snapshots into one single file. If Auto Stitch is Off, the snapshots are saved as separate files. Ambience menu • White Balance. Select a white balance setting type such as Fluorescent, Night, etc. to suit your lighting environment. • Effect. Choose a special effect such as Grayscale, Sepia, etc., to apply to your photos or video clips. Note White Balance cannot be applied if an Effect has already been applied. Capture Settings menu • Resolution. Select the desired image or video size. • Quality. Select the JPEG image quality level for all captured still images. You can choose from Basic, Normal, Fine, and Super Fine. • Metering Mode. Select a metering mode to allow the camera to measure the amount of light in the center and around the image and calculate the best-fit exposure value before capturing. Choose either Center Area to measure light using the center area of the image or Average to measure light using the area all around the image. • Time Stamp (Photo, Sports and Burst modes). Choose whether or not to include the shooting date and time on captured photos.
-
 1
1 -
2
-
3
-
4
-
5
-
6
-
7
-
8
-
9
-
10
-
11
-
12
-
13
-
14
-
15
-
16
-
17
-
18
-
19
-
20
-
21
-
22
-
23
-
24
-
25
-
26
-
27
-
28
-
29
-
30
-
31
-
32
-
33
-
34
-
35
-
36
-
37
-
38
-
39
-
40
-
41
-
42
-
43
-
44
-
45
-
46
-
47
-
48
-
49
-
50
-
51
-
52
-
53
-
54
-
55
-
56
-
57
-
58
-
59
-
60
-
61
-
62
-
63
-
64
-
65
-
66
-
67
-
68
-
69
-
70
-
71
-
72
-
73
-
74
-
75
-
76
-
77
-
78
-
79
-
80
-
81
-
82
-
83
-
84
-
85
-
86
-
87
-
88
-
89
-
90
-
91
-
92
-
93
-
94
-
95
-
96
-
97
-
98
-
99
-
100
-
101
-
102
-
103
-
104
-
105
-
106
-
107
-
108
-
109
-
110
-
111
-
112
-
113
-
114
-
115
-
116
-
117
-
118
-
119
-
120
-
121
-
122
-
123
-
124
-
125
-
126
-
127
-
128
-
129
-
130
-
131
-
132
-
133
-
134
-
135
-
136
-
137
-
138
-
139
-
140
-
141
-
142
-
143
-
144
-
145
-
146
-
147
-
148
-
149
-
150
-
151
-
152
-
153
-
154
-
155
-
156
-
157
-
158
-
159
-
160
-
161
-
162
-
163
-
164
-
165
-
166
-
167
-
168
-
169
-
170
-
171
-
172
-
173
-
174
-
175
-
176
-
177
-
178
-
179
-
 180
180 -
 181
181 -
 182
182 -
 183
183 -
 184
184 -
 185
185 -
 186
186 -
 187
187 -
 188
188 -
 189
189 -
 190
190 -
191
-
192
-
193
-
194
-
195
-
196
-
197
-
198
-
199
-
200
-
201
-
202
-
203
-
204
-
205
-
206
-
207
-
208
-
209
-
210
-
211
-
212
-
213
-
214
-
215
-
216
-
217
-
218
-
219
-
220
-
221
-
222
-
223
-
224
-
225
-
226
-
227
-
228
-
229
-
230
-
231
-
232
-
233
-
234
-
235
-
236
-
237
-
238
-
239
-
240
 |
 |