HTC Tilt User Manual - Page 216
Add Contacts, Menu > Add, Contact, To add a contact
 |
View all HTC Tilt manuals
Add to My Manuals
Save this manual to your list of manuals |
Page 216 highlights
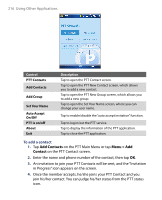
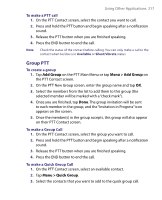
216 Using Other Applications Control PTT Contacts Add Contacts Add Croup Set Your Name Auto Accept On/Off PTT is on/off About Exit Description Tap to open the PTT Contact screen. Tap to open the PTT New Contact screen, which allows you to add a new contact. Tap to open the PTT New Group screen, which allows you to add a new group. Tap to open the Set Your Name screen, where you can change your user name. Tap to enable/disable the "auto accept invitation" function. Tap to log in/out the PTT service. Tap to display the information of the PTT application. Tap to close the PTT application. To add a contact 1. Tap Add Contacts on the PTT Main Menu or tap Menu > Add Contact on the PTT Contact screen. 2. Enter the name and phone number of the contact, then tap OK. 3. An invitation to join your PTT Contacts will be sent, and the "Invitation in Progress" icon appears on the screen. 4. Once the member accepts, he/she joins your PTT Contact and you join his/her contact. You can judge his/her status from the PTT status icon.
-
 1
1 -
2
-
3
-
4
-
5
-
6
-
7
-
8
-
9
-
10
-
11
-
12
-
13
-
14
-
15
-
16
-
17
-
18
-
19
-
20
-
21
-
22
-
23
-
24
-
25
-
26
-
27
-
28
-
29
-
30
-
31
-
32
-
33
-
34
-
35
-
36
-
37
-
38
-
39
-
40
-
41
-
42
-
43
-
44
-
45
-
46
-
47
-
48
-
49
-
50
-
51
-
52
-
53
-
54
-
55
-
56
-
57
-
58
-
59
-
60
-
61
-
62
-
63
-
64
-
65
-
66
-
67
-
68
-
69
-
70
-
71
-
72
-
73
-
74
-
75
-
76
-
77
-
78
-
79
-
80
-
81
-
82
-
83
-
84
-
85
-
86
-
87
-
88
-
89
-
90
-
91
-
92
-
93
-
94
-
95
-
96
-
97
-
98
-
99
-
100
-
101
-
102
-
103
-
104
-
105
-
106
-
107
-
108
-
109
-
110
-
111
-
112
-
113
-
114
-
115
-
116
-
117
-
118
-
119
-
120
-
121
-
122
-
123
-
124
-
125
-
126
-
127
-
128
-
129
-
130
-
131
-
132
-
133
-
134
-
135
-
136
-
137
-
138
-
139
-
140
-
141
-
142
-
143
-
144
-
145
-
146
-
147
-
148
-
149
-
150
-
151
-
152
-
153
-
154
-
155
-
156
-
157
-
158
-
159
-
160
-
161
-
162
-
163
-
164
-
165
-
166
-
167
-
168
-
169
-
170
-
171
-
172
-
173
-
174
-
175
-
176
-
177
-
178
-
179
-
180
-
181
-
182
-
183
-
184
-
185
-
186
-
187
-
188
-
189
-
190
-
191
-
192
-
193
-
194
-
195
-
196
-
197
-
198
-
199
-
200
-
201
-
202
-
203
-
204
-
205
-
206
-
207
-
208
-
209
-
210
-
 211
211 -
 212
212 -
 213
213 -
 214
214 -
 215
215 -
 216
216 -
 217
217 -
 218
218 -
 219
219 -
 220
220 -
 221
221 -
222
-
223
-
224
-
225
-
226
-
227
-
228
-
229
-
230
-
231
-
232
-
233
-
234
-
235
-
236
-
237
-
238
-
239
-
240
 |
 |
