HP Designjet L28500 HP Designjet L28500 Printer Series - User's guide
HP Designjet L28500 Manual
 |
View all HP Designjet L28500 manuals
Add to My Manuals
Save this manual to your list of manuals |
HP Designjet L28500 manual content summary:
- HP Designjet L28500 | HP Designjet L28500 Printer Series - User's guide - Page 1
DESIGNJET L28500 printer series User's guide - HP Designjet L28500 | HP Designjet L28500 Printer Series - User's guide - Page 2
© 2011 Hewlett-Packard Development Company, L.P. 2nd edition Legal notices The information contained herein is subject to change without notice. The only warranties for HP Products and services are set forth in the express warranty statement accompanying such products and services. Nothing herein - HP Designjet L28500 | HP Designjet L28500 Printer Series - User's guide - Page 3
21 Porous substrates ...24 Load a roll onto the spindle ...26 Load a roll into the printer (automatically 29 Load a roll into the printer (manually 32 Load a cut sheet into the printer 35 Unload a roll from the printer 36 The take-up reel ...37 The edge holders ...46 The loading accessory ...47 - HP Designjet L28500 | HP Designjet L28500 Printer Series - User's guide - Page 4
the ink system 83 Check the status of the ink cartridges 83 Check the status of a printhead 84 Check the file system ...84 Printer alerts ...85 11 Firmware update ...86 12 Hardware maintenance 88 Ink system tips ...88 Align the printheads ...88 Clean and lubricate the carriage rail 89 Clean the - HP Designjet L28500 | HP Designjet L28500 Printer Series - User's guide - Page 5
Move or store the printer ...102 Replace an ink cartridge ...103 Replace the ink maintenance kit 107 Replace a printhead ...113 Replace the printhead cleaning kit 118 Service maintenance ...125 13 Troubleshoot print-quality issues 126 General printing advice ...126 Use the printhead status plot - HP Designjet L28500 | HP Designjet L28500 Printer Series - User's guide - Page 6
rollers squeak ...152 17 Front-panel error messages 153 Printer logs ...156 18 When you need help 157 Introduction ...157 Documentation ...157 Customer Self Repair ...157 HP Customer Care Centers ...158 Service information ...158 19 Printer specifications 159 Functional specifications ...159 - HP Designjet L28500 | HP Designjet L28500 Printer Series - User's guide - Page 7
● There are no operator-serviceable parts inside the printer except those covered by HP's Customer Self Repair program (see http://www.hp.com/go/selfrepair/). Refer servicing of other parts to qualified service personnel. ● Turn off the printer and call your service representative in any of the - HP Designjet L28500 | HP Designjet L28500 Printer Series - User's guide - Page 8
Site preparation guide and Assembly instructions. Three-phase lines are required, each protected by a branch circuit breaker. The power cable is not provided with the printer. ● Do not insert objects through slots in the printer. ● Take care not to spill liquid on the printer. ● Do not use aerosol - HP Designjet L28500 | HP Designjet L28500 Printer Series - User's guide - Page 9
problems associated with them. However, HP recommends that you wear gloves when handling ink system components. Warnings and cautions The following symbols are used in this manual to ensure the proper use of the printer and to prevent the printer from being damaged. Follow the instructions - HP Designjet L28500 | HP Designjet L28500 Printer Series - User's guide - Page 10
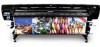
-serviceable parts inside the printer. Refer servicing to qualified service personnel. See installation instructions 104 in) wide. Some major features of the printer are shown below: ● Printing speeds in draft mode of up to 70 m²/h (753 ft²/h). ● Environmentally friendly, odorless, aqueous latex - HP Designjet L28500 | HP Designjet L28500 Printer Series - User's guide - Page 11
wide range of substrates-including most low-cost, uncoated, solvent-compatible substrates ● A range of HP recyclable substrates is available ● Durable prints it is not provided with the printer. The printer's main components The following views of the printer illustrate its main components. Front - HP Designjet L28500 | HP Designjet L28500 Printer Series - User's guide - Page 12
7. Printhead cleaning cartridge 8. Substrate-adjustment lever 9. Take-up reel motor 10. Tension bar 11. Spindle 12. Take-up reel 13. Spindle stop 14. Spindle lock lever 15. Curing module 16. Drying module Rear view 1. Printhead cleaning container 2. Sockets for communication cables and optional - HP Designjet L28500 | HP Designjet L28500 Printer Series - User's guide - Page 13
Edge holders case The case is normally attached to the rear of the printer, and contains the two edge holders when they are not in use. Drying enclosure ENWW The printer's main components 7 - HP Designjet L28500 | HP Designjet L28500 Printer Series - User's guide - Page 14
functions: ● Assists you in troubleshooting issues ● Is used when performing certain physical operations, such as unloading substrate and maintaining the printer ● Displays information in brief about the status of the printer ● Displays warning and error messages, when appropriate, along with - HP Designjet L28500 | HP Designjet L28500 Printer Series - User's guide - Page 15
icons ● Press to return to the home screen. ● Press to view this User's guide on the front panel. ● Press to go to the previous item. ● Press to information on any of these, press that part of the screen. If the printer is left idle for some time, it goes into sleep mode and switches off - HP Designjet L28500 | HP Designjet L28500 Printer Series - User's guide - Page 16
throughout this guide. The Embedded Web Server The Embedded Web Server is a Web server running inside the printer. You can use it to obtain printer information, manage settings and presets, align printheads, upload new firmware and troubleshoot problems. Service engineers can use it to retrieve - HP Designjet L28500 | HP Designjet L28500 Printer Series - User's guide - Page 17
tab offers various kinds of help with your printer. ● Browse helpful information from a variety of sources ● Troubleshoot problems ● Access HP Designjet links for technical support with your printer and accessories ● Access service support pages that show current and historical data on the usage - HP Designjet L28500 | HP Designjet L28500 Printer Series - User's guide - Page 18
moments, then press the Power button again. This should restart the printer. If the printer fails to restart, try the following alternative procedure. 1. Turn off the printer by using the power switch at the rear of the printer. Check that the residual current circuit breakers are in the up position - HP Designjet L28500 | HP Designjet L28500 Printer Series - User's guide - Page 19
2 Connectivity and software instructions Connection method Your printer can be connected in the following way. switches) NOTE: The speed of any network connection depends on all the components that are used in the network, which can include network interface cards, hubs, routers, switches, and - HP Designjet L28500 | HP Designjet L28500 Printer Series - User's guide - Page 20
to the network, or your network has no DHCP server. In the latter case, you will have to set the IP address manually: see The printer cannot get an IP address on page 149. Refer to the RIP instructions (not provided by HP) to install the software RIP. 14 Chapter 2 Connectivity and software - HP Designjet L28500 | HP Designjet L28500 Printer Series - User's guide - Page 21
● If you cannot understand the current front panel language, start with the printer turned off. Turn it on. As soon as icons appear on the front panel, press followed by . The front panel blinks briefly. Whichever method you used, the language selection menu should now appear on the front panel - HP Designjet L28500 | HP Designjet L28500 Printer Series - User's guide - Page 22
Request e-mail notification of specific error conditions 1. In the Embedded Web Server (see Access the the RIP), the printer´s drying and curing heaters remain on for the specified time and temperature in case another job arrives or in case you need to avoid any print-quality problem that could be - HP Designjet L28500 | HP Designjet L28500 Printer Series - User's guide - Page 23
● Google Chrome 7 To use the Embedded Web Server on any computer, open your Web browser and type the printer's IP address in the browser's address bar. The printer's IP address appears on the front panel's home screen (12.34.12.34 in this example): If you follow these instructions but fail to open - HP Designjet L28500 | HP Designjet L28500 Printer Series - User's guide - Page 24
order to perform the following printer functions. ● Change printer settings. ● Update the firmware. ● Change the printer's date and time. ● how you use your printer, and which product features are the most important to you. All data is collected and used in accordance with the HP Privacy Policy - HP Designjet L28500 | HP Designjet L28500 Printer Series - User's guide - Page 25
are red cross marks in front of any items, then you may need to configure a proxy server: an 'intermediary' computer which sits in between your printer and the Internet, and can 'talk' to both. The resulting window may look like this. ENWW Return to the AutoSend page, and perform the following - HP Designjet L28500 | HP Designjet L28500 Printer Series - User's guide - Page 26
4. Click the Test and Apply button in the lower right corner of the screen. If the first message in the Result of AutoSend Settings window is Success and all items have a green check mark in front of them, then the configuration is complete. At this point you can browse to another tab of the - HP Designjet L28500 | HP Designjet L28500 Printer Series - User's guide - Page 27
of printing materials, all of which are referred to in this guide as substrates. Substrate tips Choosing the correct substrate for your needs is and unwind from the core. ● Using the take-up reel with some substrates, such as textiles, may give the printer better control of the substrate and is - HP Designjet L28500 | HP Designjet L28500 Printer Series - User's guide - Page 28
printer (manually) on page 32. CAUTION: Removing the substrate from the printer manually without using the front panel could damage the printer. Do this only when necessary to clear a substrate jam. Supported , reflective, or perforated. Examples: HP Air Release Adhesive Gloss Cast Vinyl, - HP Designjet L28500 | HP Designjet L28500 Printer Series - User's guide - Page 29
be compatible with your printer. The tool allows searching by manufacturer brand, substrate type, application or geographical availability. It can be found at http://www.hp.com/go/latexmediafinder/. Supported HP substrates Substrate Banners HP HDPE Reinforced Banner HP Double-sided HDPE Reinforced - HP Designjet L28500 | HP Designjet L28500 Printer Series - User's guide - Page 30
signifying that these substrates support the development of Greenguard AgBB HP PVC-free Wall Paper printed using HP Latex Inks is listed used with this printer, but very porous substrates could damage the printer. To check the porosity of your substrate, proceed as follows. 1. If the printer - HP Designjet L28500 | HP Designjet L28500 Printer Series - User's guide - Page 31
to check. 5. Open your RIP software. 6. Download the test file from inside the printer: http://printerIP/hp/device/webAccess/ images/Ink_trespassing_check.pdf, where printerIP is the IP address of your printer. 7. Print the test file using the number of passes and media preset that you intend to - HP Designjet L28500 | HP Designjet L28500 Printer Series - User's guide - Page 32
, lower it by lifting the lever. 3. Lift the spindle lock lever to disengage the spindle. 4. Remove the spindle from the printer. CAUTION: Do not insert your fingers into the spindle supports. The spindle has a stop at each end to keep the roll in position. Remove the blue stop at the left end - HP Designjet L28500 | HP Designjet L28500 Printer Series - User's guide - Page 33
5. Unlock the blue stop. 6. Remove the stop from the left end of the spindle. 7. Slide the spindle into the roll. If the roll is long and heavy, you may need two people to handle it. ENWW Load a roll onto the spindle 27 - HP Designjet L28500 | HP Designjet L28500 Printer Series - User's guide - Page 34
8. The right stop of the spindle has two positions: one for rolls of the printer's maximum width, and another for narrower rolls. Remember to use the second position for narrower rolls, which improves the drying process and allows higher printing speeds. 9. Put the blue stop on to the upper end - HP Designjet L28500 | HP Designjet L28500 Printer Series - User's guide - Page 35
, or substrates with a tendency to curl, you should follow the manual loading procedure to reduce the risk of substrate jams and printhead crashes; see Load a roll into the printer (manually) on page 32. 1. At the printer's front panel, press roll. , then , then Substrate > Substrate load > Load - HP Designjet L28500 | HP Designjet L28500 Printer Series - User's guide - Page 36
the substrate remains taut during the process. Avoid rewinding the substrate manually, unless the printer asks you to do so. WARNING! Take care not to NOTE: You should select the name of the particular substrate that you are using in your RIP software, not in the front panel. NOTE: The RIP substrate - HP Designjet L28500 | HP Designjet L28500 Printer Series - User's guide - Page 37
. If you choose to do so, the amount of substrate that is subsequently used is then tracked. See Substrate length tracking on page 54. 6. The printer checks the substrate in various ways and may ask you to correct problems with skew or tension. NOTE: You can specify the maximum permitted amount of - HP Designjet L28500 | HP Designjet L28500 Printer Series - User's guide - Page 38
is ready for printing. Take care not to cover the top fans. For instructions on how to use the take-up reel, see The take-up reel on page 37. Load a roll into the printer (manually) The manual loading process should be used in the following cases: ● The substrate is unusually thin or unusually - HP Designjet L28500 | HP Designjet L28500 Printer Series - User's guide - Page 39
the substrate remains taut during the process. Avoid rewinding the substrate manually, unless the printer asks you to do so. 4. Continue to feed the substrate you are using tends to curl, keep feeding the substrate until the edge is out of the printer. You are also recommended to use the take-up - HP Designjet L28500 | HP Designjet L28500 Printer Series - User's guide - Page 40
, always select the substrate type as HP Photorealistic to maximize the vacuum pressure. substrate. TIP: When manually loading textile substrates that you intend to use with the take-up reel, . 7. The printer checks the substrate in various ways and may ask you to correct problems with skew or - HP Designjet L28500 | HP Designjet L28500 Printer Series - User's guide - Page 41
to load cut sheets into the printer, but print quality cannot be guaranteed, and you may have some difficulty in avoiding skew. ● The sheet should be at least 1067 mm (42 in) long. ● Load the sheet by following the normal roll loading process (automatic or manual, depending on the substrate). ENWW - HP Designjet L28500 | HP Designjet L28500 Printer Series - User's guide - Page 42
tolerable, you can consider skipping the automatic skew correction. To do so, when prompted, choose Continue with current skew. Unload a roll from the printer 1. If you used the take-up reel during printing, unload the printed roll from the take-up reel. See Unload a roll from the take-up reel on - HP Designjet L28500 | HP Designjet L28500 Printer Series - User's guide - Page 43
on the right side of the printer first. Do not insert your fingers into the spindle supports during the removal process. The take-up reel. Press Yes to confirm, and follow the instructions on the front panel. The tension bar When in use, the take-up reel requires a dangling loop of substrate - HP Designjet L28500 | HP Designjet L28500 Printer Series - User's guide - Page 44
. Loading the take-up reel during printing saves approximately 1.5 m (4.9 ft) of substrate. TIP: If you have already loaded the take-up reel, but the printer fails to recognize that it is loaded, you can save some time by selecting Load it during printing. TIP: You are recommended to keep the - HP Designjet L28500 | HP Designjet L28500 Printer Series - User's guide - Page 45
3. Ensure that the tension bar is in its raised position (up). 4. Unlock the take-up reel by lifting the two levers. 5. Remove the take-up reel. ENWW The take-up reel 39 - HP Designjet L28500 | HP Designjet L28500 Printer Series - User's guide - Page 46
6. Unlock the blue stop. 7. Remove the stop from the left end of the spindle. 8. Load the core onto the take-up reel. The core should be at least as wide as the substrate. 40 Chapter 4 Handle the substrate ENWW - HP Designjet L28500 | HP Designjet L28500 Printer Series - User's guide - Page 47
take-up reel. Slide it into contact with the core, then lock it. 10. Load the take-up reel into the printer by pushing firmly on both ends. 11. Use the Move substrate option in the front panel's Substrate menu to advance the substrate. Continue advancing the substrate until it reaches the - HP Designjet L28500 | HP Designjet L28500 Printer Series - User's guide - Page 48
to straighten the substrate. Do not attempt to pull more substrate out of the printer. NOTE: If you are loading the take-up reel during printing you do the spindle core when an adequate length of substrate has fed from the printer after printing begins. 14. Ensure that the right-hand edge of the - HP Designjet L28500 | HP Designjet L28500 Printer Series - User's guide - Page 49
. Tape the leading edge of the substrate to the core in the center, then at each side. Make sure that the substrate is straight. 16. Use the advance button on the take-up reel motor to advance the take-up reel one turn, to make sure that the substrate is firmly - HP Designjet L28500 | HP Designjet L28500 Printer Series - User's guide - Page 50
the lever to lower the tension bar. 19. Use the winding-direction switch on the take-up reel successfully installed message appears. 21. The following image shows how the printer looks when it is operating. As substrate is fed from the printer, it drops down to the tension bar, over the diverter, - HP Designjet L28500 | HP Designjet L28500 Printer Series - User's guide - Page 51
then , then Substrate > Enable take-up reel. The printer advances the substrate to allow for cutting. 2. Switch the up reel. 5. Press the OK button on the front panel. The printer asks you to cut the substrate manually. 6. Use the advance button on the take-up reel motor to wind the remainder - HP Designjet L28500 | HP Designjet L28500 Printer Series - User's guide - Page 52
printer, pulling out the end on the right side of the printer first. Do not insert your fingers into the spindle supports during the removal process. 10. To remove the roll from the printer When not in use, they can be stored in their case at the rear of the printer. If you choose to use them, you - HP Designjet L28500 | HP Designjet L28500 Printer Series - User's guide - Page 53
holder. The following picture shows an edge holder correctly placed. NOTE: When you use the edge holders, your prints should have a minimum margin of 10 mm. is recommended when loading such substrates, but not obligatory. The printer comes with two loading accessories: one for rolls up to 1.55 m - HP Designjet L28500 | HP Designjet L28500 Printer Series - User's guide - Page 54
accessory from the Substrate Load menu on the front panel. NOTE: If you select Load with accessory, a message is displayed asking whether you want to use the edge holders. 2. Lay the textile loading accessory on the floor and flip forward enough of the white flaps to cover the width of the - HP Designjet L28500 | HP Designjet L28500 Printer Series - User's guide - Page 55
substrate. The black patches are magnetic and grip the substrate. 5. Lift the loading accessory and the leading edge of the substrate together. 6. Load the substrate manually, see Load a roll into the printer (manually) on page 32. ENWW The loading accessory 49 - HP Designjet L28500 | HP Designjet L28500 Printer Series - User's guide - Page 56
accessory passes through the printer's substrate path with the substrate. 8. The front panel asks whether you want to use the edge holders. See when loading very thick substrates, always select the substrate type as HP Photorealistic to maximize the vacuum pressure. After loading and before - HP Designjet L28500 | HP Designjet L28500 Printer Series - User's guide - Page 57
11. The printer checks the substrate in various ways and may ask you to correct problems with skew or tension. NOTE: You can loading process as usual and adjust the skew if necessary. Double-sided printing The printer can be used to print on both sides of the substrate, in the following way. NOTE: - HP Designjet L28500 | HP Designjet L28500 Printer Series - User's guide - Page 58
to find the reference line more accurately. See Load a roll into the printer (manually) on page 32. If you use only the automatic loading procedure, the printer may take some time to find the reference line. TIP: You are recommended to use the edge holders when printing the second side, which means - HP Designjet L28500 | HP Designjet L28500 Printer Series - User's guide - Page 59
aligned with the permanent line on the platen. You may find it useful to mark where the reference line is on the other side of size to compensate for the contraction of the substrate after passing once through the printer. See The substrate has shrunk or expanded on page 141. View information about - HP Designjet L28500 | HP Designjet L28500 Printer Series - User's guide - Page 60
you can note it for future reference. 3. Next time the substrate is loaded, you can enter the remaining length, and the printer again tracks the substrate as it is used. If the substrate was never actually unloaded, for example if there was a substrate jam and the substrate was unloaded and the - HP Designjet L28500 | HP Designjet L28500 Printer Series - User's guide - Page 61
the waiting time and prints the available pages immediately. ● If the printer is drying the ink after printing, Form feed and cut cancels the waiting cut it. NOTE: The cutter is disabled when the take-up reel is in use, and when a banner or textile substrate is loaded. Store the substrate The - HP Designjet L28500 | HP Designjet L28500 Printer Series - User's guide - Page 62
supported substrate has its own characteristics. The printer your printer are installed in the RIP. The RIP contains media presets for only the most commonly used substrates. . ● Further information can be found at http://www.hp.com/go/L28500/solutions/. Add a new substrate This section is provided in - HP Designjet L28500 | HP Designjet L28500 Printer Series - User's guide - Page 63
for your substrate may be available from your RIP vendor or substrate vendor. If not, you can start by copying printer settings from a similar substrate of the same family. See Supported substrate families on page 22. If you cannot find a similar substrate for some reason, here are some recommended - HP Designjet L28500 | HP Designjet L28500 Printer Series - User's guide - Page 64
Paper-Aqueous Paper-Solvent Low temp (incl. HP Photoreal) Mesh Drying temp. 55 50 55 , ink smears or substrate jams. Curing is needed to coalesce the latex, creating a polymeric film which acts as a protective layer, while use the substrate family default value. 58 Chapter 5 Substrate - HP Designjet L28500 | HP Designjet L28500 Printer Series - User's guide - Page 65
printer was calibrated at the factory to ensure that it advances the substrate accurately when using supported substrates in normal environmental conditions. However, you may find it useful If selected, there can be excess of ink and some problems related to poor drying and curing. TIP: Select High - HP Designjet L28500 | HP Designjet L28500 Printer Series - User's guide - Page 66
printer's built-in cutter can cut the substrate automatically between each print. Disable the cutter in the following cases: ● You want to increase the speed of printing. ● You want to use the take-up reel. ● You want to cut the substrate manually after using this substrate. ● You are instructed to - HP Designjet L28500 | HP Designjet L28500 Printer Series - User's guide - Page 67
Here are some more advanced settings, which you are not recommended to change, unless you have problems that you cannot resolve any other way. The drying and curing temperatures used by the printer are determined by adding the offset to the base temperature. The base temperatures shown in the table - HP Designjet L28500 | HP Designjet L28500 Printer Series - User's guide - Page 68
drying power Low temp 5 80 0 75 0 85 0 0 (incl. HP Photoreal) Mesh 5 85 0 80 0 95 0 0.7 Interpass drying time is not stopped until this temperature is reached. This setting is determined by the printer. You cannot change it. This offset is added to the base cool-down curing - HP Designjet L28500 | HP Designjet L28500 Printer Series - User's guide - Page 69
since this is a critical area for correct printing results with latex inks on a wide variety of substrates. The diagram below graphically values used for a given substrate type (family), consult the main and advanced settings tables above. NOTE: tp time can be modified through the printer's front - HP Designjet L28500 | HP Designjet L28500 Printer Series - User's guide - Page 70
Maybe Maybe Yes Yes Yes Yes Yes Yes Yes Yes Yes Yes Key ● X: Do not use ● No: Expect low print quality ● Low ink: May be worth trying for extra speed, many substrates from different vendors are available in the HP Media Finder at http://www.hp.com/go/latexmediafinder/. NOTE: After selecting the - HP Designjet L28500 | HP Designjet L28500 Printer Series - User's guide - Page 71
your media preset are adequate. Look at the color patches in the HP diagnostic chart and check that the patches have the correct amount of ink using the guidelines below: 1. Too much ink: There are several possible symptoms of this problem. ● The last two or three scales of the chart look the same - HP Designjet L28500 | HP Designjet L28500 Printer Series - User's guide - Page 72
ink). Try reducing the amount of ink in your RIP software, then reprint the chart and check again. You may have chosen a media preset that uses more ink than your substrate allows. Consult your RIP documentation to make sure you're applying the right media preset, and to find out how - HP Designjet L28500 | HP Designjet L28500 Printer Series - User's guide - Page 73
out. Try increasing the amount of ink in your RIP software, then reprint the chart and check again. You may have chosen a media preset that uses less ink than your substrate allows. Consult your RIP documentation to make sure you're applying the right media preset, and to find out how - HP Designjet L28500 | HP Designjet L28500 Printer Series - User's guide - Page 74
passes, the printer is more sensitive to substrate advance problems. ● With service the printheads. See also The printer seems slow on page 151. Color calibration The purpose of color calibration is to produce consistent colors with the specific printheads, inks and substrate that you are using - HP Designjet L28500 | HP Designjet L28500 Printer Series - User's guide - Page 75
problem, proceed as follows. 1. Ensure that the take-up reel is enabled. 2. Advance the substrate until the tension bar reaches its lowest position. 3. Manually rewind the take-up reel, using are not necessarily accurate. For instance, if your printer prints all colors as black, its colors may be - HP Designjet L28500 | HP Designjet L28500 Printer Series - User's guide - Page 76
printer output in terms of color gamut, ink usage and print quality. These are as follows: ● To achieve the best dark colors in vinyl gloss and other substrates, use how to create or modify media presets. Presets for HP-branded substrates have been created following the above recommendations in order - HP Designjet L28500 | HP Designjet L28500 Printer Series - User's guide - Page 77
6 Retrieving usage information ● Get accounting information ● Check usage statistics ● Check usage statistics for a job ● Request accounting data by E-mail ENWW 71 - HP Designjet L28500 | HP Designjet L28500 Printer Series - User's guide - Page 78
spreadsheet. See Request accounting data by E-mail on page 72. ● Use a third-party application to request product status, product usage or job The product provides data in XML to the application whenever requested. HP provides a Software Development Kit to facilitate the development of such - HP Designjet L28500 | HP Designjet L28500 Printer Series - User's guide - Page 79
mail messages. 10. From the Configuration menu, select Printer settings. 11. In the Accounting section, if you used and various other attributes of the job. Accounting data are also provided on scan and copy jobs. You can download an Excel template from HP's Web site (http://www.hp.com/go/designjet - HP Designjet L28500 | HP Designjet L28500 Printer Series - User's guide - Page 80
7 The ink system Ink system components Ink cartridges The printer's six ink cartridges provide magenta, light magenta, black, yellow, light cyan and cyan ink to the printheads. Each cartridge has a capacity of 775 ml. Ink - HP Designjet L28500 | HP Designjet L28500 Printer Series - User's guide - Page 81
at regular intervals, and automatically serviced when necessary. This takes a cloth, which is used to clean the printheads. You are notified when 92% of the roll has been used, after which the in the front panel because of a print-quality problem (see Horizontal banding on page 128). Remember to turn - HP Designjet L28500 | HP Designjet L28500 Printer Series - User's guide - Page 82
with a new one. Ink funnel The ink funnel collects waste ink produced during printhead servicing. It is important that this funnel is installed, as it prevents significant deposits of ink over various other printer parts. From the ink funnel, the waste ink passes through the ink tube assembly into - HP Designjet L28500 | HP Designjet L28500 Printer Series - User's guide - Page 83
funnel, which collects tiny droplets of waste ink produced during printhead servicing. ● The ink tube assembly, which passes tiny droplets of ink collected by the ink funnel to the printhead cleaning container If the printer asks you to replace the ink tube assembly, you should replace the ink - HP Designjet L28500 | HP Designjet L28500 Printer Series - User's guide - Page 84
any problem with these components. Order ink supplies You can order the following ink supplies for your printer. Table 7-1 Ink cartridges Cartridge Capacity (ml) HP 792 Black Latex Designjet Ink Cartridge 775 HP 792 Cyan Latex Designjet Ink Cartridge 775 HP 792 Magenta Latex Designjet Ink - HP Designjet L28500 | HP Designjet L28500 Printer Series - User's guide - Page 85
Printhead HP 792 Yellow and Black Designjet Printhead HP 792 Cyan and Light Cyan Designjet Printhead HP 792 Magenta and Light Magenta Designjet Printhead Table 7-3 Waste management system Kit HP 792 Designjet Printhead Cleaning Kit HP 792 Designjet Ink Maintenance Kit HP 789/792 Designjet Printhead - HP Designjet L28500 | HP Designjet L28500 Printer Series - User's guide - Page 86
the same workflow. Even if the cutter is on or successive jobs use different print modes, it is better to print them all together without delays to minimize the time spent in Preparing to print. Change margins The printer margins determine the area between the edges of your image and the edges - HP Designjet L28500 | HP Designjet L28500 Printer Series - User's guide - Page 87
, number of prints by substrate family, number of prints by print-quality option, and total amount of ink used per color. The accuracy of these estimates is not guaranteed. ● Service information: Provides information that service engineers require. ENWW Request the printer's internal prints 81 - HP Designjet L28500 | HP Designjet L28500 Printer Series - User's guide - Page 88
ease the process of switching between different substrates. Name HP Designjet Soft Media Loading Accessory 104-in HP Designjet Soft Media Loading Accessory 61-in HP Designjet L28500 104-in Printer 3-in Spindle HP Designjet L2x500 User Maintenance Kit Product number CZ278A CR765A CZ277A CQ201A - HP Designjet L28500 | HP Designjet L28500 Printer Series - User's guide - Page 89
The front panel and the Embedded Web Server both display the status of the printer, the loaded substrate and the ink system. Check the status of the ink system 1. Access the Embedded press the color of the cartridge. The following information is shown. ● Color ● Status ENWW Check printer status 83 - HP Designjet L28500 | HP Designjet L28500 Printer Series - User's guide - Page 90
, this indicates that non-HP ink is being used. Printer service or repairs required as a result of using "non-HP" ink are not covered on the printer's hard disk, and automatically correct any errors. You are recommended to do this about once every six months, or if you notice any trouble in - HP Designjet L28500 | HP Designjet L28500 Printer Series - User's guide - Page 91
problem, it may start a file system check automatically. This can take about half an hour. Printer alerts The printer can communicate two types of alerts: ● Errors: When the printer service engineer: ● Service Maintenance Kit 1 ● Service Maintenance Kit 2 ● Service Maintenance Kit 3 ENWW Printer alerts - HP Designjet L28500 | HP Designjet L28500 Printer Series - User's guide - Page 92
www.hp.com/go/L28500/support/ and store it on the USB flash drive. IMPORTANT: The USB flash drive should contain only one firmware file (.fmw) in the drive's root folder, and no other files. 2. Connect the USB flash drive to the USB connector at the rear of the printer and follow the instructions on - HP Designjet L28500 | HP Designjet L28500 Printer Series - User's guide - Page 93
Follow the on-screen instructions to download the firmware file and store it on your hard disk. Then select the downloaded .fmw file and click Update. If you experience very slow progress while uploading the firmware file to the printer, the reason could be that you are using a proxy server. In that - HP Designjet L28500 | HP Designjet L28500 Printer Series - User's guide - Page 94
printer. Ink system tips For best results, always follow these guidelines: ● Follow the instructions on the front panel during installation. ● Allow the printer align the printheads manually (see Manual alignment on page 89) or perform the automatic alignment on a supported substrate first, then - HP Designjet L28500 | HP Designjet L28500 Printer Series - User's guide - Page 95
printhead alignment from the Embedded Web Server, select the Setup tab, then select Printhead alignment > Manual printhead alignment > Print. The printer prints 18 rows labelled from A to R. Inspect the print and write down the number of the straightest line in each row (for example, A:9). When - HP Designjet L28500 | HP Designjet L28500 Printer Series - User's guide - Page 96
> Clean and 2. Unlock and open the window. 3. Clean the carriage rail using a lint-free cloth dampened with 95% ethanol. Take care to clean the the bottle of oil from the Maintenance Kit that is supplied with your printer (a replacement kit can be ordered if necessary). 8. Apply a few drops of - HP Designjet L28500 | HP Designjet L28500 Printer Series - User's guide - Page 97
carriage. Under these circumstances, HP recommends that you clean the electrical connections on the printhead. However, routine cleaning of the connections when no problems are apparent is not recommended. A carriage interconnect wiper is included with your printer in the User Maintenance Kit - HP Designjet L28500 | HP Designjet L28500 Printer Series - User's guide - Page 98
. 1. Remove a new pre-moistened replacement sponge from its pouch. A supply of sponges is included in the box with the wiper. If all sponges have been used, more can be obtained by calling your service representative. 2. Open the carriage interconnect wiper. 92 Chapter 12 Hardware maintenance ENWW - HP Designjet L28500 | HP Designjet L28500 Printer Series - User's guide - Page 99
Open the printhead carriage latch and extract the printhead that is causing the problem, as indicated on the front panel. See Replace a printhead on page slot. CAUTION: If the carriage remains in the central part of the printer for more than 7 minutes, it attempts to return to its home position to - HP Designjet L28500 | HP Designjet L28500 Printer Series - User's guide - Page 100
by the mechanical stop on the tool. 8. Take special care to clean all contacts thoroughly, including the ones at the lowest point of the connector. 9. Using the same sponge, clean the lower strip of electrical contacts on the printhead (unless the printhead is new). Avoid touching the upper set of - HP Designjet L28500 | HP Designjet L28500 Printer Series - User's guide - Page 101
and clothing. If the front panel continues to show the Reseat or Replace message, replace the printhead or call your service representative. Clean the exterior of the printer Use a damp sponge or a soft cloth and a mild household cleaner such as non-abrasive liquid soap to clean the outside of - HP Designjet L28500 | HP Designjet L28500 Printer Series - User's guide - Page 102
window on page 99. Follow these instructions to clean the platen. 1. Unload all substrate from the printer. See Unload a roll from the printer on page 36. 2. Turn off the printer and wait until it has cooled down, then unlock and open the printer window. 3. Use a clean, absorbent lint-free cloth to - HP Designjet L28500 | HP Designjet L28500 Printer Series - User's guide - Page 103
ethanol is not provided in the User Maintenance Kit. CAUTION: Ethanol is highly flammable. Observe the manufacturer's safety precautions. CAUTION: Do not use commercial cleaners or abrasive cleaners. Do not wet the platen directly, because you will leave too much moisture behind, which could damage - HP Designjet L28500 | HP Designjet L28500 Printer Series - User's guide - Page 104
printer and reloading the substrate. 11. With a 1 mm diameter pin ensure that the vacuum holes are not obstructed, especially the holes that are covered by the most-used the printheads (which often enables them to recover from problems), go to the printer's front panel and press , then , then Ink - HP Designjet L28500 | HP Designjet L28500 Printer Series - User's guide - Page 105
in size) close to the third pinchwheel from the right. HP recommends that you clean the substrate-advance sensor window whenever you clean . 1. Unload the substrate by using the front panel procedure. See Unload a roll from the printer on page 36. 2. Turn off the printer and wait until it has cooled - HP Designjet L28500 | HP Designjet L28500 Printer Series - User's guide - Page 106
that the platen rollers are squeaking, it is time to lubricate them. Locate the oil bottle in the User Maintenance Kit that came with your printer. 1. Unlock and open the printer window. 2. Locate the small holes in the platen near some of the rollers. 100 Chapter 12 Hardware maintenance ENWW - HP Designjet L28500 | HP Designjet L28500 Printer Series - User's guide - Page 107
3. Put three drops of oil into each hole in the platen. NOTE: Be careful not to spill oil onto the platen. 4. If oil spills onto the platen, wipe the platen clean by using the cloth that was supplied with the User Maintenance Kit. ENWW Lubricate the platen rollers 101 - HP Designjet L28500 | HP Designjet L28500 Printer Series - User's guide - Page 108
substrate is loaded. 3. Make sure that the printhead carriage is located in the service station (at the right end of the printer). 4. Make sure that the Ready message appears on the front panel. 5. Turn off the power by using the Power button on the front panel. 6. Also switch off the power switch - HP Designjet L28500 | HP Designjet L28500 Printer Series - User's guide - Page 109
want to replace it with a full cartridge for unattended printing. You can use the remaining ink in the first cartridge at a more convenient time. ● panel prompts you. If you remove an ink cartridge incorrectly, the printer may subsequently reject that cartridge. CAUTION: Remove an ink cartridge only - HP Designjet L28500 | HP Designjet L28500 Printer Series - User's guide - Page 110
the end of the cartridge that is inserted into the printer, because the connection might be coated with ink. NOTE: If necessary, store a partially-used ink cartridge in the same position as if it were inserted in the printer. Avoid using a partially-used cartridge that has been stored on its end - HP Designjet L28500 | HP Designjet L28500 Printer Series - User's guide - Page 111
can see the label at the top of the side that is facing you. 2. Check that the colored label above the empty slot in the printer matches the color of the label on the cartridge. 3. Shake the cartridge vigorously for about 15 seconds. 4. Insert the ink cartridge into the cartridge drawer - HP Designjet L28500 | HP Designjet L28500 Printer Series - User's guide - Page 112
for the cost of replacement. ● Print quality may be impaired. ● The printer will be unable to estimate the ink level in the cartridge, and will report it as empty. If you decide to use refilled or non-HP ink cartridges, you will need to follow these instructions to make the printer use a cartridge - HP Designjet L28500 | HP Designjet L28500 Printer Series - User's guide - Page 113
icons are not illuminated; but, if you press them successfully, the front panel displays a series of warning messages. In response to each message, press Cancel to cancel the process, or OK tube cap, which will be used to cover the end of the old ink tube. ENWW Replace the ink maintenance kit - HP Designjet L28500 | HP Designjet L28500 Printer Series - User's guide - Page 114
2. On the printer's front panel, press , then Options > Replace ink maintenance kit. 3. Pull the bottom of the ink tube assembly out of the printhead cleaning container. 4. Cover the - HP Designjet L28500 | HP Designjet L28500 Printer Series - User's guide - Page 115
6. Locate the ink funnel. 7. Pull the slider with one finger while removing the ink funnel with the other hand. NOTE: You are recommended to wear gloves. 8. Remove the ink tube assembly support and the ink tube assembly. ENWW Replace the ink maintenance kit 109 - HP Designjet L28500 | HP Designjet L28500 Printer Series - User's guide - Page 116
9. Insert the new ink tube assembly. 10. Pull the slider with one finger while inserting the new ink funnel with the other hand. 11. Press the ink funnel into place. 110 Chapter 12 Hardware maintenance ENWW - HP Designjet L28500 | HP Designjet L28500 Printer Series - User's guide - Page 117
12. Remove the cap from the bottom of the ink tube assembly. 13. Insert the bottom of the ink tube assembly into the printhead cleaning container. 14. Open the ink filter cover. ENWW Replace the ink maintenance kit 111 - HP Designjet L28500 | HP Designjet L28500 Printer Series - User's guide - Page 118
15. Remove the old ink filter and insert a new one. 16. Close the ink filter cover. 17. Close and lock the window. 112 Chapter 12 Hardware maintenance ENWW - HP Designjet L28500 | HP Designjet L28500 Printer Series - User's guide - Page 119
Replace a printhead Remove a printhead 1. On the printer's front panel, press , then Options > Replace printheads. 2. The carriage moves to has stopped moving, the front panel prompts you to open the printer window. Unlock the window and open it. 4. Locate the carriage on the right side of the - HP Designjet L28500 | HP Designjet L28500 Printer Series - User's guide - Page 120
5. Pull up and release the latch on top of the carriage. 6. Lift up the cover. This provides access to the printheads. 7. To remove a printhead, lift up the blue handle. 114 Chapter 12 Hardware maintenance ENWW - HP Designjet L28500 | HP Designjet L28500 Printer Series - User's guide - Page 121
8. Using the blue handle, gently disengage the printhead. 9. Gently pull the blue handle upward until the printhead is released from the carriage. CAUTION: Do not pull - HP Designjet L28500 | HP Designjet L28500 Printer Series - User's guide - Page 122
Insert a printhead 1. If the printhead is new, shake it vigorously before removing the protective caps. Hold the printhead upright (with the protective caps facing down) and shake the printhead vigorously in a smooth up and down motion for about 15 seconds. NOTE: Be careful not to strike the - HP Designjet L28500 | HP Designjet L28500 Printer Series - User's guide - Page 123
5. Push down as indicated by the arrow. CAUTION: You might feel some resistance when installing the new printhead, so you need to press it down firmly but smoothly. You should hear a beep and see confirmation on the front-panel display that the printhead has been inserted. 6. Insert all of the other - HP Designjet L28500 | HP Designjet L28500 Printer Series - User's guide - Page 124
checking and preparing the printheads. The default routine process, when all printheads are changed, takes up to 18 minutes. If the printer identifies a problem when preparing the printheads, the process takes longer, up to 30 minutes. For a single printhead insertion, the time varies between 10 - HP Designjet L28500 | HP Designjet L28500 Printer Series - User's guide - Page 125
, then Options > Replace PH cleaning kit. 2. The printhead cleaning cartridge is located in a slot underneath the front panel, at the front of the printer. Open the door. Follow these precautions when removing a printhead cleaning cartridge: ● Be careful not to get ink on your hands. Ink may be on - HP Designjet L28500 | HP Designjet L28500 Printer Series - User's guide - Page 126
cartridge to remove it from the slot, and slide it out. 5. The plastic bag in which the new printhead cleaning cartridge comes can be used to dispose of the old printhead cleaning cartridge. 6. Remove the plastic cover from the new printhead cleaning cartridge. 120 Chapter 12 Hardware maintenance - HP Designjet L28500 | HP Designjet L28500 Printer Series - User's guide - Page 127
front panel will not show the new printhead cleaning cartridge until the door is closed. 9. When you have inserted the printhead cleaning cartridge into the printer, close the door. 10. Unlock and open the window. ENWW Replace the printhead cleaning kit 121 - HP Designjet L28500 | HP Designjet L28500 Printer Series - User's guide - Page 128
11. Locate the ink funnel. 12. Pull the slider with one finger while removing the ink funnel with the other hand. NOTE: You are recommended to wear gloves. 122 Chapter 12 Hardware maintenance ENWW - HP Designjet L28500 | HP Designjet L28500 Printer Series - User's guide - Page 129
13. Pull the slider with one finger while inserting the new ink funnel with the other hand. 14. Press the ink funnel into place. 15. Close and lock the window. ENWW Replace the printhead cleaning kit 123 - HP Designjet L28500 | HP Designjet L28500 Printer Series - User's guide - Page 130
16. Open the ink filter cover. 17. Remove the old ink filter and insert a new one. 18. Close the ink filter cover. 124 Chapter 12 Hardware maintenance ENWW - HP Designjet L28500 | HP Designjet L28500 Printer Series - User's guide - Page 131
lives. You can continue printing for quite some time, depending on your use of the printer. However, HP strongly recommends that you call your service representative and arrange for a service maintenance visit. The service engineer can then replace the worn parts on-site, which will prolong the - HP Designjet L28500 | HP Designjet L28500 Printer Series - User's guide - Page 132
using when you detected a problem. 2. Check that the selected substrate type is the same as the substrate type that is loaded into the printer. 3. On the printer's front panel, press , then > Clean printheads > Print test plot. , then Ink > Image-quality maintenance 126 Chapter 13 Troubleshoot - HP Designjet L28500 | HP Designjet L28500 Printer Series - User's guide - Page 133
on page 113. What to do if problems persist If you still experience print-quality problems after applying the advice in this chapter, here printer firmware is up to date. See Firmware update on page 86. ● Check that you have the correct settings in your software program. ● Call your service - HP Designjet L28500 | HP Designjet L28500 Printer Series - User's guide - Page 134
). You can check whether it is necessary by using the printhead status plot (see Use the printhead status plot on page 126). ● allow better drying on consecutive passes. If the problem persists, call your service representative. See When you need help on page Troubleshoot print-quality issues ENWW - HP Designjet L28500 | HP Designjet L28500 Printer Series - User's guide - Page 135
one of the printheads. Turn off the printer and allow it to cool down, then page 88). If necessary, align them manually. ◦ Print the printhead status plot using pure black and not a mixture of other colors. See your RIP documentation. If the problem persists, call your service representative (see HP - HP Designjet L28500 | HP Designjet L28500 Printer Series - User's guide - Page 136
calib > Print adjustment plot. The printer prints a substrate-advance adjustment image. Therefore, in this case you are recommended to use only the adjustment plot. When you have chosen by the RIP. Depending on your firmware version, this option may also be Troubleshoot print-quality issues ENWW - HP Designjet L28500 | HP Designjet L28500 Printer Series - User's guide - Page 137
Consider using the take-up reel, to give the printer better control of the substrate. ◦ This kind of banding is less visible when the printer is at the beginning of the print, disable the cutter and advance the substrate manually about 100-150 mm before the first print. The print is deformed into - HP Designjet L28500 | HP Designjet L28500 Printer Series - User's guide - Page 138
by using the printhead status plot (see Use the printhead status plot on page 126). Color intensity varies If some printhead nozzles are in use while the problem in some cases, as all the nozzles are refreshed whenever they enter the service station between passes. 132 Chapter 13 Troubleshoot - HP Designjet L28500 | HP Designjet L28500 Printer Series - User's guide - Page 139
Not all RIPs provide this option. ● Add lateral color bars to the image, manually, before printing. In this case, you can either use the standard colors, or decide to include a particular color in which you have noticed the problem. The recommended width of each color bar is 3 mm. Lack of sharpness - HP Designjet L28500 | HP Designjet L28500 Printer Series - User's guide - Page 140
jobs that start printing when the printer is idle and when the problem tends to disappear if the substrate is left uncovered for some time. Alternatively, some individual rolls of substrate may have a defective coating. The solution in this case is to use another roll. 134 Chapter 13 Troubleshoot - HP Designjet L28500 | HP Designjet L28500 Printer Series - User's guide - Page 141
the minimum drying power. NOTE: This solution is specific to this problem, and should not be used in other cases, when it could cause further problems. ● When the symptoms can be seen only at the start of the first print after the printer has been idle for some time (especially when the start of - HP Designjet L28500 | HP Designjet L28500 Printer Series - User's guide - Page 142
the color inside the tile. To solve this problem, go to the front panel and press , This is a common issue of inkjet printers (both thermal inkjet and piezo inkjet), set from the RIP. ◦ If you are using a unidirectional print mode, try changing to bidirectional Troubleshoot print-quality issues ENWW - HP Designjet L28500 | HP Designjet L28500 Printer Series - User's guide - Page 143
14 Troubleshoot substrate issues The substrate cannot be loaded successfully Here are some suggestions to try if you cannot load the substrate successfully. ● Reread the loading instructions, and make sure that you are following them. See Handle the substrate on page 21. ● When loading a textile - HP Designjet L28500 | HP Designjet L28500 Printer Series - User's guide - Page 144
codes (see Front-panel error messages on page 153). If you are trying to load a very thin or very thick substrate, or a textile, remember to follow the special procedure for loading such substrates. See The loading accessory on page 47. Check the substrate path ● This problem can occur when a roll - HP Designjet L28500 | HP Designjet L28500 Printer Series - User's guide - Page 145
front panel, then also switch off the power switch at the rear. 2. Unlock and open the printer window. 3. Cut the substrate where it enters the printer, and rewind the input roll. 4. Wait for the printer to cool down to room temperature. 5. Try to move the printhead carriage out of the way. ENWW - HP Designjet L28500 | HP Designjet L28500 Printer Series - User's guide - Page 146
to cause an obstruction within the printer, it can often be cleared by loading a rigid substrate type into the printer. 14. If you find that you have print-quality problems after a jam, try realigning the and 50 mmH2O for other substrate families. 140 Chapter 14 Troubleshoot substrate issues ENWW - HP Designjet L28500 | HP Designjet L28500 Printer Series - User's guide - Page 147
apply only to jobs that start printing when the printer is idle and when the cutter is disabled. ● the next job, and advance the substrate, using the Move substrate option in the front panel job will be printed on undamaged substrate. If the problem appears only at the beginning of the print, try - HP Designjet L28500 | HP Designjet L28500 Printer Series - User's guide - Page 148
used in the print. You can expect the following variations from one print to another: ● Photorealistic, Paper-Solvent, Paper-Aqueous: less than 0.4% ● Self-Adhesive: less than 0.7% ● Banner: less than 1% To solve the tiling problem HP automatically or manually. When Troubleshoot substrate issues ENWW - HP Designjet L28500 | HP Designjet L28500 Printer Series - User's guide - Page 149
substrate is severely damaged on the take-up reel, do not use the printer's cutter to cut and remove the substrate. Instead, cut the substrate manually as close as possible to the printer window, then remove the roll. If the problem remains after removing the substrate jam, unload the take-up reel - HP Designjet L28500 | HP Designjet L28500 Printer Series - User's guide - Page 150
winding direction is not correct. Change the winding direction using the winding-direction switch on the take-up reel motor. You may need to use the blue arrow buttons to collect substrate from the floor Change the switch to the correct position. 144 Chapter 14 Troubleshoot substrate issues ENWW - HP Designjet L28500 | HP Designjet L28500 Printer Series - User's guide - Page 151
15 Troubleshoot ink-system issues Ink maintenance kit needs to be installed If the front panel tells you that the ink maintenance kit needs to be installed, it means that the kit has not been installed in your printer. Perform the normal procedure for replacing the ink maintenance kit (see Replace - HP Designjet L28500 | HP Designjet L28500 Printer Series - User's guide - Page 152
a printhead has been reseated or replaced. In the case of a substrate jam, if you have used a custom substrate, or if you are experiencing problems with color accuracy; you might need to align the printheads. See Align the printheads on page 88. 146 Chapter 15 Troubleshoot ink-system issues ENWW - HP Designjet L28500 | HP Designjet L28500 Printer Series - User's guide - Page 153
material that is not supported, make sure you use a material with the same thickness as the material you are going to use for printing. 3. Remove before using the printer. NOTE: A calibration image is printed during the printhead alignment process. The front panel shows if there were any errors in - HP Designjet L28500 | HP Designjet L28500 Printer Series - User's guide - Page 154
a material that is not supported, make sure you use a material with the same thickness as the material you are going to use for printing. 2. Go to process is complete before using the printer. Scan errors during alignment If the alignment process fails, a Scanning problems message appears on the - HP Designjet L28500 | HP Designjet L28500 Printer Series - User's guide - Page 155
16 Troubleshoot other issues The printer cannot get an IP address If your network has no DHCP server, the printer cannot automatically retrieve an IP address. In this case, you must set the printer's IP address manually, in the following way. 1. From the front panel, press , then , then Setup > - HP Designjet L28500 | HP Designjet L28500 Printer Series - User's guide - Page 156
printer by using the Power button on the front panel, wait until the electromagnetic environment has returned to normal, then turn the printer on again. If the problems persist, call your service the roll from the printer and load a new roll, using the front panel to guide you through the process. - HP Designjet L28500 | HP Designjet L28500 Printer Series - User's guide - Page 157
message when you try to print, such as error 61:09 or 63:05. See Front-panel error messages on page 153. ● Your computer or printer stalls when transferring data. To solve a communication problem: ● Make sure that you have selected the correct printer in your RIP. ● Remember that large images - HP Designjet L28500 | HP Designjet L28500 Printer Series - User's guide - Page 158
The platen rollers squeak See Lubricate the platen rollers on page 100. 152 Chapter 16 Troubleshoot other issues ENWW - HP Designjet L28500 | HP Designjet L28500 Printer Series - User's guide - Page 159
on the front panel that is not included in this list, turn off the printer and then turn it back on. If the problem persists, call your service representative. Table 17-1 Numeric error messages Error code Recommendation 14.32:01, 14.52:01, 14.72:01 14.33:01, 14.53:01, 14.73:01 14 - HP Designjet L28500 | HP Designjet L28500 Printer Series - User's guide - Page 160
error messages (continued) Error code Recommendation 24:03 The setup procedure has not been completed. Restart the printer, then restart the setup procedure from the beginning. 26.n:01 (where n = the ink cartridge number) Remove the ink cartridge and reinstall it in the printer. If the error - HP Designjet L28500 | HP Designjet L28500 Printer Series - User's guide - Page 161
Numeric error messages (continued) Error code Recommendation 61:01 The file format is incorrect and the printer cannot process the job. Try the following remedies: ● Make sure that the RIP supports the printer and that the printer driver is installed in the RIP. ● Check that you are using the - HP Designjet L28500 | HP Designjet L28500 Printer Series - User's guide - Page 162
error messages (continued) Error code Recommendation 81:01, 81:03 Open the printer cleaning the carriage reflector; if the problem persists, see The substrate has jammed Use the printhead status plot on page 126. Printer logs If you go to the front panel and press , then , then Setup > Printer - HP Designjet L28500 | HP Designjet L28500 Printer Series - User's guide - Page 163
and can also be downloaded from http://www.hp.com/go/L28500/manuals/. ● Introductory information ● User's guide, including maintenance and troubleshooting information ● Legal information ● Limited warranty NOTE: The User's guide can also be viewed on the printer's front panel by pressing the icon - HP Designjet L28500 | HP Designjet L28500 Printer Series - User's guide - Page 164
to do before you call: ● Review the troubleshooting suggestions in this guide. ● Review your RIP's documentation, if relevant. ● Please have the following information available: ◦ The printer you are using: the product number, the serial number and the service ID NOTE: This information is available - HP Designjet L28500 | HP Designjet L28500 Printer Series - User's guide - Page 165
19 Printer specifications Functional specifications Table 19-1 HP No. 792 ink supplies Printheads Yellow/black in) Narrow substrate: 254 mm (10 in) Length 1.5 m (59 in) Weight Maximum 2642 mm (104 in) Roll with maximum external diameter of 250 mm (9.8 in) 100 kg (220 lb) The substrate core - HP Designjet L28500 | HP Designjet L28500 Printer Series - User's guide - Page 166
shows the resolutions supported by the printer. See your RIP documentation to find the resolutions supported by your RIP. Speed Std Speed Std Speed Std Speed Std Speed Std Std Std Approximate printing speed (m²/h) 2.64 m (104 in) wide 1.98 m (78 inch) wide 1.52 m (60 inch) wide 70.0 60.0 55 - HP Designjet L28500 | HP Designjet L28500 Printer Series - User's guide - Page 167
of the building's electrical system used to power the printer and also for printer installation. Make sure that your electrician Code (NEC). NOTE: Remember that you are required to follow the local laws, regulations and standards that pertain to the electrical installation of your printer - HP Designjet L28500 | HP Designjet L28500 Printer Series - User's guide - Page 168
humid location, water from the atmosphere can condensate on the printer parts and cartridges and can result in ink leaks and printer errors. In this case, HP recommends that you wait at least 3 hours before turning on the printer or installing the ink cartridges, to allow the condensate to evaporate - HP Designjet L28500 | HP Designjet L28500 Printer Series - User's guide - Page 169
detailed treatment of any particular problem, please see the relevant chapter in this guide. Problem Parameter Durability problems, ink smudges Curing temperature printing Increase Slower printing Decrease Slower printing Disable Manual substrate advance may be needed to avoid crashes with - HP Designjet L28500 | HP Designjet L28500 Printer Series - User's guide - Page 170
carriage speed to fix this) Increase (depends on RIP) Increase Slower printing Activate Grainy aspect Use Avoid difficult areas at the end of the queue, and sudden changes of ink limits while Less durability (smudges), oily finish 164 Appendix A Summary of common printing problems ENWW - HP Designjet L28500 | HP Designjet L28500 Printer Series - User's guide - Page 171
from print to print and from printer to printer. Curing The substrate is heated in the curing zone to coalesce the latex, creating a polymeric film which acts is in progress. Firmware Software that controls your printer's functionality and is stored semi-permanently in the printer (it can be updated - HP Designjet L28500 | HP Designjet L28500 Printer Series - User's guide - Page 172
temperatures, vacuum pressure and substrate advance compensation) and requirements of the substrate that are not directly related to color. Media presets for your printer are installed in the RIP. Minimum drying power The minimum heat applied in the printing zone so that the substrate does not cool - HP Designjet L28500 | HP Designjet L28500 Printer Series - User's guide - Page 173
passes, to compensate for the characteristics of different substrate types. The printer normally performs this adjustment automatically, but may need to be recalibrated for substrates not supported by HP, or for an unusual ambient temperature or humidity. Incorrect substrate advance compensation - HP Designjet L28500 | HP Designjet L28500 Printer Series - User's guide - Page 174
70 communication problems 151 components of printer 5 connect the printer 13 connection printer 4 file system check 84 firmware update 86 front panel 8 language 15 front panel error language 15 load roll 29 load with accessory 48 manual load 33 manual PH alignment 89 max skew setting 31, 34, - HP Designjet L28500 | HP Designjet L28500 Printer Series - User's guide - Page 175
substrate problems 137 loading thick substrates 34, 50 loading thin substrates 34, 50 lubricating the platen rollers 100 M maintenance, service 125 manuals 157 margins changing 80 specification 160 media presets downloading 56 memory specifications 161 move the printer 102 N non-HP ink cartridges - HP Designjet L28500 | HP Designjet L28500 Printer Series - User's guide - Page 176
wrinkled 141 substrate-advance adjustment 129 support services HP Customer Care 157 U units of measurement 17 W warming duration 16 warning 3 warning labels 3 T take-up reel doesn't rewind 143 motor 8 using 37 telephone number 158 telephone support 158 turn the printer on/off 11 170 Index ENWW
-
 1
1 -
 2
2 -
 3
3 -
 4
4 -
 5
5 -
 6
6 -
 7
7 -
8
-
9
-
10
-
11
-
12
-
13
-
14
-
15
-
16
-
17
-
18
-
19
-
20
-
21
-
22
-
23
-
24
-
25
-
26
-
27
-
28
-
29
-
30
-
31
-
32
-
33
-
34
-
35
-
36
-
37
-
38
-
39
-
40
-
41
-
42
-
43
-
44
-
45
-
46
-
47
-
48
-
49
-
50
-
51
-
52
-
53
-
54
-
55
-
56
-
57
-
58
-
59
-
60
-
61
-
62
-
63
-
64
-
65
-
66
-
67
-
68
-
69
-
70
-
71
-
72
-
73
-
74
-
75
-
76
-
77
-
78
-
79
-
80
-
81
-
82
-
83
-
84
-
85
-
86
-
87
-
88
-
89
-
90
-
91
-
92
-
93
-
94
-
95
-
96
-
97
-
98
-
99
-
100
-
101
-
102
-
103
-
104
-
105
-
106
-
107
-
108
-
109
-
110
-
111
-
112
-
113
-
114
-
115
-
116
-
117
-
118
-
119
-
120
-
121
-
122
-
123
-
124
-
125
-
126
-
127
-
128
-
129
-
130
-
131
-
132
-
133
-
134
-
135
-
136
-
137
-
138
-
139
-
140
-
141
-
142
-
143
-
144
-
145
-
146
-
147
-
148
-
149
-
150
-
151
-
152
-
153
-
154
-
155
-
156
-
157
-
158
-
159
-
160
-
161
-
162
-
163
-
164
-
165
-
166
-
167
-
168
-
169
-
170
-
171
-
172
-
173
-
174
-
175
-
176
 |
 |

DESIGNJET L28500 printer series
User’s guide