HP Designjet L28500 HP Designjet L28500 Printer Series - User's guide - Page 37
Substrate, Substrate handling options, Max skew setting
 |
View all HP Designjet L28500 manuals
Add to My Manuals
Save this manual to your list of manuals |
Page 37 highlights
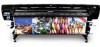
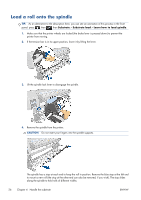
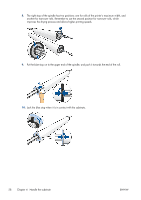
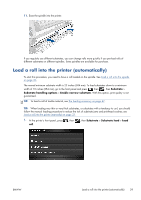
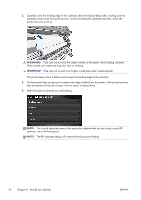
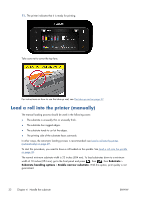
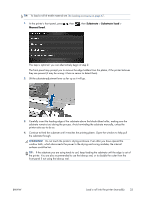
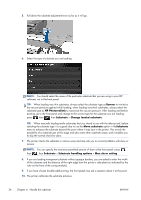
5. You have the option of entering the length of substrate on the roll. If you choose to do so, the amount of substrate that is subsequently used is then tracked. See Substrate length tracking on page 54. 6. The printer checks the substrate in various ways and may ask you to correct problems with skew or tension. NOTE: You can specify the maximum permitted amount of skew at the front panel: press , then , then Substrate > Substrate handling options > Max skew setting. 7. Wait until the substrate emerges from the printer, as shown below. NOTE: If you have an unexpected problem at any stage of the substrate loading process, see The substrate cannot be loaded successfully on page 137. 8. If you are loading transparent substrate without opaque borders, you are asked to enter the width of the substrate and the distance of the right edge from the printer's side plate (as indicated by the ruler on the front of the curing module). 9. If you have chosen double-sided printing, the front panel may ask a question about it at this point. 10. The printer calibrates the substrate advance. ENWW Load a roll into the printer (automatically) 31
-
 1
1 -
2
-
3
-
4
-
5
-
6
-
7
-
8
-
9
-
10
-
11
-
12
-
13
-
14
-
15
-
16
-
17
-
18
-
19
-
20
-
21
-
22
-
23
-
24
-
25
-
26
-
27
-
28
-
29
-
30
-
31
-
 32
32 -
 33
33 -
 34
34 -
 35
35 -
 36
36 -
 37
37 -
 38
38 -
 39
39 -
 40
40 -
 41
41 -
 42
42 -
43
-
44
-
45
-
46
-
47
-
48
-
49
-
50
-
51
-
52
-
53
-
54
-
55
-
56
-
57
-
58
-
59
-
60
-
61
-
62
-
63
-
64
-
65
-
66
-
67
-
68
-
69
-
70
-
71
-
72
-
73
-
74
-
75
-
76
-
77
-
78
-
79
-
80
-
81
-
82
-
83
-
84
-
85
-
86
-
87
-
88
-
89
-
90
-
91
-
92
-
93
-
94
-
95
-
96
-
97
-
98
-
99
-
100
-
101
-
102
-
103
-
104
-
105
-
106
-
107
-
108
-
109
-
110
-
111
-
112
-
113
-
114
-
115
-
116
-
117
-
118
-
119
-
120
-
121
-
122
-
123
-
124
-
125
-
126
-
127
-
128
-
129
-
130
-
131
-
132
-
133
-
134
-
135
-
136
-
137
-
138
-
139
-
140
-
141
-
142
-
143
-
144
-
145
-
146
-
147
-
148
-
149
-
150
-
151
-
152
-
153
-
154
-
155
-
156
-
157
-
158
-
159
-
160
-
161
-
162
-
163
-
164
-
165
-
166
-
167
-
168
-
169
-
170
-
171
-
172
-
173
-
174
-
175
-
176
 |
 |