HP Designjet L28500 HP Designjet L28500 Printer Series - User's guide - Page 149
The automatic cutter does not work, Take-up reel substrate jam, Take-up reel does not wind - pdf
 |
View all HP Designjet L28500 manuals
Add to My Manuals
Save this manual to your list of manuals |
Page 149 highlights
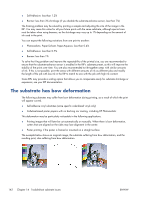
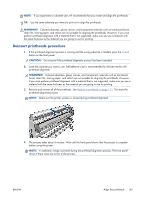
You can use the straightness optimization option in the front panel, or in your RIP software, to compensate for this effect and restore the original shape of your image. ● At the front panel, press , then , then Ink > Image-quality maintenance > Straightness optimization, and select a correction value from -15 to +15. The chosen value should represent the vertical distance in millimeters that the centre of the substrate has moved with respect to the left and right edges. If the deformation moves the center of the substrate in the direction of substrate advance, the correction value should be negative; if in the reverse direction, the correction value should be positive. In practice, the required correction value is normally negative. TIP: You can use the diagnostic image provided in http://IPaddress/hp/device/ webAccess/diagnostic/StraightnessOptimizationPlot.pdf (where IPaddress is the IP address of your printer) to help you to determine the correct value to apply. ● To use the straightness optimization option from the RIP, please refer to your RIP documentation. The automatic cutter does not work The automatic cutter is turned off in any of the following cases. ● When it has been manually disabled from the front panel: press > Substrate handling options > Cutter > Off. , then , then Substrate ● When printing on some particularly heavy substrate types, which it cannot cut. ● When the take-up reel is enabled. TIP: You can disable the take-up reel from the front panel by pressing Substrate > Take-up reel > Enable take-up reel. ● During double-sided printing. , then , then Take-up reel substrate jam If the substrate is severely damaged on the take-up reel, do not use the printer's cutter to cut and remove the substrate. Instead, cut the substrate manually as close as possible to the printer window, then remove the roll. If the problem remains after removing the substrate jam, unload the take-up reel from the front panel and load it again. Take-up reel does not wind Predictably, if the take-up reel is not winding as anticipated, the printed output is likely to end up on the floor. If the printer recognizes a problem with the take-up reel, it interrupts the print job until the issue is corrected. If the printer does not recognize a problem, the job continues to print. The following table highlights possible issues and solutions. ENWW The automatic cutter does not work 143
-
 1
1 -
2
-
3
-
4
-
5
-
6
-
7
-
8
-
9
-
10
-
11
-
12
-
13
-
14
-
15
-
16
-
17
-
18
-
19
-
20
-
21
-
22
-
23
-
24
-
25
-
26
-
27
-
28
-
29
-
30
-
31
-
32
-
33
-
34
-
35
-
36
-
37
-
38
-
39
-
40
-
41
-
42
-
43
-
44
-
45
-
46
-
47
-
48
-
49
-
50
-
51
-
52
-
53
-
54
-
55
-
56
-
57
-
58
-
59
-
60
-
61
-
62
-
63
-
64
-
65
-
66
-
67
-
68
-
69
-
70
-
71
-
72
-
73
-
74
-
75
-
76
-
77
-
78
-
79
-
80
-
81
-
82
-
83
-
84
-
85
-
86
-
87
-
88
-
89
-
90
-
91
-
92
-
93
-
94
-
95
-
96
-
97
-
98
-
99
-
100
-
101
-
102
-
103
-
104
-
105
-
106
-
107
-
108
-
109
-
110
-
111
-
112
-
113
-
114
-
115
-
116
-
117
-
118
-
119
-
120
-
121
-
122
-
123
-
124
-
125
-
126
-
127
-
128
-
129
-
130
-
131
-
132
-
133
-
134
-
135
-
136
-
137
-
138
-
139
-
140
-
141
-
142
-
143
-
 144
144 -
 145
145 -
 146
146 -
 147
147 -
 148
148 -
 149
149 -
 150
150 -
 151
151 -
 152
152 -
 153
153 -
 154
154 -
155
-
156
-
157
-
158
-
159
-
160
-
161
-
162
-
163
-
164
-
165
-
166
-
167
-
168
-
169
-
170
-
171
-
172
-
173
-
174
-
175
-
176
 |
 |
