HP Designjet L28500 HP Designjet L28500 Printer Series - User's guide - Page 105
Clean the substrate-advance sensor window
 |
View all HP Designjet L28500 manuals
Add to My Manuals
Save this manual to your list of manuals |
Page 105 highlights
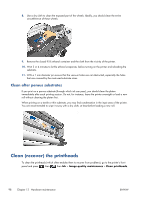
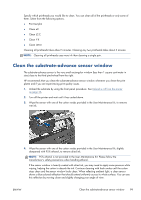
Specify which printheads you would like to clean. You can clean all of the printheads or only some of them. Select from the following options. ● Print test plot ● Clean all ● Clean LC-C ● Clean Y-K ● Clean LM-M Cleaning all printheads takes about 5 minutes. Cleaning any two printheads takes about 3 minutes. NOTE: Cleaning all printheads uses more ink than cleaning a single pair. Clean the substrate-advance sensor window The substrate-advance sensor is the very small rectangular window (less than 1 square centimeter in size) close to the third pinchwheel from the right. HP recommends that you clean the substrate-advance sensor window whenever you clean the print platen and if you are experiencing print quality issues. 1. Unload the substrate by using the front panel procedure. See Unload a roll from the printer on page 36. 2. Turn off the printer and wait until it has cooled down. 3. Wipe the sensor with one of the cotton swabs provided in the User Maintenance Kit, to remove wet ink. 4. Wipe the sensor with one of the cotton swabs provided in the User Maintenance Kit, slightly dampened with 95% ethanol, to remove dried ink. NOTE: 95% ethanol is not provided in the User Maintenance Kit. Please follow the manufacturer's safety precautions when handling ethanol. If the sensor window is heavily coated with dried ink, you may need to apply some pressure while wiping, helping the cotton to absorb the ink. Continue cleaning with fresh swabs until the cotton stays clean and the sensor window looks clean. When reflecting ambient light, a clean sensor shows a blue-colored reflection that should extend uniformly across its whole surface. You can see this reflection by moving closer and slightly changing your angle of view. ENWW Clean the substrate-advance sensor window 99
-
 1
1 -
2
-
3
-
4
-
5
-
6
-
7
-
8
-
9
-
10
-
11
-
12
-
13
-
14
-
15
-
16
-
17
-
18
-
19
-
20
-
21
-
22
-
23
-
24
-
25
-
26
-
27
-
28
-
29
-
30
-
31
-
32
-
33
-
34
-
35
-
36
-
37
-
38
-
39
-
40
-
41
-
42
-
43
-
44
-
45
-
46
-
47
-
48
-
49
-
50
-
51
-
52
-
53
-
54
-
55
-
56
-
57
-
58
-
59
-
60
-
61
-
62
-
63
-
64
-
65
-
66
-
67
-
68
-
69
-
70
-
71
-
72
-
73
-
74
-
75
-
76
-
77
-
78
-
79
-
80
-
81
-
82
-
83
-
84
-
85
-
86
-
87
-
88
-
89
-
90
-
91
-
92
-
93
-
94
-
95
-
96
-
97
-
98
-
99
-
 100
100 -
 101
101 -
 102
102 -
 103
103 -
 104
104 -
 105
105 -
 106
106 -
 107
107 -
 108
108 -
 109
109 -
 110
110 -
111
-
112
-
113
-
114
-
115
-
116
-
117
-
118
-
119
-
120
-
121
-
122
-
123
-
124
-
125
-
126
-
127
-
128
-
129
-
130
-
131
-
132
-
133
-
134
-
135
-
136
-
137
-
138
-
139
-
140
-
141
-
142
-
143
-
144
-
145
-
146
-
147
-
148
-
149
-
150
-
151
-
152
-
153
-
154
-
155
-
156
-
157
-
158
-
159
-
160
-
161
-
162
-
163
-
164
-
165
-
166
-
167
-
168
-
169
-
170
-
171
-
172
-
173
-
174
-
175
-
176
 |
 |
