HP Designjet L28500 HP Designjet L28500 Printer Series - User's guide - Page 96
Preventive maint. tasks, Clean and, lubricate the carriage rail, CAUTION
 |
View all HP Designjet L28500 manuals
Add to My Manuals
Save this manual to your list of manuals |
Page 96 highlights
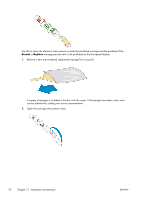
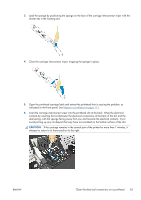
1. At the front panel, press , then lubricate the carriage rail. , then Preventive maint. tasks > Clean and 2. Unlock and open the window. 3. Clean the carriage rail using a lint-free cloth dampened with 95% ethanol. Take care to clean the whole rail, including the part under the left cover. NOTE: 95% ethanol is not provided in the Maintenance Kit. CAUTION: Ethanol is highly flammable. Observe the manufacturer's safety precautions. CAUTION: Do not use commercial cleaners or abrasive cleaners. CAUTION: While cleaning, be careful not to damage the metal strip located on top of the rail. 4. Wait until the rail is dry, then close the window. The carriage moves to the center of the printer so that you can reach the part of the rail under the right cover and the carriage pads. 5. Unlock and open the printer window. 6. Clean the carriage rail area under the right cover as described in step 3. 7. Take the bottle of oil from the Maintenance Kit that is supplied with your printer (a replacement kit can be ordered if necessary). 8. Apply a few drops of oil directly to the pads on either side of the carriage. NOTE: While lubricating, be careful not to drop oil on the metal strip located on top of the rail. 90 Chapter 12 Hardware maintenance ENWW
-
 1
1 -
2
-
3
-
4
-
5
-
6
-
7
-
8
-
9
-
10
-
11
-
12
-
13
-
14
-
15
-
16
-
17
-
18
-
19
-
20
-
21
-
22
-
23
-
24
-
25
-
26
-
27
-
28
-
29
-
30
-
31
-
32
-
33
-
34
-
35
-
36
-
37
-
38
-
39
-
40
-
41
-
42
-
43
-
44
-
45
-
46
-
47
-
48
-
49
-
50
-
51
-
52
-
53
-
54
-
55
-
56
-
57
-
58
-
59
-
60
-
61
-
62
-
63
-
64
-
65
-
66
-
67
-
68
-
69
-
70
-
71
-
72
-
73
-
74
-
75
-
76
-
77
-
78
-
79
-
80
-
81
-
82
-
83
-
84
-
85
-
86
-
87
-
88
-
89
-
90
-
 91
91 -
 92
92 -
 93
93 -
 94
94 -
 95
95 -
 96
96 -
 97
97 -
 98
98 -
 99
99 -
 100
100 -
 101
101 -
102
-
103
-
104
-
105
-
106
-
107
-
108
-
109
-
110
-
111
-
112
-
113
-
114
-
115
-
116
-
117
-
118
-
119
-
120
-
121
-
122
-
123
-
124
-
125
-
126
-
127
-
128
-
129
-
130
-
131
-
132
-
133
-
134
-
135
-
136
-
137
-
138
-
139
-
140
-
141
-
142
-
143
-
144
-
145
-
146
-
147
-
148
-
149
-
150
-
151
-
152
-
153
-
154
-
155
-
156
-
157
-
158
-
159
-
160
-
161
-
162
-
163
-
164
-
165
-
166
-
167
-
168
-
169
-
170
-
171
-
172
-
173
-
174
-
175
-
176
 |
 |
