HP Designjet L28500 HP Designjet L28500 Printer Series - User's guide - Page 125
Options, Replace PH cleaning kit
 |
View all HP Designjet L28500 manuals
Add to My Manuals
Save this manual to your list of manuals |
Page 125 highlights
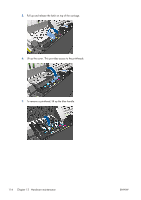
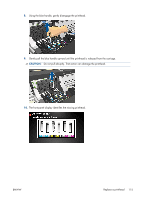
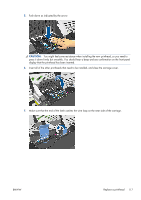
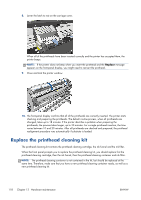
TIP: If you want to remove and inspect the printhead cleaning cartridge at any time, you can start the following procedure. If you put the old printhead cleaning cartridge back into the printer after inspecting it, the procedure ends at that point. 1. On the printer's front panel, press , then Options > Replace PH cleaning kit. 2. The printhead cleaning cartridge is located in a slot underneath the front panel, at the front of the printer. Open the door. Follow these precautions when removing a printhead cleaning cartridge: ● Be careful not to get ink on your hands. Ink may be on, around and inside the replaced printhead cleaning cartridge. ● Always handle and store the replaced printhead cleaning cartridge upright to avoid spilling any ink. WARNING! Make sure that the printer wheels are locked (the brake lever is pressed down) to prevent the printer from moving. ENWW Replace the printhead cleaning kit 119
-
 1
1 -
2
-
3
-
4
-
5
-
6
-
7
-
8
-
9
-
10
-
11
-
12
-
13
-
14
-
15
-
16
-
17
-
18
-
19
-
20
-
21
-
22
-
23
-
24
-
25
-
26
-
27
-
28
-
29
-
30
-
31
-
32
-
33
-
34
-
35
-
36
-
37
-
38
-
39
-
40
-
41
-
42
-
43
-
44
-
45
-
46
-
47
-
48
-
49
-
50
-
51
-
52
-
53
-
54
-
55
-
56
-
57
-
58
-
59
-
60
-
61
-
62
-
63
-
64
-
65
-
66
-
67
-
68
-
69
-
70
-
71
-
72
-
73
-
74
-
75
-
76
-
77
-
78
-
79
-
80
-
81
-
82
-
83
-
84
-
85
-
86
-
87
-
88
-
89
-
90
-
91
-
92
-
93
-
94
-
95
-
96
-
97
-
98
-
99
-
100
-
101
-
102
-
103
-
104
-
105
-
106
-
107
-
108
-
109
-
110
-
111
-
112
-
113
-
114
-
115
-
116
-
117
-
118
-
119
-
 120
120 -
 121
121 -
 122
122 -
 123
123 -
 124
124 -
 125
125 -
 126
126 -
 127
127 -
 128
128 -
 129
129 -
 130
130 -
131
-
132
-
133
-
134
-
135
-
136
-
137
-
138
-
139
-
140
-
141
-
142
-
143
-
144
-
145
-
146
-
147
-
148
-
149
-
150
-
151
-
152
-
153
-
154
-
155
-
156
-
157
-
158
-
159
-
160
-
161
-
162
-
163
-
164
-
165
-
166
-
167
-
168
-
169
-
170
-
171
-
172
-
173
-
174
-
175
-
176
 |
 |
