HP Designjet L28500 HP Designjet L28500 Printer Series - User's guide - Page 109
Replace an ink cartridge, Ink information, Options
 |
View all HP Designjet L28500 manuals
Add to My Manuals
Save this manual to your list of manuals |
Page 109 highlights
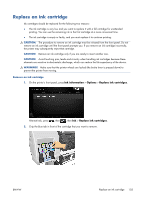
Replace an ink cartridge Ink cartridges should be replaced for the following two reasons: ● The ink cartridge is very low and you want to replace it with a full cartridge for unattended printing. You can use the remaining ink in the first cartridge at a more convenient time. ● The ink cartridge is empty or faulty, and you must replace it to continue printing. CAUTION: The procedure to remove an ink cartridge must be initiated from the front panel. Do not remove an ink cartridge until the front panel prompts you. If you remove an ink cartridge incorrectly, the printer may subsequently reject that cartridge. CAUTION: Remove an ink cartridge only if you are ready to insert another one. CAUTION: Avoid touching pins, leads and circuitry when handling ink cartridges because these elements are sensitive to electrostatic discharge, which can reduce the life expectancy of the device. WARNING! Make sure that the printer wheels are locked (the brake lever is pressed down) to prevent the printer from moving. Remove an ink cartridge 1. On the printer's front panel, press Ink information > Options > Replace ink cartridges. Alternatively, press , then , then Ink > Replace ink cartridges. 2. Grip the blue tab in front of the cartridge that you want to remove. ENWW Replace an ink cartridge 103
-
 1
1 -
2
-
3
-
4
-
5
-
6
-
7
-
8
-
9
-
10
-
11
-
12
-
13
-
14
-
15
-
16
-
17
-
18
-
19
-
20
-
21
-
22
-
23
-
24
-
25
-
26
-
27
-
28
-
29
-
30
-
31
-
32
-
33
-
34
-
35
-
36
-
37
-
38
-
39
-
40
-
41
-
42
-
43
-
44
-
45
-
46
-
47
-
48
-
49
-
50
-
51
-
52
-
53
-
54
-
55
-
56
-
57
-
58
-
59
-
60
-
61
-
62
-
63
-
64
-
65
-
66
-
67
-
68
-
69
-
70
-
71
-
72
-
73
-
74
-
75
-
76
-
77
-
78
-
79
-
80
-
81
-
82
-
83
-
84
-
85
-
86
-
87
-
88
-
89
-
90
-
91
-
92
-
93
-
94
-
95
-
96
-
97
-
98
-
99
-
100
-
101
-
102
-
103
-
 104
104 -
 105
105 -
 106
106 -
 107
107 -
 108
108 -
 109
109 -
 110
110 -
 111
111 -
 112
112 -
 113
113 -
 114
114 -
115
-
116
-
117
-
118
-
119
-
120
-
121
-
122
-
123
-
124
-
125
-
126
-
127
-
128
-
129
-
130
-
131
-
132
-
133
-
134
-
135
-
136
-
137
-
138
-
139
-
140
-
141
-
142
-
143
-
144
-
145
-
146
-
147
-
148
-
149
-
150
-
151
-
152
-
153
-
154
-
155
-
156
-
157
-
158
-
159
-
160
-
161
-
162
-
163
-
164
-
165
-
166
-
167
-
168
-
169
-
170
-
171
-
172
-
173
-
174
-
175
-
176
 |
 |
