HP Designjet L28500 HP Designjet L28500 Printer Series - User's guide - Page 137
The print is deformed into a curved shape
 |
View all HP Designjet L28500 manuals
Add to My Manuals
Save this manual to your list of manuals |
Page 137 highlights
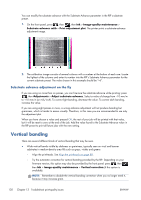
◦ Decrease the base drying temperature in steps of 5°C. This is likely to reduce vertical banding in light-to-medium-density area fills, but not if you are printing high-density area fills. NOTE: You may change the drying temperature while printing at any time if you are trying to print with different ink densities. NOTE: Slight differential banding at the sides and/or color differences may appear at the very edges of the print. In this case, try to increase the inter-pass drying time (in the RIP or front panel) to allow better drying on consecutive passes, or modify the side margins of the print if possible. ◦ Increase the roll back tension in steps of 5 N/m. ◦ Reduce the minimum drying power in steps of 0.2 kW if you are printing very-light-density area fills. ◦ Reduce the vacuum level in steps of 5 mmH2O when printing on vinyl. Do not exceed the lower limit of 10 mmH2O to avoid crashes and/or smears. ◦ Consider using the take-up reel, to give the printer better control of the substrate. ◦ This kind of banding is less visible when the printer is stable at high temperature (after more than half an hour of continuous printing). You can help to avoid visible banding by modifying the printing queue so that vulnerable or important prints are printed later; or by pre-warming the printer (see Change the warming duration on page 16). ● Thin vertical bands visible by darkness, typically seen in the first 150-200 mm of the print on vinyl and banner glossy substrates in high-density area fills or in backlit applications ◦ Reduce the ink quantity if possible. ◦ Modify the inter-pass drying time (in the RIP or front panel) to allow better drying on consecutive passes. ◦ Disable the cutter. ◦ Increase the number of passes. ◦ If applicable, tell the RIP to group jobs together, so that printer temperatures remain more stable between jobs. ◦ Modify your media preset as suggested in Color reproduction tricks on page 70. ● Irregular or isolated vertical bands ◦ Increase the vacuum level in steps of 10 mmH2O. Do not exceed the following limits: 20 mmH2O for banners, 35 mmH2O for vinyl, and 50 mmH2O for other substrate families. ◦ In backlit applications, increase the number of passes to 20 or more, and change the drying temperature up and down in steps of 5°C. ◦ If the banding appears only at the beginning of the print, disable the cutter and advance the substrate manually about 100-150 mm before the first print. The print is deformed into a curved shape This may occur as a result of substrate bow deformation. See The substrate has bow deformation on page 142. ENWW The print is deformed into a curved shape 131
-
 1
1 -
2
-
3
-
4
-
5
-
6
-
7
-
8
-
9
-
10
-
11
-
12
-
13
-
14
-
15
-
16
-
17
-
18
-
19
-
20
-
21
-
22
-
23
-
24
-
25
-
26
-
27
-
28
-
29
-
30
-
31
-
32
-
33
-
34
-
35
-
36
-
37
-
38
-
39
-
40
-
41
-
42
-
43
-
44
-
45
-
46
-
47
-
48
-
49
-
50
-
51
-
52
-
53
-
54
-
55
-
56
-
57
-
58
-
59
-
60
-
61
-
62
-
63
-
64
-
65
-
66
-
67
-
68
-
69
-
70
-
71
-
72
-
73
-
74
-
75
-
76
-
77
-
78
-
79
-
80
-
81
-
82
-
83
-
84
-
85
-
86
-
87
-
88
-
89
-
90
-
91
-
92
-
93
-
94
-
95
-
96
-
97
-
98
-
99
-
100
-
101
-
102
-
103
-
104
-
105
-
106
-
107
-
108
-
109
-
110
-
111
-
112
-
113
-
114
-
115
-
116
-
117
-
118
-
119
-
120
-
121
-
122
-
123
-
124
-
125
-
126
-
127
-
128
-
129
-
130
-
131
-
 132
132 -
 133
133 -
 134
134 -
 135
135 -
 136
136 -
 137
137 -
 138
138 -
 139
139 -
 140
140 -
 141
141 -
 142
142 -
143
-
144
-
145
-
146
-
147
-
148
-
149
-
150
-
151
-
152
-
153
-
154
-
155
-
156
-
157
-
158
-
159
-
160
-
161
-
162
-
163
-
164
-
165
-
166
-
167
-
168
-
169
-
170
-
171
-
172
-
173
-
174
-
175
-
176
 |
 |