HP Designjet L28500 HP Designjet L28500 Printer Series - User's guide - Page 160
Front-panel error messages, Table 17-1
 |
View all HP Designjet L28500 manuals
Add to My Manuals
Save this manual to your list of manuals |
Page 160 highlights
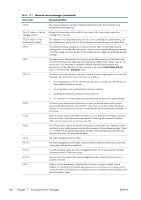
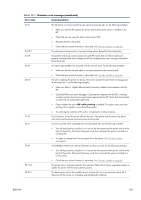
Table 17-1 Numeric error messages (continued) Error code Recommendation 24:03 The setup procedure has not been completed. Restart the printer, then restart the setup procedure from the beginning. 26.n:01 (where n = the ink cartridge number) Remove the ink cartridge and reinstall it in the printer. If the error persists, replace the cartridge with a new one. 27.n:01 (where n = the printhead slot number) The calibration was not performed because one or more printheads are malfunctioning. Use the printhead status plot to find out which printheads are malfunctioning, and replace them. 29:01 The printhead cleaning cartridge is not inserted correctly. Open the printhead cleaning cartridge door on the right side of the printer, make sure that the printhead cleaning cartridge is correctly seated, then close the door. If the problem persists, replace the printhead cleaning cartridge. 32:01 The take-up reel is disconnected. If you want to use the take-up reel, turn off the printer and ensure that all take-up reel cables are connected (sensor cables, printer cable). If you do not want to use it, you may need to unload the substrate manually from the take-up reel. Remember to cut the substrate first, either manually or by using the Form feed and cut option in the front panel's Substrate menu. 32:01.2 This error occurs when the tension bar stays in one of its sensor trigger positions for more than 8 seconds. The most likely causes of this error are as follows. ● The winding-direction switch on the take-up reel motor is activated, but substrate has not been taped to the take-up reel yet. ● The wrong take-up reel winding direction has been selected. ● Something is blocking the movement of the tension bar. ● The substrate is not following the correct path between the tension bar and the diverter. 32:02 This error occurs during printer initialization, to warn you that the take-up reel has been disconnected while the printer was turned off. It also occurs if you try to enable the take-up reel, but it is not connected to the printer. Connect the take-up reel to the printer and press OK to continue. 41:03 Open the printer window and make sure that there are no obstacles restricting the movement of the drive roller. If the substrate has jammed and is restricting the movement of the drive roller, see The substrate has jammed on page 138. 42:03 Turn off the printer using the front panel and the power switch at the rear. Open the window and check for any visible obstacles restricting the movement of the printhead carriage. If there is a wrinkled mass of substrate blocking the carriage, lift the substrate adjustment lever and clear the obstruction. Turn the printer on again. 44:10 The waste management fan has failed. 44.1:01 The waste management system cable is disconnected; the cable from the printer cover to the interconnect could be disconnected too. 44.2:01 A switch has failed. Check the waste management system: the ink tube assembly should be connected and the ink filter door closed. 44.4:01 There is noise in the signal of the waste management system. Check that the connector is properly connected. 52:01 Problem with the drop detector. Check that the ink funnel is correctly installed. Use the 'Replace ink maintenance kit' process (see Replace the ink maintenance kit on page 107) to access the funnel. Check that there is no obstruction (such as substrate) in the funnel that could block the detector signal. 154 Chapter 17 Front-panel error messages ENWW
-
 1
1 -
2
-
3
-
4
-
5
-
6
-
7
-
8
-
9
-
10
-
11
-
12
-
13
-
14
-
15
-
16
-
17
-
18
-
19
-
20
-
21
-
22
-
23
-
24
-
25
-
26
-
27
-
28
-
29
-
30
-
31
-
32
-
33
-
34
-
35
-
36
-
37
-
38
-
39
-
40
-
41
-
42
-
43
-
44
-
45
-
46
-
47
-
48
-
49
-
50
-
51
-
52
-
53
-
54
-
55
-
56
-
57
-
58
-
59
-
60
-
61
-
62
-
63
-
64
-
65
-
66
-
67
-
68
-
69
-
70
-
71
-
72
-
73
-
74
-
75
-
76
-
77
-
78
-
79
-
80
-
81
-
82
-
83
-
84
-
85
-
86
-
87
-
88
-
89
-
90
-
91
-
92
-
93
-
94
-
95
-
96
-
97
-
98
-
99
-
100
-
101
-
102
-
103
-
104
-
105
-
106
-
107
-
108
-
109
-
110
-
111
-
112
-
113
-
114
-
115
-
116
-
117
-
118
-
119
-
120
-
121
-
122
-
123
-
124
-
125
-
126
-
127
-
128
-
129
-
130
-
131
-
132
-
133
-
134
-
135
-
136
-
137
-
138
-
139
-
140
-
141
-
142
-
143
-
144
-
145
-
146
-
147
-
148
-
149
-
150
-
151
-
152
-
153
-
154
-
 155
155 -
 156
156 -
 157
157 -
 158
158 -
 159
159 -
 160
160 -
 161
161 -
 162
162 -
 163
163 -
 164
164 -
 165
165 -
166
-
167
-
168
-
169
-
170
-
171
-
172
-
173
-
174
-
175
-
176
 |
 |