Sharp MX-M450N Operation Manual - Page 12

Contents - toner

Page 12 highlights

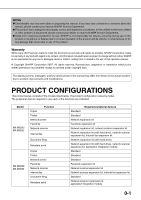
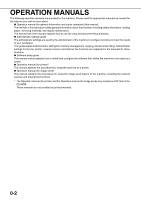
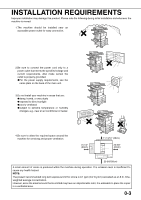
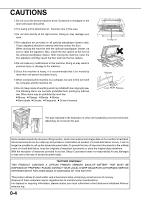
CONTENTS Page PRODUCT CONFIGURATIONS 0-1 OPERATION MANUALS 0-2 INSTALLATION REQUIREMENTS 0-3 CAUTIONS 0-4 ● Laser Information 0-5 CONTENTS 0-6 CHAPTER 1 BEFORE USING THE PRODUCT INTRODUCTION 1-2 MAIN FEATURES 1-3 PART NAMES AND FUNCTIONS 1-9 ● Exterior 1-9 ● Interior 1-10 ● Part names and functions of peripheral devices...1-11 ● Operation panel 1-13 ● Touch panel 1-14 TURNING THE POWER ON AND OFF 1-17 AUDITING MODE 1-18 ● Using the machine when the auditing mode is enabled 1-18 CHAPTER 2 MANAGING THE MACHINE LOADING PAPER 2-2 ● Loading paper in paper tray 1 2-2 ● Changing the paper size in paper tray 1 2-2 ● Specifications of paper trays 2-3 ● Setting the paper type and paper size 2-5 ● Setting the paper size when a special size is loaded 2-6 ● Programming and editing paper types 2-7 ● Loading paper in the multi purpose drawer ..........2-8 ● Specifications (multi purpose drawer 2-10 ● Loading paper in the stand/3 x 500 sheet paper drawer 2-10 ● Specifications (stand/3 x 500 sheet paper drawer 2-10 ● Loading paper in the stand/MPD & 2000 sheet paper drawer 2-11 ● Specifications (stand/MPD & 2000 sheet paper drawer 2-11 SYSTEM SETTINGS 2-12 ● General procedure for system settings 2-12 ● About the settings 2-14 REPLACING THE TONER CARTRIDGE 2-15 STORAGE OF SUPPLIES 2-16 MISFEED REMOVAL 2-17 ● Misfeed removal guidance 2-17 ● Misfeed in the transport area, fusing area, and exit area 2-18 ● Misfeed in the duplex module 2-19 ● Misfeed in the paper feed area 2-20 REMOVING AN ORIGINAL MISFEED 2-22 ● Removing a misfed original from the automatic document feeder 2-22 TROUBLESHOOTING 2-23 CHAPTER 3 PERIPHERAL DEVICES DUPLEX MODULE 3-2 ● Part names 3-2 ● Specifications 3-2 ● Loading paper in the bypass tray 3-3 ● Troubleshooting (concerning the duplex module).. 3-4 MAIL-BIN STACKER 3-5 ● Part names 3-5 ● Specifications 3-5 ● Misfeed in the mail-bin stacker 3-6 FINISHER 3-7 ● Part names 3-7 ● Specifications 3-7 ● Finisher functions 3-8 ● Using the finisher functions 3-9 ● Staple cartridge replacement 3-10 ● Misfeed in the finisher 3-12 ● Troubleshooting finisher problems 3-13 SADDLE STITCH FINISHER 3-14 ● Part names 3-14 ● Specifications 3-14 ● Saddle stitch finisher functions 3-15 ● Using the saddle stitch finisher 3-18 ● Staple cartridge replacement and staple jam removal.... 3-19 ● Misfeed in the saddle stitch finisher 3-22 ● Troubleshooting (concerning the saddle stitch finisher) ... 3-24 SHARP OSA 3-25 APPLICATION COMMUNICATION MODULE (MX-AMX2) 3-25 ● Standard application setup 3-25 ● Selecting a standard application 3-25 ● Operation in OSA mode 3-26 EXTERNAL ACCOUNT MODULE (MX-AMX3 3-27 ● External account application setup 3-27 ● Operation in external account mode 3-27 CHAPTER 4 MAKING COPIES AUTOMATIC DOCUMENT FEEDER 4-2 ● Acceptable originals 4-2 PLACING ORIGINALS 4-3 CHECKING THE SIZE OF A PLACED ORIGINAL...... 4-5 ● Manually setting the scanning size 4-5 STORING, DELETING, AND USING ORIGINAL SIZES 4-6 ● Storing or deleting an original size 4-6 NORMAL COPYING 4-7 ● Making copies with the automatic document feeder 4-7 ● Automatic two-sided copying using the automatic document feeder 4-10 ● Copying from the document glass 4-11 ● Automatic two-sided copying from the document glass 4-13 ADJUSTING THE EXPOSURE 4-14 REDUCTION/ENLARGEMENT/ZOOM 4-15 ● Automatic selection (auto image 4-15 ● Manual selection (preset copy ratios/zoom)......... 4-16 ● XY ZOOM 4-18 SPECIAL PAPERS 4-20 0-6

  • 1
  • 2
  • 3
  • 4
  • 5
  • 6
  • 7
  • 8
  • 9
  • 10
  • 11
  • 12
  • 13
  • 14
  • 15
  • 16
  • 17
  • 18
  • 19
  • 20
  • 21
  • 22
  • 23
  • 24
  • 25
  • 26
  • 27
  • 28
  • 29
  • 30
  • 31
  • 32
  • 33
  • 34
  • 35
  • 36
  • 37
  • 38
  • 39
  • 40
  • 41
  • 42
  • 43
  • 44
  • 45
  • 46
  • 47
  • 48
  • 49
  • 50
  • 51
  • 52
  • 53
  • 54
  • 55
  • 56
  • 57
  • 58
  • 59
  • 60
  • 61
  • 62
  • 63
  • 64
  • 65
  • 66
  • 67
  • 68
  • 69
  • 70
  • 71
  • 72
  • 73
  • 74
  • 75
  • 76
  • 77
  • 78
  • 79
  • 80
  • 81
  • 82
  • 83
  • 84
  • 85
  • 86
  • 87
  • 88
  • 89
  • 90
  • 91
  • 92
  • 93
  • 94
  • 95
  • 96
  • 97
  • 98
  • 99
  • 100
  • 101
  • 102
  • 103
  • 104
  • 105
  • 106
  • 107
  • 108
  • 109
  • 110
  • 111
  • 112
  • 113
  • 114
  • 115
  • 116
  • 117
  • 118
  • 119
  • 120
  • 121
  • 122
  • 123
  • 124
  • 125
  • 126
  • 127
  • 128
  • 129
  • 130
  • 131
  • 132
  • 133
  • 134
  • 135
  • 136
  • 137
  • 138
  • 139
  • 140
  • 141
  • 142
  • 143
  • 144
  • 145
  • 146
  • 147
  • 148
  • 149
  • 150
  • 151
  • 152
  • 153
  • 154
  • 155
  • 156
  • 157
  • 158
  • 159
  • 160
  • 161
  • 162
  • 163
  • 164
  • 165
  • 166
  • 167
  • 168
  • 169
  • 170
  • 171
  • 172
  • 173
  • 174
  • 175
  • 176
  • 177
  • 178
  • 179
  • 180
  • 181
  • 182
  • 183
  • 184
  • 185
  • 186
  • 187
  • 188
  • 189
  • 190
  • 191
  • 192
  • 193
  • 194
  • 195
  • 196
  • 197
  • 198
  • 199
  • 200

0-6
CONTENTS
Page
PRODUCT CONFIGURATIONS
...................................
0-1
OPERATION MANUALS
..............................................
0-2
INSTALLATION REQUIREMENTS
...............................
0-3
CAUTIONS
...................................................................
0-4
Laser Information
..................................................
0-5
CONTENTS
..................................................................
0-6
CHAPTER 1
BEFORE USING THE PRODUCT
INTRODUCTION
..........................................................
1-2
MAIN FEATURES
.........................................................
1-3
PART NAMES AND FUNCTIONS
................................
1-9
Exterior
.................................................................
1-9
Interior
..................................................................
1-10
Part names and functions of peripheral devices...1-11
Operation panel
....................................................
1-13
Touch panel
..........................................................
1-14
TURNING THE POWER ON AND OFF
.......................
1-17
AUDITING MODE
.........................................................
1-18
Using the machine when the auditing mode is
enabled
.................................................................
1-18
CHAPTER 2
MANAGING THE MACHINE
LOADING PAPER
.........................................................
2-2
Loading paper in paper tray 1
...............................
2-2
Changing the paper size in paper tray 1
...............
2-2
Specifications of paper trays
.................................
2-3
Setting the paper type and paper size
..................
2-5
Setting the paper size when a special size is
loaded
...................................................................
2-6
Programming and editing paper types
..................
2-7
Loading paper in the multi purpose drawer
..........
2-8
Specifications (multi purpose drawer)
..................
2-10
Loading paper in the stand/3 x 500 sheet paper
drawer
...................................................................
2-10
Specifications (stand/3 x 500 sheet paper
drawer)
.................................................................
2-10
Loading paper in the stand/MPD & 2000 sheet
paper drawer
........................................................
2-11
Specifications (stand/MPD & 2000 sheet paper
drawer)
.................................................................
2-11
SYSTEM SETTINGS
....................................................
2-12
General procedure for system settings
.................
2-12
About the settings
.................................................
2-14
REPLACING THE TONER CARTRIDGE
.....................
2-15
STORAGE OF SUPPLIES
............................................
2-16
MISFEED REMOVAL
...................................................
2-17
Misfeed removal guidance
....................................
2-17
Misfeed in the transport area, fusing area, and
exit area
................................................................
2-18
Misfeed in the duplex module
...............................
2-19
Misfeed in the paper feed area
.............................
2-20
REMOVING AN ORIGINAL MISFEED
.........................
2-22
Removing a misfed original from the automatic
document feeder
...................................................
2-22
TROUBLESHOOTING
..................................................
2-23
CHAPTER 3
PERIPHERAL DEVICES
DUPLEX MODULE
......................................................
3-2
Part names
...........................................................
3-2
Specifications
.......................................................
3-2
Loading paper in the bypass tray
.........................
3-3
Troubleshooting (concerning the duplex module)
.. 3-4
MAIL-BIN STACKER
....................................................
3-5
Part names
...........................................................
3-5
Specifications
.......................................................
3-5
Misfeed in the mail-bin stacker
.............................
3-6
FINISHER
....................................................................
3-7
Part names
...........................................................
3-7
Specifications
.......................................................
3-7
Finisher functions
.................................................
3-8
Using the finisher functions
..................................
3-9
Staple cartridge replacement
...............................
3-10
Misfeed in the finisher
..........................................
3-12
Troubleshooting finisher problems
.......................
3-13
SADDLE STITCH FINISHER
.......................................
3-14
Part names
...........................................................
3-14
Specifications
.......................................................
3-14
Saddle stitch finisher functions
............................
3-15
Using the saddle stitch finisher
............................
3-18
Staple cartridge replacement and staple jam removal
....
3-19
Misfeed in the saddle stitch finisher
.....................
3-22
Troubleshooting (concerning the saddle stitch finisher) ...
3-24
SHARP OSA
................................................................
3-25
APPLICATION COMMUNICATION MODULE (MX-AMX2)
3-25
Standard application setup
........................................
3-25
Selecting a standard application
..............................
3-25
Operation in OSA mode
.............................................
3-26
EXTERNAL ACCOUNT MODULE (MX-AMX3)
...........
3-27
External account application setup
..........................
3-27
Operation in external account mode
........................
3-27
CHAPTER 4
MAKING COPIES
AUTOMATIC DOCUMENT FEEDER
...........................
4-2
Acceptable originals
.............................................
4-2
PLACING ORIGINALS
.................................................
4-3
CHECKING THE SIZE OF A PLACED ORIGINAL
......
4-5
Manually setting the scanning size
......................
4-5
STORING, DELETING, AND USING ORIGINAL SIZES
4-6
Storing or deleting an original size
.......................
4-6
NORMAL COPYING
....................................................
4-7
Making copies with the automatic document
feeder
...................................................................
4-7
Automatic two-sided copying using the automatic
document feeder
..................................................
4-10
Copying from the document glass
.......................
4-11
Automatic two-sided copying from the document
glass
....................................................................
4-13
ADJUSTING THE EXPOSURE
...................................
4-14
REDUCTION/ENLARGEMENT/ZOOM
.......................
4-15
Automatic selection (auto image)
.........................
4-15
Manual selection (preset copy ratios/zoom)
.........
4-16
XY ZOOM
............................................................
4-18
SPECIAL PAPERS
......................................................
4-20