Sharp MX-M450N Operation Manual - Page 173
[Print], PRINT AND SAVE THE DATA] key
 |
View all Sharp MX-M450N manuals
Add to My Manuals
Save this manual to your list of manuals |
Page 173 highlights
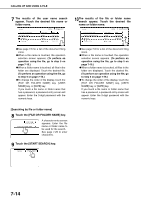
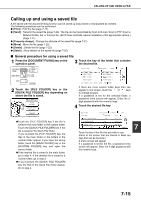
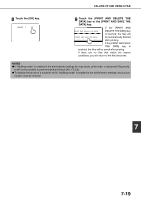
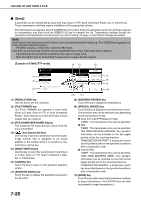
CALLING UP AND USING A FILE ■ [Print] A saved file can be printed. The screen below appears when the [PRINT] key is selected in the operation selection screen. To begin printing, touch the [PRINT] (7) key. Printing settings can be selected in this screen before printing. The settings that were in effect when the file was saved appear initially. The settings can be changed as needed. NOTES ● When print settings are changed with this procedure, only the value for the number of copies is overwritten. ● The printing speed will be slower for image files saved using certain resolution settings. (See page 7-31.) (1) (2) (3) 2-SIDED SPECIAL MODES JOB SETTINGS / PRINT CANCEL Basic specifications Yamada Taro 81/2 x11 AUTO PAPER SELECT OUTPUT 2-SIDED NUMBER OF PRINTS 1 (1~999) PRINT AND DELETE THE DATA PRINT AND SAVE THE DATA TANDEM PRINT (4) (5) (6) (7) (1) [PAPER SELECT] key Use this key to set the paper size. (2) [OUTPUT] key Use this key to select sort, group or staple sort functions, and to select the output tray. (3) [2-SIDED] key When performing two-sided printing, use this key to select the orientation of the image on the back side of the paper. To have the front and back images oriented in the same direction, touch the [2-SIDED BOOKLET] key. To have the front and back images oriented opposite to each other, touch the [2SIDED TABLET] key. Note that the size and orientation of the saved image may cause these keys to have the opposite effect. If neither key is selected, one-sided printing will take place. To perform two-sided printing, the optional duplex module is necessary. (4) [TANDEM PRINT] key If the conditions for tandem printing are met (page 5-10), touch this key to enable tandem printing. See page 5-10 for more information. When printing a file that was saved in copy mode, this key changes to the [SPECIAL MODES] key. The [SPECIAL MODES] include [PRINT MENU] and [TANDEM PRINT]. For information on the print menu, see page 5-30. (5) [NUMBER OF PRINTS] setting key Use this key to set the number of copies. (6) [PRINT AND DELETE THE DATA] key Touch this key to print a file and then have it automatically deleted. (7) [PRINT AND SAVE THE DATA] key Touch this key to print a file. The file will not be automatically deleted after printing. 7 7-17
-
 1
1 -
2
-
3
-
4
-
5
-
6
-
7
-
8
-
9
-
10
-
11
-
12
-
13
-
14
-
15
-
16
-
17
-
18
-
19
-
20
-
21
-
22
-
23
-
24
-
25
-
26
-
27
-
28
-
29
-
30
-
31
-
32
-
33
-
34
-
35
-
36
-
37
-
38
-
39
-
40
-
41
-
42
-
43
-
44
-
45
-
46
-
47
-
48
-
49
-
50
-
51
-
52
-
53
-
54
-
55
-
56
-
57
-
58
-
59
-
60
-
61
-
62
-
63
-
64
-
65
-
66
-
67
-
68
-
69
-
70
-
71
-
72
-
73
-
74
-
75
-
76
-
77
-
78
-
79
-
80
-
81
-
82
-
83
-
84
-
85
-
86
-
87
-
88
-
89
-
90
-
91
-
92
-
93
-
94
-
95
-
96
-
97
-
98
-
99
-
100
-
101
-
102
-
103
-
104
-
105
-
106
-
107
-
108
-
109
-
110
-
111
-
112
-
113
-
114
-
115
-
116
-
117
-
118
-
119
-
120
-
121
-
122
-
123
-
124
-
125
-
126
-
127
-
128
-
129
-
130
-
131
-
132
-
133
-
134
-
135
-
136
-
137
-
138
-
139
-
140
-
141
-
142
-
143
-
144
-
145
-
146
-
147
-
148
-
149
-
150
-
151
-
152
-
153
-
154
-
155
-
156
-
157
-
158
-
159
-
160
-
161
-
162
-
163
-
164
-
165
-
166
-
167
-
 168
168 -
 169
169 -
 170
170 -
 171
171 -
 172
172 -
 173
173 -
 174
174 -
 175
175 -
 176
176 -
 177
177 -
 178
178 -
179
-
180
-
181
-
182
-
183
-
184
-
185
-
186
-
187
-
188
-
189
-
190
-
191
-
192
-
193
-
194
-
195
-
196
-
197
-
198
-
199
-
200
 |
 |