Xerox 8860MFP User Guide - Page 183
Smudges or Smears, Problem, Solution - maintenance kit
 |
UPC - 095205735574
View all Xerox 8860MFP manuals
Add to My Manuals
Save this manual to your list of manuals |
Page 183 highlights
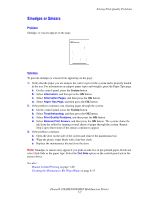
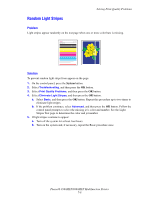
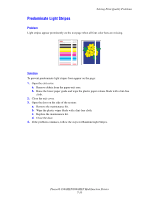
Smudges or Smears Problem Smudges or smears appear on the page. Solving Print-Quality Problems Solution To prevent smudges or smears from appearing on the page: 1. Verify that the paper you are using is the correct type for the system and is properly loaded in the tray. For information on support paper types and weights, print the Paper Tips page. a. On the control panel, press the System button. b. Select Information, and then press the OK button. c. Select Information Pages, and then press the OK button. d. Select Paper Tips Page, and then press the OK button. 2. If the problem continues, run cleaning pages through the system: a. On the control panel, press the System button. b. Select Troubleshooting, and then press the OK button. c. Select Print Quality Problems, and then press the OK button. d. Select Remove Print Smears, and then press the OK button. The system cleans the ink from the rollers by running several sheets of paper through the system. Repeat Step 2 up to three times if the smears continue to appear. 3. If the problem continues: a. Open the door on the side of the system and remove the maintenance kit. b. Wipe the plastic wiper blade with a lint-free cloth. c. Replace the maintenance kit and close the door. Note: Smudges or smears may appear if you print on side two of pre-printed paper, but do not select 2nds Side as the paper type. Select the 2nd Side option on the control panel and in the printer driver. See also: Manual 2-Sided Printing on page 3-28 Cleaning the Maintenance Kit Wiper Blade on page 8-15 Phaser® 8560MFP/8860MFP Multifunction Printer 7-7
-
 1
1 -
2
-
3
-
4
-
5
-
6
-
7
-
8
-
9
-
10
-
11
-
12
-
13
-
14
-
15
-
16
-
17
-
18
-
19
-
20
-
21
-
22
-
23
-
24
-
25
-
26
-
27
-
28
-
29
-
30
-
31
-
32
-
33
-
34
-
35
-
36
-
37
-
38
-
39
-
40
-
41
-
42
-
43
-
44
-
45
-
46
-
47
-
48
-
49
-
50
-
51
-
52
-
53
-
54
-
55
-
56
-
57
-
58
-
59
-
60
-
61
-
62
-
63
-
64
-
65
-
66
-
67
-
68
-
69
-
70
-
71
-
72
-
73
-
74
-
75
-
76
-
77
-
78
-
79
-
80
-
81
-
82
-
83
-
84
-
85
-
86
-
87
-
88
-
89
-
90
-
91
-
92
-
93
-
94
-
95
-
96
-
97
-
98
-
99
-
100
-
101
-
102
-
103
-
104
-
105
-
106
-
107
-
108
-
109
-
110
-
111
-
112
-
113
-
114
-
115
-
116
-
117
-
118
-
119
-
120
-
121
-
122
-
123
-
124
-
125
-
126
-
127
-
128
-
129
-
130
-
131
-
132
-
133
-
134
-
135
-
136
-
137
-
138
-
139
-
140
-
141
-
142
-
143
-
144
-
145
-
146
-
147
-
148
-
149
-
150
-
151
-
152
-
153
-
154
-
155
-
156
-
157
-
158
-
159
-
160
-
161
-
162
-
163
-
164
-
165
-
166
-
167
-
168
-
169
-
170
-
171
-
172
-
173
-
174
-
175
-
176
-
177
-
 178
178 -
 179
179 -
 180
180 -
 181
181 -
 182
182 -
 183
183 -
 184
184 -
 185
185 -
 186
186 -
 187
187 -
 188
188 -
189
-
190
-
191
-
192
-
193
-
194
-
195
-
196
-
197
-
198
-
199
-
200
-
201
-
202
-
203
-
204
-
205
-
206
-
207
-
208
-
209
-
210
-
211
-
212
-
213
-
214
-
215
-
216
-
217
-
218
-
219
-
220
-
221
-
222
-
223
-
224
-
225
-
226
-
227
-
228
-
229
-
230
-
231
-
232
-
233
-
234
-
235
-
236
-
237
-
238
-
239
-
240
-
241
-
242
-
243
-
244
-
245
-
246
-
247
-
248
-
249
-
250
-
251
-
252
-
253
-
254
-
255
-
256
-
257
-
258
-
259
-
260
-
261
-
262
-
263
-
264
-
265
-
266
-
267
-
268
-
269
-
270
-
271
-
272
-
273
-
274
-
275
-
276
-
277
-
278
-
279
-
280
-
281
 |
 |