Canon MultiPASS C3500 User guide for the MPC3000. - Page 153
Revising Your Annotations, Showing and Hiding Your Annotations, Selecting One or More Annotations
 |
View all Canon MultiPASS C3500 manuals
Add to My Manuals
Save this manual to your list of manuals |
Page 153 highlights
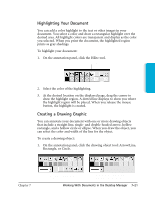
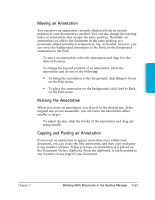
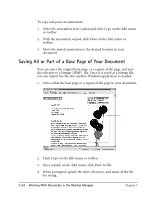
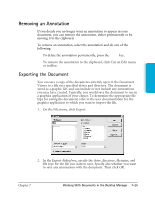
2. Select the color and width of the line for the object you are drawing. For an arrow or line, also select the particular style you want to use. 3. At the desired location on the displayed page, drag the cursor to draw the object. A dotted line displays to show you where the drawn object will be placed. When you release the mouse button, the object is created. Showing and Hiding Your Annotations As you add annotations to your document, you can turn the display of the annotations on and off for viewing. To show or hide your annotations, click Annotations on the View menu. On the Annotations menu, click the command to hide or show your annotations. For color annotations, click B&W Preview to display the annotations in black and white. Revising Your Annotations Once you have created annotations in your document, you can revise the annotations as needed. For example, you may want to resize, move, delete or cut, or copy and paste an annotation. Selecting One or More Annotations To revise an annotation, you must first select it. In most situations, you can select one or more annotations at a time. r To select a single annotation, click the Annotation Select button on the annotation panel. Then click the annotation. r To select all annotations, click Select All on the Edit menu. This method selects all the annotations in the open document on all pages. You cannot resize an annotation using this method. r To select annotations within a specified region, click the Region Select tool on the annotation panel. At the desired location on the displayed page, drag the cursor to draw a rectangle enclosing the annotations you want included within the region. A dotted line displays to indicate the region. On the Edit menu, click Select in Region. Graphic handles display for the annotations that are selected. r To select the base page of your document, click Select Base Image on the Edit menu. 7-22 Working With Documents in the Desktop Manager Chapter 7
-
 1
1 -
2
-
3
-
4
-
5
-
6
-
7
-
8
-
9
-
10
-
11
-
12
-
13
-
14
-
15
-
16
-
17
-
18
-
19
-
20
-
21
-
22
-
23
-
24
-
25
-
26
-
27
-
28
-
29
-
30
-
31
-
32
-
33
-
34
-
35
-
36
-
37
-
38
-
39
-
40
-
41
-
42
-
43
-
44
-
45
-
46
-
47
-
48
-
49
-
50
-
51
-
52
-
53
-
54
-
55
-
56
-
57
-
58
-
59
-
60
-
61
-
62
-
63
-
64
-
65
-
66
-
67
-
68
-
69
-
70
-
71
-
72
-
73
-
74
-
75
-
76
-
77
-
78
-
79
-
80
-
81
-
82
-
83
-
84
-
85
-
86
-
87
-
88
-
89
-
90
-
91
-
92
-
93
-
94
-
95
-
96
-
97
-
98
-
99
-
100
-
101
-
102
-
103
-
104
-
105
-
106
-
107
-
108
-
109
-
110
-
111
-
112
-
113
-
114
-
115
-
116
-
117
-
118
-
119
-
120
-
121
-
122
-
123
-
124
-
125
-
126
-
127
-
128
-
129
-
130
-
131
-
132
-
133
-
134
-
135
-
136
-
137
-
138
-
139
-
140
-
141
-
142
-
143
-
144
-
145
-
146
-
147
-
 148
148 -
 149
149 -
 150
150 -
 151
151 -
 152
152 -
 153
153 -
 154
154 -
 155
155 -
 156
156 -
 157
157 -
 158
158 -
159
-
160
-
161
-
162
-
163
-
164
-
165
-
166
-
167
-
168
-
169
-
170
-
171
-
172
-
173
-
174
-
175
-
176
-
177
-
178
-
179
-
180
-
181
-
182
-
183
-
184
-
185
-
186
-
187
-
188
-
189
-
190
-
191
-
192
-
193
-
194
-
195
-
196
-
197
-
198
-
199
-
200
-
201
-
202
-
203
-
204
-
205
-
206
-
207
-
208
-
209
-
210
-
211
-
212
-
213
-
214
-
215
-
216
-
217
-
218
-
219
-
220
-
221
-
222
-
223
-
224
-
225
-
226
-
227
-
228
-
229
-
230
-
231
-
232
-
233
-
234
-
235
-
236
-
237
-
238
-
239
-
240
-
241
-
242
-
243
-
244
-
245
-
246
-
247
-
248
-
249
-
250
-
251
-
252
-
253
-
254
-
255
-
256
-
257
-
258
-
259
-
260
 |
 |