HP 2840 HP Color LaserJet 2820/2830/2840 All-In-One - Software Technical Refer - Page 213
Key features, Scan to e-mail or a folder, ADD NEW FOLDER
 |
UPC - 829160742731
View all HP 2840 manuals
Add to My Manuals
Save this manual to your list of manuals |
Page 213 highlights
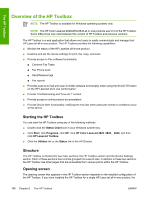
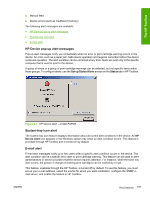
The HP Toolbox Key features This section provides information about the following topics: ● Scan to e-mail or a folder ● Receive faxes to this computer ● Receive Alert messages for device events Scan to e-mail or a folder In the Scan to e-mail or a folder feature, you can set up the HP LaserJet all-in-one product to later initiate a scan directly from the HP LaserJet all-in-one product control panel. On the HP LaserJet all-in-one product control panel, press the SCAN TO button. Use the < or the > button to select an e-mail recipient or folder location, and then press the START SCAN button or the ENTER button. For e-mail, the scanned item is attached to an e-mail message, which is then sent automatically to the e-mail recipient that you selected. For a folder, the scanned item is saved to the specified folder. NOTE You must program the SCAN TO button before you can use this method to scan to e-mail. Go to the Scan to tab in the HP Toolbox. Click the Turn on scan to e-mail or a folder option, and then click Apply. To add an e-mail address, click the E-mail addresses option, type the e-mail address you want to add in the text box. If you want the e-mail address to appear as a different name on the all-inone product control panel, type the new name in the Display at the device as text box, and then click Add. The e-mail address (and it's display name, if any) appears in the E-mail addresses and folders list toward the bottom of the page. To add a folder destination, click the Folder option, type folder path in the text box, or click Browse to locate the folder on your computer. If you want the folder to appear as a different name on the all-in-one product control panel, type the new name (up to 14 characters) in the Display at the device as text box, and then click Add. The folder (and its display name, if any) appears in the E-mail addresses and folders list toward the bottom of the page. The following destinations are set up automatically when a direct connection installation is performed and appear on the HP LaserJet all-in-one product control panel: MY SCANS, ADD NEW E-MAIL, and ADD NEW FOLDER. Selecting MY SCANS sends a copy of the scan to the MY SCANS folder in the MY DOCUMENTS folder on your computer. Selecting ADD NEW E-MAIL or ADD NEW FOLDER opens the Scan to E-mail or a Folder screen in the HP Toolbox on the computer. Add e-mail addresses or folders by typing them into the E-mail addresses text box or the Folder text box, and then clicking Add. These new entries appear on the HP LaserJet all-in-one product SCAN TO list. To use this feature on a network installation, go to the Scan-to tab in the HP Toolbox. Click the Turn on scan to e-mail or a folder option, and then click Apply. NOTE If you change the scan preferences on the Scan to tab in the HP Toolbox, the new settings affect only the scanning that is initiated by pressing the SCAN TO button on the HP Color LaserJet 2820/2830/2840 all-in-one control panel. The HP Toolbox settings do not affect scanning that is initiated at the computer or by pressing the START SCAN button on the control panel. ENWW Key features 189
-
 1
1 -
2
-
3
-
4
-
5
-
6
-
7
-
8
-
9
-
10
-
11
-
12
-
13
-
14
-
15
-
16
-
17
-
18
-
19
-
20
-
21
-
22
-
23
-
24
-
25
-
26
-
27
-
28
-
29
-
30
-
31
-
32
-
33
-
34
-
35
-
36
-
37
-
38
-
39
-
40
-
41
-
42
-
43
-
44
-
45
-
46
-
47
-
48
-
49
-
50
-
51
-
52
-
53
-
54
-
55
-
56
-
57
-
58
-
59
-
60
-
61
-
62
-
63
-
64
-
65
-
66
-
67
-
68
-
69
-
70
-
71
-
72
-
73
-
74
-
75
-
76
-
77
-
78
-
79
-
80
-
81
-
82
-
83
-
84
-
85
-
86
-
87
-
88
-
89
-
90
-
91
-
92
-
93
-
94
-
95
-
96
-
97
-
98
-
99
-
100
-
101
-
102
-
103
-
104
-
105
-
106
-
107
-
108
-
109
-
110
-
111
-
112
-
113
-
114
-
115
-
116
-
117
-
118
-
119
-
120
-
121
-
122
-
123
-
124
-
125
-
126
-
127
-
128
-
129
-
130
-
131
-
132
-
133
-
134
-
135
-
136
-
137
-
138
-
139
-
140
-
141
-
142
-
143
-
144
-
145
-
146
-
147
-
148
-
149
-
150
-
151
-
152
-
153
-
154
-
155
-
156
-
157
-
158
-
159
-
160
-
161
-
162
-
163
-
164
-
165
-
166
-
167
-
168
-
169
-
170
-
171
-
172
-
173
-
174
-
175
-
176
-
177
-
178
-
179
-
180
-
181
-
182
-
183
-
184
-
185
-
186
-
187
-
188
-
189
-
190
-
191
-
192
-
193
-
194
-
195
-
196
-
197
-
198
-
199
-
200
-
201
-
202
-
203
-
204
-
205
-
206
-
207
-
 208
208 -
 209
209 -
 210
210 -
 211
211 -
 212
212 -
 213
213 -
 214
214 -
 215
215 -
 216
216 -
 217
217 -
 218
218 -
219
-
220
-
221
-
222
-
223
-
224
-
225
-
226
-
227
-
228
-
229
-
230
-
231
-
232
-
233
-
234
-
235
-
236
-
237
-
238
-
239
-
240
-
241
-
242
-
243
-
244
-
245
-
246
-
247
-
248
-
249
-
250
-
251
-
252
-
253
-
254
-
255
-
256
-
257
-
258
-
259
-
260
-
261
-
262
-
263
-
264
-
265
-
266
-
267
-
268
-
269
-
270
-
271
-
272
-
273
-
274
-
275
-
276
-
277
-
278
-
279
-
280
-
281
-
282
-
283
-
284
-
285
-
286
-
287
-
288
-
289
-
290
-
291
-
292
-
293
-
294
-
295
-
296
-
297
-
298
-
299
-
300
-
301
-
302
-
303
-
304
-
305
-
306
-
307
-
308
-
309
-
310
-
311
-
312
-
313
-
314
-
315
-
316
-
317
-
318
-
319
-
320
-
321
-
322
-
323
-
324
-
325
-
326
-
327
-
328
-
329
-
330
-
331
-
332
-
333
-
334
-
335
-
336
-
337
-
338
-
339
-
340
-
341
-
342
-
343
-
344
-
345
-
346
-
347
-
348
-
349
-
350
-
351
-
352
-
353
-
354
-
355
-
356
-
357
-
358
-
359
-
360
-
361
-
362
-
363
-
364
-
365
-
366
-
367
-
368
-
369
-
370
-
371
-
372
-
373
-
374
-
375
-
376
-
377
-
378
-
379
-
380
-
381
-
382
-
383
-
384
-
385
-
386
-
387
-
388
-
389
-
390
-
391
-
392
-
393
-
394
-
395
-
396
-
397
-
398
-
399
-
400
-
401
-
402
-
403
-
404
-
405
-
406
 |
 |