Icom IC-R9500 Instruction Manual - Page 109
Programmed scan operation
 |
View all Icom IC-R9500 manuals
Add to My Manuals
Save this manual to your list of manuals |
Page 109 highlights
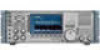
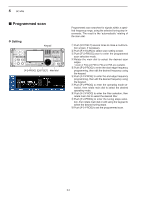
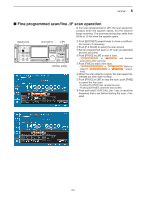
SCANS 8 D Programmed scan operation [SQUELCH] [EXIT/SET] [PROG] Scan indicator and Program scan number appear q Push [EXIT/SET] several times to close a multifunction screen, if necessary. w Select the desired VFO or memory channel. e Select the desired operating mode. • The operating mode can also be changed while scanning. r Set [SQUELCH] control open or closed. • See page 8-3 for squelch condition. t Push [PROG] to start the programmed scan. • Scan screen appears. • " PROGRAM SCAN " and decimal points blink while scanning. • Push numeral key (0-9) to change to the other edges. y When the scan detects a signal, the scan stops, pauses or ignores it depending on the resume setting and the squelch condition. u To cancel the scan, push [PROG]. • Pushing [F5•STOP] also cancels the scan. • Pushing [EXIT/SET] closes the scan screen. i Push and hold [F-6•RECALL] for 1 sec. to recall the frequency that is set before starting the scan, if desired. If the same frequencies are programmed into the scan edge memory channel PxA and PxB, programmed scan does not start. ✔ For your convenience Ten programmed scans can be selected directly from the keypad. Then the scan starts immediately. ➥ Push numeral key (0-9) then push [PROG] to start the desired programmed scan. 8-7
-
 1
1 -
2
-
3
-
4
-
5
-
6
-
7
-
8
-
9
-
10
-
11
-
12
-
13
-
14
-
15
-
16
-
17
-
18
-
19
-
20
-
21
-
22
-
23
-
24
-
25
-
26
-
27
-
28
-
29
-
30
-
31
-
32
-
33
-
34
-
35
-
36
-
37
-
38
-
39
-
40
-
41
-
42
-
43
-
44
-
45
-
46
-
47
-
48
-
49
-
50
-
51
-
52
-
53
-
54
-
55
-
56
-
57
-
58
-
59
-
60
-
61
-
62
-
63
-
64
-
65
-
66
-
67
-
68
-
69
-
70
-
71
-
72
-
73
-
74
-
75
-
76
-
77
-
78
-
79
-
80
-
81
-
82
-
83
-
84
-
85
-
86
-
87
-
88
-
89
-
90
-
91
-
92
-
93
-
94
-
95
-
96
-
97
-
98
-
99
-
100
-
101
-
102
-
103
-
 104
104 -
 105
105 -
 106
106 -
 107
107 -
 108
108 -
 109
109 -
 110
110 -
 111
111 -
 112
112 -
 113
113 -
 114
114 -
115
-
116
-
117
-
118
-
119
-
120
-
121
-
122
-
123
-
124
-
125
-
126
-
127
-
128
-
129
-
130
-
131
-
132
-
133
-
134
-
135
-
136
-
137
-
138
-
139
-
140
-
141
-
142
-
143
-
144
-
145
-
146
-
147
-
148
-
149
-
150
-
151
-
152
-
153
-
154
-
155
-
156
-
157
-
158
-
159
-
160
-
161
-
162
-
163
-
164
-
165
-
166
-
167
-
168
-
169
-
170
-
171
-
172
-
173
-
174
-
175
-
176
-
177
-
178
-
179
-
180
-
181
-
182
-
183
-
184
-
185
-
186
-
187
-
188
-
189
-
190
-
191
-
192
-
193
-
194
 |
 |