Netgear R7300DST User Manual - Page 236
Change a Port Forwarding Rule, Internal Starting Port
 |
View all Netgear R7300DST manuals
Add to My Manuals
Save this manual to your list of manuals |
Page 236 highlights
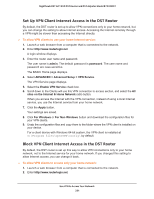
Nighthawk DST AC1900 DST Router and DST Adpater Model R7300DST 7. Click the Add Custom Service button. 8. In the Service Name field, enter a descriptive name. 9. In the Service Type menu, select the protocol (TCP or UDP) that is associated with the service or application. If you are unsure, select TCP/UDP. 10. In the External Starting Port field, enter the beginning port number. If the service or application uses a single port, enter the same port number in the Ending Port field. If the service or application uses a range of ports, enter the ending port number of the range in the External Ending Port field. 11. Specify the internal ports by one of these methods: • Leave the Use the same port range for Internal port check box selected. • Type the port numbers in the Internal Starting Port and Internal Ending Port fields. 12. Type the IP address in the Internal IP address field or select the radio button for an attached device listed in the table. 13. Click the Apply button. Your settings are saved. The rule is added to the table on the Port Forwarding / Port Triggering page. Change a Port Forwarding Rule You can change an existing port forwarding rule. To change a port forwarding rule: 1. Launch a web browser from a computer or WiFi device that is connected to the network. 2. Enter http://www.routerlogin.net. A login window displays. 3. Enter the router user name and password. The user name is admin. The default password is password. The user name and password are case-sensitive. Manage Port Forwarding and Port Triggering 236
-
 1
1 -
2
-
3
-
4
-
5
-
6
-
7
-
8
-
9
-
10
-
11
-
12
-
13
-
14
-
15
-
16
-
17
-
18
-
19
-
20
-
21
-
22
-
23
-
24
-
25
-
26
-
27
-
28
-
29
-
30
-
31
-
32
-
33
-
34
-
35
-
36
-
37
-
38
-
39
-
40
-
41
-
42
-
43
-
44
-
45
-
46
-
47
-
48
-
49
-
50
-
51
-
52
-
53
-
54
-
55
-
56
-
57
-
58
-
59
-
60
-
61
-
62
-
63
-
64
-
65
-
66
-
67
-
68
-
69
-
70
-
71
-
72
-
73
-
74
-
75
-
76
-
77
-
78
-
79
-
80
-
81
-
82
-
83
-
84
-
85
-
86
-
87
-
88
-
89
-
90
-
91
-
92
-
93
-
94
-
95
-
96
-
97
-
98
-
99
-
100
-
101
-
102
-
103
-
104
-
105
-
106
-
107
-
108
-
109
-
110
-
111
-
112
-
113
-
114
-
115
-
116
-
117
-
118
-
119
-
120
-
121
-
122
-
123
-
124
-
125
-
126
-
127
-
128
-
129
-
130
-
131
-
132
-
133
-
134
-
135
-
136
-
137
-
138
-
139
-
140
-
141
-
142
-
143
-
144
-
145
-
146
-
147
-
148
-
149
-
150
-
151
-
152
-
153
-
154
-
155
-
156
-
157
-
158
-
159
-
160
-
161
-
162
-
163
-
164
-
165
-
166
-
167
-
168
-
169
-
170
-
171
-
172
-
173
-
174
-
175
-
176
-
177
-
178
-
179
-
180
-
181
-
182
-
183
-
184
-
185
-
186
-
187
-
188
-
189
-
190
-
191
-
192
-
193
-
194
-
195
-
196
-
197
-
198
-
199
-
200
-
201
-
202
-
203
-
204
-
205
-
206
-
207
-
208
-
209
-
210
-
211
-
212
-
213
-
214
-
215
-
216
-
217
-
218
-
219
-
220
-
221
-
222
-
223
-
224
-
225
-
226
-
227
-
228
-
229
-
230
-
 231
231 -
 232
232 -
 233
233 -
 234
234 -
 235
235 -
 236
236 -
 237
237 -
 238
238 -
 239
239 -
 240
240 -
 241
241 -
242
-
243
-
244
-
245
-
246
-
247
-
248
-
249
-
250
-
251
-
252
-
253
-
254
-
255
-
256
-
257
-
258
-
259
-
260
-
261
-
262
-
263
-
264
-
265
-
266
 |
 |
