Samsung UN65H6300AF User Manual Ver.1.0 (English) - Page 153
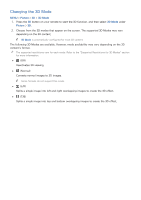
Changing the 3D Mode
 |
View all Samsung UN65H6300AF manuals
Add to My Manuals
Save this manual to your list of manuals |
Page 153 highlights
Changing the 3D Mode MENU > Picture > 3D > 3D Mode 111 Press the 3D button on your remote to start the 3D function, and then select 3D Mode under Picture > 3D. 222 Choose from the 3D modes that appear on the screen. The supported 3D Modes may vary depending on the 3D content. "" 3D Mode is automatically configured for most 3D content. The following 3D Modes are available. However, mode availability may vary depending on the 3D content's format. "" The supported resolutions vary for each mode. Refer to the "Supported Resolutions for 3D Modes" section for more information. ●● Off (Off) Deactivates 3D viewing. ● ● (Normal) Converts normal images to 3D images. "" Some formats do not support this mode. ● ● (L/R) Splits a single image into left and right overlapping images to create the 3D effect. ● ● (T/B) Splits a single image into top and bottom overlapping images to create the 3D effect.
-
 1
1 -
2
-
3
-
4
-
5
-
6
-
7
-
8
-
9
-
10
-
11
-
12
-
13
-
14
-
15
-
16
-
17
-
18
-
19
-
20
-
21
-
22
-
23
-
24
-
25
-
26
-
27
-
28
-
29
-
30
-
31
-
32
-
33
-
34
-
35
-
36
-
37
-
38
-
39
-
40
-
41
-
42
-
43
-
44
-
45
-
46
-
47
-
48
-
49
-
50
-
51
-
52
-
53
-
54
-
55
-
56
-
57
-
58
-
59
-
60
-
61
-
62
-
63
-
64
-
65
-
66
-
67
-
68
-
69
-
70
-
71
-
72
-
73
-
74
-
75
-
76
-
77
-
78
-
79
-
80
-
81
-
82
-
83
-
84
-
85
-
86
-
87
-
88
-
89
-
90
-
91
-
92
-
93
-
94
-
95
-
96
-
97
-
98
-
99
-
100
-
101
-
102
-
103
-
104
-
105
-
106
-
107
-
108
-
109
-
110
-
111
-
112
-
113
-
114
-
115
-
116
-
117
-
118
-
119
-
120
-
121
-
122
-
123
-
124
-
125
-
126
-
127
-
128
-
129
-
130
-
131
-
132
-
133
-
134
-
135
-
136
-
137
-
138
-
139
-
140
-
141
-
142
-
143
-
144
-
145
-
146
-
147
-
 148
148 -
 149
149 -
 150
150 -
 151
151 -
 152
152 -
 153
153 -
 154
154 -
 155
155 -
 156
156 -
 157
157 -
 158
158 -
159
-
160
-
161
-
162
-
163
-
164
-
165
-
166
-
167
-
168
-
169
-
170
-
171
-
172
-
173
-
174
-
175
-
176
-
177
-
178
-
179
-
180
-
181
-
182
-
183
-
184
-
185
-
186
-
187
-
188
-
189
-
190
-
191
-
192
-
193
-
194
-
195
-
196
-
197
-
198
-
199
-
200
-
201
-
202
-
203
-
204
-
205
-
206
-
207
-
208
-
209
-
210
-
211
-
212
-
213
-
214
-
215
-
216
-
217
-
218
 |
 |
